Sony LBT-ZUX9 Support Question
Sony LBT-ZUX9 Support Question
Find answers below for this question about Sony LBT-ZUX9 - Mini Hifi Component.Need a Sony LBT-ZUX9 manual? We have 3 online manuals for this item!
Question posted by latech on June 29th, 2010
Lbtzux9 Turns Off
The person who posted this question about this Sony product did not include a detailed explanation. Please use the "Request More Information" button to the right if more details would help you to answer this question.
Current Answers
Related Sony LBT-ZUX9 Manual Pages
Limited Warranty (US Only) - Page 1

... ANY INCIDENTAL OR CONSEQUENTIAL DAMAGES FOR BREACH OF ANY EXPRESS OR IMPLIED WARRANTY ON THIS PRODUCT. 4-557-172-02
General Stereo/Hifi Components/Tape Decks
®
CD Players/Mini Disc Players/Audio Systems
Hifi Audio
LIMITED WARRANTY
Sony Electronics Inc. ("Sony") warrants this Product is determined to be presented to obtain warranty service.
This warranty does...
Operating Instructions - Page 1

Refer to them whenever you call upon your
Sony dealer regarding this product. Serial No.
LBT-ZUX9
©2007 Sony Corporation 3-100-770-71(3)
Mini Hi-Fi Component System
Operating Instructions
Owner's Record
The model and serial numbers are located on the rear of the unit. Record the serial
number in the space provided below. Model No.
Operating Instructions - Page 3
... particular, specifies that the cable ground shall be determined by turning the equipment off and on a
circuit different from Fraunhofer IIS...CAUTION The use of optical instruments with this manual
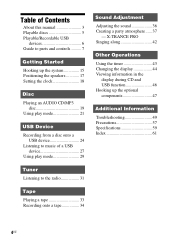
The LBT-ZUX9 consists of Sony Corporation. About this product will not ... that provides guidelines for help. MPEG Layer-3 audio coding technology and patents licensed from that any changes...
Operating Instructions - Page 4
... function 46 Hooking up the system 15 Positioning the speakers 17 Setting the clock 18
Disc Playing an AUDIO CD/MP3
disc 19 Using play mode 21
USB Device Recording from a disc onto a
USB device ... 6 Guide to parts and controls.......... 7
Getting Started Hooking up the optional components 47
Additional Information
Troubleshooting 49 Precautions 57 Specifications 59 Index 61
4US
Operating Instructions - Page 8
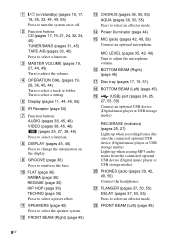
..., 21, 24, 32, 34, 45) TUNER/BAND (pages 31, 45) TAPE A/B (pages 33, 45) Press to turn the system on the display. E Display (pages 11, 44, 46, 56)
F IR Receptor (page 50)
G Function buttons: AUDIO (pages 38, 45, 48) VIDEO (pages 38, 45, 48) USB (pages 25, 27, 38, 45) Press to...
Operating Instructions - Page 9
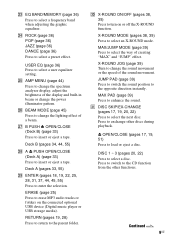
...from the other discs during playback. X-ROUND ON/OFF (pages 38, 39) Press to exchange other functions. X-ROUND JOG (page 39) Turn to select a disc. DISC 1 ~ 3 (pages 20, 22) Press to change the sound movement or the speed of creating "MAX"...movement.
Continued l
9US wj B PUSH Z OPEN/CLOSE (Deck B) (page 33) Press to erase MP3 audio tracks or folders on or off the X-ROUND function.
Operating Instructions - Page 10
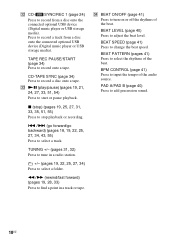
..., 33) Press to find a point in a radio station.
+/- (pages 19, 22, 25, 27, 34) Press to turn on or off the rhythms of the beat. ef BEAT ON/OFF (page 41) Press to select a folder.
BEAT PATTERN (... 34) Press to select a track.
TAPE REC PAUSE/START (page 34) Press to input the tempo of the audio source. TUNING +/- (pages 31, 32) Press to select the rhythms of the beat. BPM CONTROL (page 41)...
Operating Instructions - Page 19
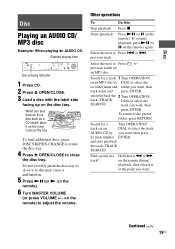
... MP3 disc by DIAL to select the track
AUDIO CD by you want, then press
its folder name and folder you want, then
track name and press ENTER.
Select the next or Press . previous track
Select the next or Press +/-. Search for a track 1 Turn OPERATION
on the inner circle of the tray...
Operating Instructions - Page 25
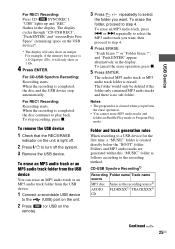
... time, a "MUSIC" folder is created directly below the "ROOT" folder.
To erase an MP3 audio track, press . or "Folder Erase ?", and "Push ENTER" appear alternatively in the display. The... > repeatedly to select the MP3 audio track you want . "Track Erase ?" CD-USB Synchro Recording1)
Recording Folder name Track name source MP3 disc Same as follows according to turn off .
2 Press "/1 to the...
Operating Instructions - Page 27
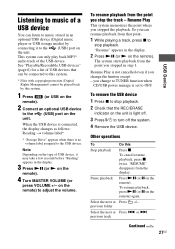
...disappears from the point you stop playback.
or >. This system can only play back MP3*
audio track of USB devices that
can resume playback from the point you stopped in the display.
3 Press NX ...(or N on the
remote).
4 Turn MASTER VOLUME (or
press VOLUME +/- When the USB device is connected, the display changes as follows: ...
Operating Instructions - Page 28
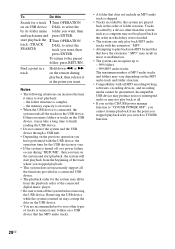
... may not play back non-MP3 format files that does not include an MP3 audio track is connected, the system reads all the tracks on the USB device.
Removing the USB device while the system is turned on may corrupt the data on the USB device.
• You are recommended not to...
Operating Instructions - Page 34

... Recording and Sound Mixing: Press TAPE REC PAUSE/START. Manual Recording:
You can "mix" sound from any tape. • When recording from an audio source, including connected audio components. For CD-TAPE Synchro Recording: Press CD and load the disc you want to record. Then, press +/- repeatedly to select the folder you want...
Operating Instructions - Page 36
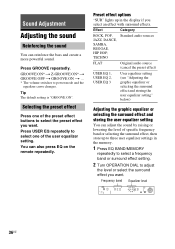
...1 Press EQ BAND/MEMORY
repeatedly to select a frequency band or surround effect setting.
2 Turn OPERATION DIAL to select the preset effect you want .
Selecting the preset effect
Press one of...sound. Effect
Category
ROCK, POP, JAZZ, DANCE, SAMBA, REGGAE, HIP HOP, TECHNO
Standard audio sources
FLAT
Original audio source (cancel the preset effect)
USER EQ 1, USER EQ 2, USER EQ 3
User ...
Operating Instructions - Page 37

...flanging effect that is automatically stored as the user equalizer setting you selected in the display.
5 Turn OPERATION DIAL to select a
user equalizer number (1~3) you want to store the equalizer setting. DELAY...new setting.
Sound Adjustment
Continued l
37US When an MP3 audio track is played back, the MP3 BOOSTER function is automatically activated to cancel storing.
6 Press ENTER.
...
Operating Instructions - Page 38

...chorus effect. CHORUS 2
create a tremolo chorus with high speed setting. AQUA
Press AQUA repeatedly.
turn off when you want by pressing SOUND EFFECT on page 17).
1 Press X-ROUND ON/OFF... to select the X-ROUND mode you : - The last selected X-ROUND mode appears in CD, USB, AUDIO and VIDEO function.
• The current effector mode is activated.
Select
To
AQUA 1
create a bubbling ...
Operating Instructions - Page 47
... details on the use of the D-LIGHT SYNC controller and lighting device, refer to a lighting device* (not supplied).
MP3 audio tracks with the respective device.
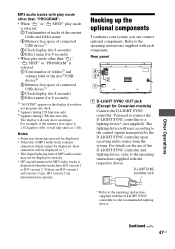
Hooking up the optional components
To enhance your system, you have ID3 version 1 or ID3 version 2. If there are ID3 version 1 and version 2 tags, ID3 version 2 tag...
Operating Instructions - Page 48

... is turned on or drum sound is distorted or too loud when you connect to the VIDEO (AUDIO IN) L/R jacks, change to the audio output jacks of music being played back.
B AUDIO OUT jacks Use an audio cord to connect to the audio output jacks of an optional component (such as a VCR). C AUDIO (AUDIO IN) L/R jacks Use an audio cord...
Operating Instructions - Page 55
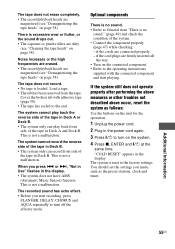
... 58). Load a tape. • The tab has been removed from the tape. Cover the broken tab with the connected component and start recording, press
FLANGER, DELAY, CHORUS and AQUA repeatedly to turn on page 58). The system cannot record the reverse side of the tape in Deck B. • The system only can...
Operating Instructions - Page 61
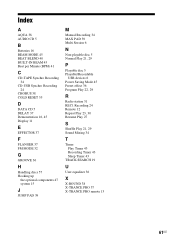
Index
A
AQUA 38 AUDIO CD 5
B
Batteries 16 BEAM MODE 45 BEAT BLEND 40 BUILT-IN BEAM 45 Beat per Minute (BPM) 41
C
CD-...CD 5 DELAY 37 Demonstration 16, 45 Display 11
E
EFFECTOR 37
F
FLANGER 37 FM MODE 32
G
GROOVE 36
H
Handling discs 57 Hooking up
the optional components 47 system 15
J
JUMP PAD 39
M
Manual Recording 34 MAX PAD 39 Multi Session 6
N
Non-playable disc 5 Normal Play 21, 29
P
Playable ...
Marketing Specifications - Page 2
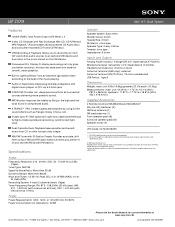
... Type: 2-way, 2-driver Tweeter: horn type Impedance: 6 ohms
Inputs and Outputs
Analog Audio Input(s): Voltage 250 mV, impendance 47 kilohms Microphone Input: Sensativity 1 mV, impendance 10 kilohms... - 108.0 MHz (50 kHz step); Please visit the Dealer Network for smooth, clean graphics. LBT-ZUX9
Mini Hi-Fi Shelf System
Features
1000W (RMS) Total Power Output 250 Watts x 4
3-disc CD Changer...
Similar Questions

3 Disc Changer Disc Ex - Change/ Hi-fi Component System Lbt-2ux9
stuck on cd
stuck on cd
(Posted by edwardlife2022 2 years ago)

How Do I Fix Sound For Sony Lbt-zux9.
My son moved the volume on my sony lbt-zux9 stereo and now when I turn it on there is only buzzing s...
My son moved the volume on my sony lbt-zux9 stereo and now when I turn it on there is only buzzing s...
(Posted by sorayajenica 5 years ago)

How Do U Turn Off The Protect On A Sony Mini Hifi Componant System Mhcec909ip
(Posted by luisfflyin 10 years ago)

How To Get Protect Mode Off My Mini Hifi Component System Mhc Ec709ip Sony
stereo
stereo
(Posted by gaev 10 years ago)
Once It Is Powered On When Any Button Is Pressed It Turns Off
Once it is powered on when any button is pressed it turns off
Once it is powered on when any button is pressed it turns off
(Posted by vanamike 12 years ago)