Singer Professional 5 Serger 14T968DC Support Question
Singer Professional 5 Serger 14T968DC Support Question
Find answers below for this question about Singer Professional 5 Serger 14T968DC.Need a Singer Professional 5 Serger 14T968DC manual? We have 3 online manuals for this item!
Question posted by gtyski on February 17th, 2023
I Was Doing A Hem With The Double Wide Cover Stitch. The Needles Began To Jam!
The person who posted this question about this Singer product did not include a detailed explanation. Please use the "Request More Information" button to the right if more details would help you to answer this question.
Current Answers
Answer #1: Posted by Asadbekboy on February 17th, 2023 6:41 PM
Asadbekboy

Member since:
February 8th, 2023 Points: 35,090

Member since:
February 8th, 2023 Points: 35,090
If the needles on your Singer Professional 5 Serger 14T968DC have jammed while you were doing a hem with the double wide cover stitch, there are a few things you can check to try to resolve the issue:
- Check the needles: The first thing to do is to check the needles to see if they are bent or damaged in any way. If they are, you will need to replace them. Also, make sure that the needles are inserted properly and tightened securely.
- Check the threading: Make sure that the serger is threaded properly for the double wide cover stitch. Check that the thread is going through all the necessary thread guides and tension discs.
- Check the fabric: If the fabric is too thick or too thin, or if there are too many layers of fabric, this can cause the needles to jam. Try adjusting the fabric layers or using a different type of fabric.
- Check the tension: Check the tension settings for the needles and make sure they are set correctly for the double wide cover stitch. If the tension is too tight or too loose, this can cause the needles to jam.
- Clean the machine: Sometimes, lint or debris can get stuck in the machine and cause the needles to jam. Use a soft brush or a vacuum to clean the machine and remove any debris.
If you have tried all of these steps and the needles continue to jam, it may be a good idea to take your serger to a professional for repair.
Asadbek
Related Singer Professional 5 Serger 14T968DC Manual Pages
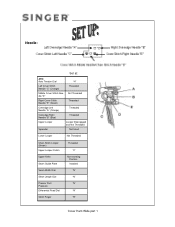
Instruction Manual - Page 6
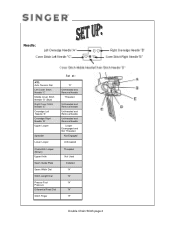
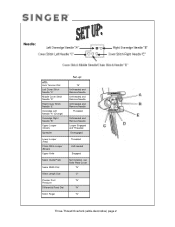
...: Auto Tension Dial Left Cover Stitch Needle "C" Middle Cover Stitch Needle "D" (Blue) Right Cover Stitch Needle "E" Overedge Left Needle "A" Overedge Right Needle "B" Upper Looper
Spreader
Lower Looper
Set at::
"D" Unthreaded and Remove Needle
Threaded
Unthreaded and Remove Needle Unthreaded and Remove Needle Unthreaded and Remove Needle
Looper Disengaged and Not Threaded
Not Engaged
Unthreaded...
Instruction Manual - Page 12

... the top cover thread guide by pulling the thread towards the left until it slips under the guide. Double Chain Stitch page 8 Pass thread from back to release the tension disks. While holding the thread, firmly pull the thread between the tension disks.
Thread the Cover Stitch Middle/Chain Stitch needle as illustrated.
4. Thread Middle Cover Stitch Needle with regular...
Instruction Manual - Page 27
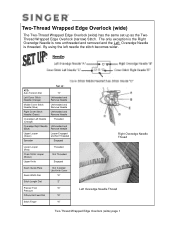
...Guide Plate Seam Width Dial
Not Installed Use Knife Cover
"N"
Stitch Length Dial
"2"
Presser Foot
"N"
Pressure
Differential Feed Dial
"N"
Stitch Finger
"N"
Right Overedge Needle Thread
Left Overedge Needle Thread
Two-Thread Wrapped Edge Overlock (wide) page 1 Two-Thread Wrapped Edge Overlock (wide)
The Two-Thread Wrapped Edge Overlock (wide) has the same set up as the TwoThread Wrapped...
Instruction Manual - Page 43
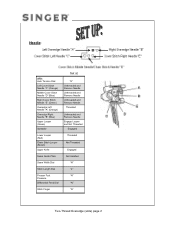
... Tension Dial Left Cover Stitch Needle "C" (Orange) Middle Cover Stitch Needle "D" (Blue) Right Cover Stitch Needle "E" (Green) Overedge Left Needle "A" (Orange) Overedge Right Needle "B" (Blue) Upper Looper (Green) Spreader
Lower Looper (Red) Chain Stitch Looper (Brown) Upper Knife
Seam Guide Plate
Seam Width Dial
Stitch Length Dial
Presser Foot Pressure Differential Feed Dial
Stitch Finger
Set...
Instruction Manual - Page 63

... Plate
Seam Width Dial
Stitch Length Dial
Presser Foot Pressure Differential Feed Dial
Stitch Finger
Set-up:
"B" Unthreaded and Remove Needle Unthreaded and Remove Needle Unthreaded and Remove Needle
Threaded
Unthreaded and Remove Needle Looper Engaged and Threaded
Disengaged
Threaded
Unthreaded
Engaged
Not Installed, use Knife Plate Cover
"N"
"2"
"N"
"N"
"N"
Three-Thread Overlock (wide) page 2
Instruction Manual - Page 68
... Width Dial
Stitch Length Dial
Presser Foot Pressure Differential Feed Dial
Stitch Finger
Set-up:
"B" Unthreaded and Remove Needle Unthreaded and Remove Needle Unthreaded and Remove Needle
Threaded
Unthreaded and Remove Needle Looper Engaged and Threaded
Disengaged
Threaded
Unthreaded
Engaged
Not Installed, use Knife Plate Cover
"N"
"2"
"N"
"N"
"N"
Three-Thread Overlock (wide-decorative) page...
Instruction Manual - Page 92

... Plate
Seam Width Dial
Stitch Length Dial
Presser Foot Pressure Differential Feed Dial
Stitch Finger
Set at:
"F" Unthreaded and Remove Needle Unthreaded and Remove Needle Unthreaded and Remove Needle
Threaded
Unthreaded and Remove Needle Looper Engaged and Threaded
Disengage
Threaded
Unthreaded
Engaged
Not Installed, use Knife Cover Plate
"N"
"2"
"N"
"N"
"N"
Three-Thread Flatlock (wide) page 2
Instruction Manual 2 - Page 34
... Tension Dial Left Cover Stitch Needle "C" Middle Cover Stitch Needle "D" (Orange) Right Cover Stitch Needle "E" Overedge Left Needle "A" (Blue) Overedge Right Needle "B" Upper Looper (Green) Spreader
Lower Looper (Red) Chain Stitch Looper (Brown) Upper Looper Clutch
Upper Knife
Seam Guide Plate
Seam Width Dial
Stitch Length Dial
Presser Foot Pressure Differential Feed Dial
Stitch Finger
"B" Not...
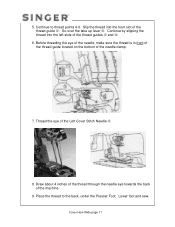
Instruction Manual 2 - Page 47
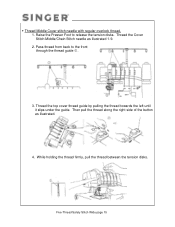
... left until it slips under the guide. Raise the Presser Foot to the front through the thread guide .
3. Thread the Cover Stitch Middle/Chain Stitch needle as illustrated.
4.
Five-Thread Safety Stitch Wide page 15 Thread Middle Cover stitch needle with regular overlock thread. 1. While holding the thread firmly, pull the thread between the tension disks. Then pull the...
Instruction Manual 2 - Page 70
...
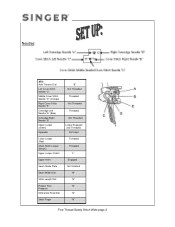
ATD: Auto Tension Dial Left Cover Stitch Needle "C" (Orange)
Middle Cover Stitch Needle "D" (Blue)
Right Cover Stitch "E" Needle
Overedge Left "A" Needle
Overedge Right "B" Needle
Upper Looper (Green)
Spreader
Lower Looper
Set-up:
"K" Threaded
Threaded
Not Threaded
Not Threaded
Not Threaded
Looper Disengaged and
Not Threaded Not Used
Not Threaded
Chain Stitch Looper (Brown) Upper Looper Clutch...
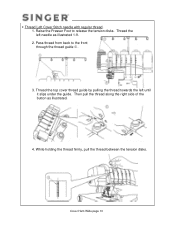
Instruction Manual 2 - Page 78

... holding the thread firmly, pull the thread between the tension disks. Cover Hem Narrow page 10 Thread the top cover thread guide by pulling the thread towards the left needle as illustrated.
4.
Pass thread from back to release the tension disks. Thread Left Cover Stitch needle with regular thread. 1. Raise the Presser Foot to the front through...
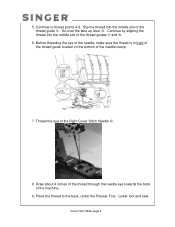
Instruction Manual 2 - Page 79

... machine.
9. Draw about 4 inches of the thread through the needle eye towards the back of the Left Cover Stitch Needle .
8. Before threading the eye of the needle, make sure the thread is in front of the thread guide located on the bottom of the thread guides and .
6. Place the thread to thread points 4-8. Lower foot and sew. Cover Hem...
Instruction Manual 2 - Page 83
...
Not Threaded
Chain Stitch Looper (Brown) Upper Looper Clutch
Upper Knife
Seam Guide Plate
Seam Width Dial
Stitch Length Dial
Presser Foot Pressure Differential Feed Dial
Stitch Finger
Threaded
"C" Non-working
Position Installed
"N" "N" "N"
"N" "R"
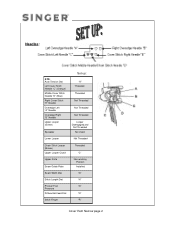
Cover Hem Wide part 1 Needle:
Set at:
ATD:
Auto Tension Dial
"H"
Left Cover Stitch Needle "C" (Orange)
Threaded
Middle Cover Stitch Nee-
Instruction Manual 2 - Page 89

... Cover Stitch needle with regular thread. 1. Then pull the thread along the right side of the button as illustrated 1-9. 2. Thread the top cover thread guide by pulling the thread towards the left needle as illustrated.
4. Thread the left until it slips under the guide. Raise the Presser Foot to the front through the thread guide .
3. Cover Hem Wide...
Instruction Manual 2 - Page 90
... bottom of the machine.
9. Cover Hem Wide page 9 Continue to the back, under the Presser Foot. Lower foot and sew. 5. Place the thread to thread points 4-8. Draw about 4 inches of the thread through the needle eye towards the back of the needle clamp.
7. Continue by slipping the thread into the middle slot of the Right Cover Stitch Needle .
8.
Go over...
Instruction Manual 2 - Page 91
... disks. While holding the thread firmly, pull the thread between the tension disks. Cover Hem Wide page 10
Raise the Presser Foot to the front through the thread guide .
3. Thread the top cover thread guide by pulling the thread towards the left needle as illustrated.
4. Thread the left until it slips under the guide. Then...
Instruction Manual 2 - Page 92
... needle clamp.
7. Cover Hem Wide page 11 Place the thread to thread points 4-8. Continue to the back, under the Presser Foot. Slip the thread into the left slots of the thread guides and .
6. Go over the take up lever . Lower foot and sew.
5. Continue by slipping the thread into the front slot of the Left Cover Stitch Needle...
Instruction Manual 2 - Page 96

... Needle "E" (Green)
Threaded
Upper Looper
Looper Disengaged and Not Threaded
Spreader
Not Used
Lower Looper
Not Threaded
Chain Stitch Looper (Brown)
Upper Looper Clutch
Threaded "C"
Upper Knife Seam Guide Plate
Non-working Position
Installed
Seam Width Dial
"N"
Stitch Length Dial
"N"
Presser Foot
"N"
Pressure
Differential Feed Dial
"N"
Stitch Finger
"R"
Triple Cover Hem...
Instruction Manual 2 - Page 102
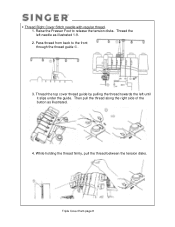
... the right side of the button as illustrated 1-9. 2.
Thread Right Cover Stitch needle with regular thread. 1. Thread the top cover thread guide by pulling the thread towards the left needle as illustrated.
4. While holding the thread firmly, pull the thread between the tension disks. Triple Cover Hem page 8 Thread the left until it slips under the guide...
Instruction Manual 2 - Page 103

....
Place the thread to thread points 4-8. Continue by slipping the thread into the rear slot of the Right Cover Stitch Needle .
8. Triple Cover Hem page 9 Before threading the eye of the needle, make sure the thread is in front of the thread guide located on the bottom of the machine.
9. Thread the eye of the thread guide .
Similar Questions

My Sewing Machine Is Not Sewing The Correct Stitch.
When I push the automated button to sew a special stitch it will not sew it. What can I do?
When I push the automated button to sew a special stitch it will not sew it. What can I do?
(Posted by tammywood16 7 years ago)

Bobbin Cover Plate / Needle Plate
I just finished cleaning my 7467S Singer machine. I am not able to get the bobbin cover plate to go ...
I just finished cleaning my 7467S Singer machine. I am not able to get the bobbin cover plate to go ...
(Posted by rsarge 8 years ago)

Is A Special Foot Required To Free Form Stitch On Singer Sewing Machine Model 55
(Posted by kopitkin 9 years ago)

How To Thread Singer Fashionmate Sewing Machine Twin Needle?
How to thread the singer fashionmate sewing machine with twin needle without inertwining the threads...
How to thread the singer fashionmate sewing machine with twin needle without inertwining the threads...
(Posted by sindssly 9 years ago)

Singer Sew Mate Sewing Machine Where Is The Bobbin Access Cover
(Posted by jfbsus 9 years ago)