
Singer H74 Support Question
Singer H74 Support Question
Find answers below for this question about Singer H74.Need a Singer H74 manual? We have 2 online manuals for this item!
Question posted by nsingleton on April 7th, 2013
How Do You Use The Program Memory To Use The Fonts?
how do you use the program memory to use the fonts? to put a name on a project
Current Answers
Related Singer H74 Manual Pages
Instruction Manual 2 - Page 3

... 75dB(A). 17. Please turn all moving parts. An appliance should be supervised to ensure that they have been given supervision or instruction concerning use as described in this sewing machine. WARNING -To reduce the risk of the appliance by persons (including children) with reduced physical, sensory or mental capabilities, or lack of experience...
Instruction Manual 2 - Page 4
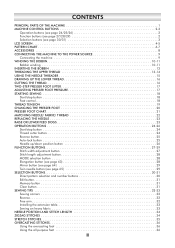
... 9 Connecting the machine 9 WINDING THE BOBBIN 10-11 Bobbin winding 10-11 INSERTING THE BOBBIN 12 THREADING THE UPPER THREAD 13-14 USING THE NEEDLE THREADER 15 DRAWING UP THE LOWER THREAD 16 CUTTING THE THREAD 16 TWO-STEP PRESSER FOOT LIFTER 17 ADJUSTING PRESSER FOOT PRESSURE 17 STARTING SEWING 18 Start/stop...
Instruction Manual 2 - Page 5
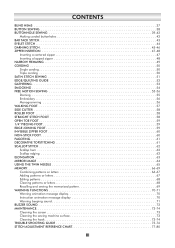
... 61 SCALLOP STITCH 62 Scallop hem 62 Scallop edging 62 ELONGATION 63 MIRROR IMAGE 64 USING THE TWIN NEEDLE 65 MEMORY 66-69 Combining patterns or letters 66-67 Adding patterns or letters 67 Editing patterns ... 72 MAINTENANCE 73-74 Cleaning the screen 73 Cleaning the sewing machine surface 73 Cleaning the hook 73-74 TROUBLE SHOOTING GUIDE 75-76 STITCH ADJUSTMENT REFERENCE CHART 77-...
Instruction Manual 2 - Page 8
...sew a reflection pattern.
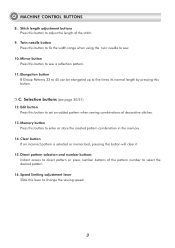
11. Mirror button Press this button to fix the width range when using the twin needle to change the sewing speed.
3 Edit button Press this lever to sew.
10. Memory... to enter or store the created pattern combination in the memory.
14. Direct pattern selection and number buttons Instant access ... sewing combinations of the pattern number to direct pattern or ...
Instruction Manual 2 - Page 13
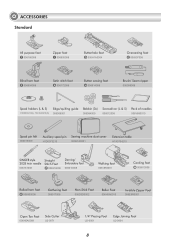
... (L & S) Edge/quilting guide Bobbin (3x) Screwdriver (L & S) Pack of needles
H1D0083210(L) TA10943210(S) 006008001
006084009
006012008
006V880010
Spool pin felt
006015009
Auxiliary spool pin Sewing machine dust cover
H1D0073210
020H7A0001
Extension table
H7A0754210
SINGER style 2025 twin needle
006161008
Straight Stitch Foot
P 006916008
Darning/ Embroidery foot
006016008
Walking foot...
Instruction Manual 2 - Page 14
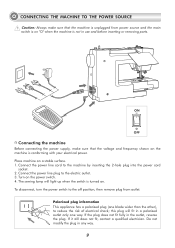
... reduce the risk of electrical shock; If the plug does not fit fully in any way.
9 The sewing lamp will fit in use and before inserting or removing parts. Connect the power line plug to the machine by inserting the 2-hole plug into the power cord
socket. 2. this plug will light up when...
Instruction Manual 2 - Page 23
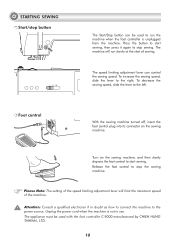
... press it again to run slowly at the start sewing.
The machine will limit the maximum speed of sewing. The speed limiting adjustment lever can be used to stop the sewing machine. Foot control
With the sewing machine turned off, insert the foot control plug into its connector on the sewing machine, and then slowly depress the foot control to...
Instruction Manual 2 - Page 33

...the Mode button, will be elongated up to another which program mode is selected. Direct mode stitch selection. Script letter mode: Character selection using number buttons. Changing the width or length of the ... buttons
When you select a stitch the machine will automatically set at Direct mode " " when the machine is first turned on the LCD screen. Block letter mode: Character...
Instruction Manual 2 - Page 36
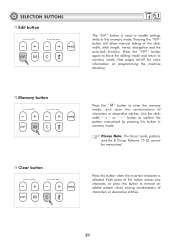
...erases one character, or press this button when the incorrect character is used to modify settings while in memory mode. Please Note: The Direct mode patterns and the B Group ...information on programming the machine Memory).
Each press of characters or decorative stitches. Press the " " button again to leave the editing mode and return to remove an added pattern when sewing combinations ...
Instruction Manual 2 - Page 37
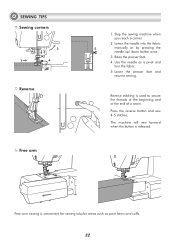
Stop the sewing machine when you reach a corner.
2. Use the needle as pant hems and cuffs.
32 Press the reverse button and sew 4-5 stitches. The machine will sew forward when the button is convenient for sewing tubular areas such as a pivot and turn the fabric.
5. Lower the needle into the fabric
5
manually or by pressing the
needle up...
Instruction Manual 2 - Page 49
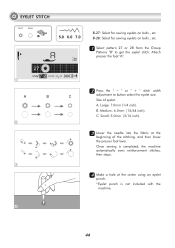
... to get the eyelet stitch. Large: 7.0mm (1/4 inch). Small: 5.0mm (3/16 inch).
2
33 Lower the needle into the fabric at the center using an eyelet
punch.
* Eyelet punch is not included with the machine.
4
44 Once sewing is completed, the machine automatically sews reinforcement stitches, then stops.
3
44 Make a hole at the
beginning of eyelet.
B.
Instruction Manual 2 - Page 52
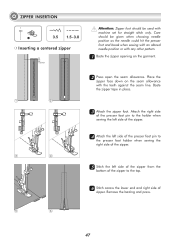
... as the needle could hit the presser foot and break when sewing with an altered needle position or with machine set for straight stitch only. Baste the zipper tape in place... ZIPPER INSERTION
1 I
3.5 1.5~3.0
Inserting a centered zipper
2 inch
Attention: Zipper foot should be used with any other pattern.
11 Baste the zipper opening on the seam allowance with the teeth against the...
Instruction Manual 2 - Page 60
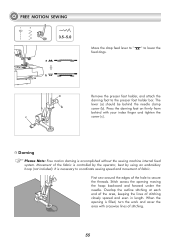
... length. Stitch across the opening is controlled by the operator, best by using an embroidery hoop (not included). The lever (a) should be behind with crosswise...SEWING
1
5
3.5~5.0
a b ba
a b
c
Move the drop feed lever to the presser foot holder bar. Movement of fabric. When the opening moving the hoop backward and forward under the needle. It is accomplished without the sewing machine...
Instruction Manual 2 - Page 62
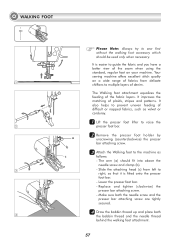
... bobbin thread up and place both
4
the bobbin thread and the needle thread
behind the walking foot attachment.
57
Your
sewing machine offers excellent stitch quality
1
on your machine. The arm (a) should be used only when necessary. Lower the presser foot bar.
- The Walking foot attachment equalizes the feeding of difficult or napped fabrics...
Instruction Manual 2 - Page 71
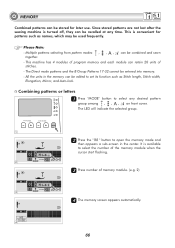
... letters 11 Press "MODE" button to set its function such as names, which may be entered into memory. - This is convenient for later use. The Direct mode patterns and the B Group Patterns 17-32 cannot be used frequently. M
4
66 This machine has 4 modules of program memory and each module can be stored for patterns such as Stitch...
Instruction Manual 2 - Page 74
... control or press the start/stop button to
start the sewing machine.
4
M
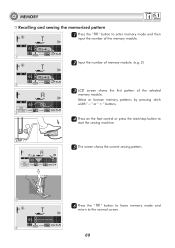
55 The screen shows the current sewing pattern.
5
66 Press the "000" button to leave memory mode and
return to enter memory mode and then
input the number of the selected
memory module. MEMORY
Recalling and sewing the memorized pattern 1 Press the " " button to the normal...
Instruction Manual 2 - Page 75
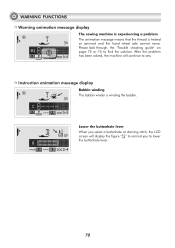
After the problem has been solved, the machine will display the figure " " to remind you to lower the buttonhole lever.
70 Lower the buttonhole... move. Please look through the "Trouble shooting guide" on page 75 or 76 to sew. WARNING FUNCTIONS Warning animation message display
The sewing machine is experiencing a problem The animation message means that the thread is winding the bobbin.
Instruction Manual 2 - Page 76
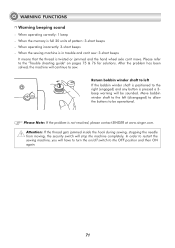
...sewing machine is in trouble and can 't move. After the problem has been solved, the machine will be operational.
When operating incorrectly: 3-short beeps - Please Note: If the problem is twisted or jammed and the hand wheel axle can 't sew... operating correctly: 1 beep - When the memory is positioned to be sounded. Please refer to sew. Return bobbin winder shaft to left (disengaged...
Instruction Manual 2 - Page 78
...
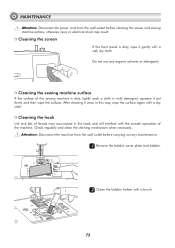
Attention: Disconnect the power cord from the wall outlet before cleaning the screen and sewing machine surface, otherwise injury or electrical shock may accumulate in this way, wipe the surface again with a brush.
2
73 Do not use any maintenance.
11 Remove the bobbin cover plate and bobbin.
1
22 Clean the bobbin holder with...
Instruction Manual 2 - Page 81
... outlet. stabilizer to the fabric.
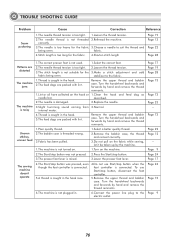
1.Thread is caught in the hook. 5.The feed dogs are distorted
The machine jams
The machine is noisy
Uneven stitches, uneven feed
The sewing machine doesn't operate
1.The correct presser foot is not used.
1.Select the correct foot.
2.The needle thread tension is too tight. 2.Loosen the thread tension.
3.The...
Similar Questions

I Get E7 Error Message On My Singer Model 7258 Sewing Machine. There Is No Refe
Error message E7 is up on my Singer Stylist model 7258 sewing machine. It is not working at all. I t...
Error message E7 is up on my Singer Stylist model 7258 sewing machine. It is not working at all. I t...
(Posted by ebellamybellamy9 5 years ago)


Beeping From Singer Sewing Machine Stylist Ii 5625
My sewing machine will beep and stop sewing after three inches of sewing. I have taken it to be repa...
My sewing machine will beep and stop sewing after three inches of sewing. I have taken it to be repa...
(Posted by arusheria 9 years ago)

Will Singer H74 Sewing Machine Go Into Sewing Machine Table
(Posted by vogelgeos 10 years ago)
