
Singer Futura XL-400 Support Question
Singer Futura XL-400 Support Question
Find answers below for this question about Singer Futura XL-400.Need a Singer Futura XL-400 manual? We have 1 online manual for this item!
Question posted by tatonka on April 26th, 2013
How Do You Center The Hoop Before You Start The Embroider Design
The person who posted this question about this Singer product did not include a detailed explanation. Please use the "Request More Information" button to the right if more details would help you to answer this question.
Current Answers
Related Singer Futura XL-400 Manual Pages
Instruction Manual - Page 2
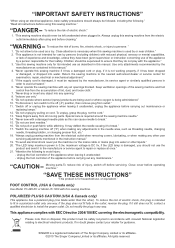
...center for its intended use , or equivalent." "To avoid electrical shock never put the machine nor the mains cable or mains plug into water or other ). Unplug the foot controller of lint, dust, and loose cloth." 7. Unplug the foot controller of electric shock, this sewing machine...by pulling on disposal, this sewing machine. "Never operate the sewing machine with this product must be ...
Instruction Manual - Page 5

... Sewing on a button 50 - 51 Buttonholes 52 - 57
Using buttonhole foot, Procedure, Corded buttonholes Buttonholing with Futura Multi hoop 88 - 95 Helpful messages when embroidering 96 - 97
4. STARTING TO SEW... 28 - 29
2. TABLE OF CONTENTS
1.GETTING TO KNOW YOUR MACHINE Machine identification 6 - 7 Accessories 8 - 9 Setting up your machine 10 - 11 Spool pins 10 - 11 Winding bobbin 12 -...
Instruction Manual - Page 10

... sure they are Class I5 J.
16
FOR EMBROIDERY
19. Satin foot
15. Embroidery software CD
19
FUTURA embroidery is "system" of your
7
Sewing machine is another
12
very useful foot and should be
used for most decorative sewing. Auxiliary spool pin
4. Screwdriver for more information.
8
2
3
4
5
6
8
9
10
11
13
14
15
17
18
20
21...
Instruction Manual - Page 12
...en "OFF"
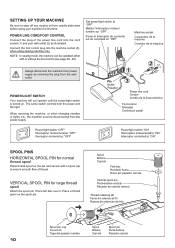
machine socket Connecteur de la machine Conector de la máquina
2 1
Pin Butée Pasador
3
Power line cord Cordon Cordón de la linea eléctrica
Foot control Rhéostat
XL-550-P04-1....spool cap to wipe off any surplus oil from needle plate area before using sewing machine only. Spool Bobine Carrete
Felt disc Rondelle feutre Disco del pasador carrete
Vertical ...
Instruction Manual - Page 28

... if it is selected, it is to move the control knobs while sewing slowly. Starting at the Auto position, slide the control knob left or right to your...The LED turns on when twin needle sewing is activated.
LED turns on when twin needle sewing is activated.
26 Stitch length and width/needle position controls
*Auto/Default settings Your sewing machine will produce most of your preference.
Instruction Manual - Page 30
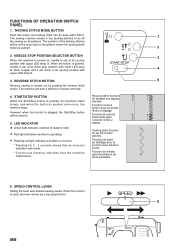
... on all patterns. When the button is pushed,
needle is set at its up -stop position with LED lit. The sewing machine makes 4 tiny tacking stitches to start.
Red light indicates machine is carried out by pushing the reverse stitch button. The position of other stitches Fonction de point de faufilage pour la...
Instruction Manual - Page 34
... J.
Thread tension control B. Start/stop the sewing machine. Turn the hand wheel counter...sewing a seam.
6. Tacking stitch mode button C. Stitch length control I J
4
NOTE: Since a straight stitch has no width, the
stitch width control is in its center position. SETTINGS Presser foot - Needle up/down position selector button D. When reaching the edge of
3
the machine...
Instruction Manual - Page 56

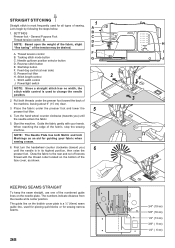
...lower the buttonhole foot.
8. Fabric marking Marque du tissu Marca de material
mark Marque Marca
* Sewing will be completed automatically in the center of the bartack threads.
54
Buttonhole foot alignment position Position d'alignement du pied boutonnière ...marking Marque du tissu Marca de material
9. Place the fabric under the foot. While holding the top thread, start the machine.
Instruction Manual - Page 64
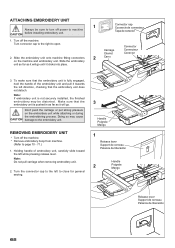
...machine. * Remove embroidery hoop from machine.
(Refer to machine ...sewing.
3
Handle Poignée Mango
1
Release lever Support de cerceau Palanca de liberación
Handle
2
Poignée Mango
Release lever Support de cerceau Palanca de liberación
62
Slide the embroidery unit onto machine fitting connectors
2
Carro
on the embroidery unit while attaching or during the embroidering...
Instruction Manual - Page 76

.... Finally you plan to work with the installation.
Attach the hoop that you are now ready to select and transmit a design to your sewing machine and connect the USB cable between your computer and then follow steps 1 through 4 above.
74 CORRECT START-UP PROCEDURE WHEN EMBROIDERING
The following steps must be stored.
Next attach the embroidery...
Instruction Manual - Page 78
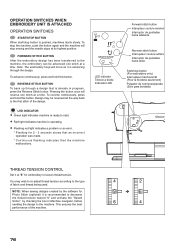
... was made. * Continuous flashing indicates that is pushed, machines starts slowly.
NOTE: When sewing designs created by checking the box in progress, press the Reverse Stitch button.
Note: The embroidery hoop will stop button is already in Machine navigator, before
sending the design to the first stitch of the design. To reverse continuously, press and hold this button...
Instruction Manual - Page 82

... to pucker and result in the frames so that when the fabric is not correctly attached.
Thread is tangled. EMBROIDERY PATTERN IS MIS-ALIGNED
MACHINE SIDE
HOOP SIDE
Embroidering is continuing when thread is tangled somewhere along the thread path, this will increase the upper thread tension and cause the fabric to hang...
Instruction Manual - Page 84

...the embroidery machine and continue embroidering. Step...Embroidered section Section brodée Sección bordada
1357
2468
automatically stop S'arrête automatiquement Para automáticamente
Blank stitches resulting from thread breakage Points vides résultant d'une rupture du fil Puntadas en blanco resultantes de ruptura de hilo
2. HELPFUL INFORMATION FOR EMBROIDERING WITH FUTURA...
Instruction Manual - Page 86
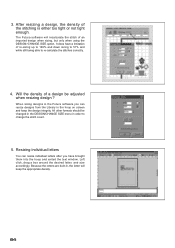
... have brought them into the hoop and exited the text window. After resizing a design, the density of re-sizing up to 149% and down sizing to 51% and while still being able to change the stitch count.
5. Resizing individual letters
You can resize designs from the Library in the Futura software you can resize...
Instruction Manual - Page 90

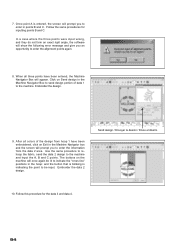
... the design.
1.
and then sews them precisely, matching one section to each part of the embroidery. When these points are input on the screen marked with exact alignment.
Multi-Hoop
Multi-Hooping is a special feature in the Futura software that will allow embroidery data which is larger than a single embroidery hoop to be sent to the machine...
Instruction Manual - Page 92

3. In each side of the hoop there is a Center Hoop line which together define the maximum sewing area for Multiple Hooping. The design data is built into the hoop, aligning cross lines of data 1 within the guide line markings of the hoop there are referred to Machine" tool on the tool bar.
5. Set fabric and stabilizer into the software. (Additional...
Instruction Manual - Page 94

... de suppression Interruptor de borrado
A
B
C In the case of a 2 hoop design, where one hoop is awaiting the input of point A. The machine is stacked on top of the other, position the Guide Lines on the horizontal cross line and the Center Hoop Marking on the cross line, and push the OK button.
These alignment...
Instruction Manual - Page 96
... the hoop: and the button that is blinking is entered, the screen will prompt you to be input. The buttons on the machine will once again be lit to indicate the "cross line" positions in the Machine Navigator box and the screen will prompt you to the machine and input the A, B and C points. Embroider the design...
Instruction Manual - Page 104
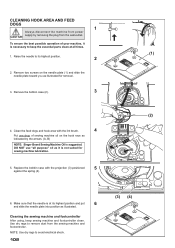
... the projection (3) positioned
5
against the spring (4).
(2)
(A) (B)
6. Make sure that the needle is at all purpose" oil as illustrated. To ensure the best possible operation of sewing machine oil on the needle plate (1) and slide the needle plate toward you as indicated by removing the plug from the wall-outlet. Use dry rags...
Instruction Manual - Page 106
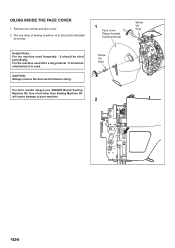
... frequently : It should be oiled periodically. For the machine used .
CAUTION: Always remove the dust and lint before it is used after a long interval : It should be oiled before oiling.
For best results always use SINGER Brand Sewing Machine Oil. Use of sewing machine oil to your machine. Screw Vis Guia
2
Screw Vis Guia
104 Remove...
Similar Questions

Replacement Part For Singer Futura Xl 400
I am looking for the embroidery arm unit for a Singer Futura Xl 400. Can you assist me in locating t...
I am looking for the embroidery arm unit for a Singer Futura Xl 400. Can you assist me in locating t...
(Posted by sjh4ba 3 years ago)

Singer Futura Xl-400
I am in need of a Singer Futura XL-400 Startup disc. Any idea where I can get one
I am in need of a Singer Futura XL-400 Startup disc. Any idea where I can get one
(Posted by fayevb 4 years ago)

I Get E7 Error Message On My Singer Model 7258 Sewing Machine. There Is No Refe
Error message E7 is up on my Singer Stylist model 7258 sewing machine. It is not working at all. I t...
Error message E7 is up on my Singer Stylist model 7258 sewing machine. It is not working at all. I t...
(Posted by ebellamybellamy9 5 years ago)

Beeping From Singer Sewing Machine Stylist Ii 5625
My sewing machine will beep and stop sewing after three inches of sewing. I have taken it to be repa...
My sewing machine will beep and stop sewing after three inches of sewing. I have taken it to be repa...
(Posted by arusheria 9 years ago)

What Is The Singer Embroidery Software And Design Cd For Futura Xl 400
(Posted by amsifdae 10 years ago)