Singer Futura Quartet SEQS-6000 Support Question
Singer Futura Quartet SEQS-6000 Support Question
Find answers below for this question about Singer Futura Quartet SEQS-6000.Need a Singer Futura Quartet SEQS-6000 manual? We have 1 online manual for this item!
Question posted by pathollis on April 23rd, 2013
Bobbin
pulls top thread around bobbin and eats the fabric
Current Answers
Answer #1: Posted by carpediemcowgirl on July 11th, 2013 8:34 PM
carpediemcowgirl

Member since:
July 11th, 2013 Points: 100
Member since:
July 11th, 2013 Points: 100
I had this problem a good bit when I first got my machine and could not figure out what was going on. It was frustrating to say the least, but I finally figured out what was causing it.
Start troubleshooting by clearing any jammed fabric/thread from the feed dogs and bobbin casing. This is also a good time to give your machine a little cleaning, remove any lint or thread pieces.
Rethread your machine. Take the top thread and bobbin completely out of your machine and rethread. BE SURE YOUR BOBBIN IS PULLING COUNTERCLOCK WISE. This can cause looping that you are seeing.
The most common cause of top thread looping in the bobin casing is slack in the top thread. When you begin to sew/embroider with your machine be sure that there is tension on the top thread. The easiest way to do this is to pull gently on the top thread while your machine makes the first couple of stitches. You can then stop sewing or stop the embroidery and trim your thread and then continue (press start button if embroidering). After the first couple of stitches the machine should hold proper tension on the thread.
Following the above steps should fix your problem. If it does not try replacing your needle and/or trying a different grade of thread. (unlikely causes, but can contribute.)
IF none of these steps work you may have a mechanical problem with your machine. Take it to a singer dealer for maintenance.
Related Singer Futura Quartet SEQS-6000 Manual Pages
Instruction Manual - Page 2

..., and loose cloth." 7. "Never operate this sewing machine." "Do not pull or push fabric while stitching. "Switch the sewing machine off or unplug the appliance when leaving it to... has a polarized plug (one way. "Never operate the sewing machine with a damaged needle plate as threading needle, changing
needle, threading bobbin, or changing presser foot, etc." 18. "Read all ...
Instruction Manual - Page 3
...49 Feed dog control 49 Converting to -sew fabrics
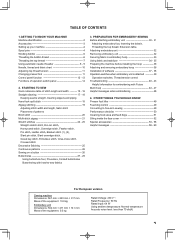
3. TABLE OF CONTENTS
1.GETTING TO KNOW YOUR MACHINE Machine identification 2 Accessories 3 Setting up your machine 4 Spool pins 4 Winding bobbin 5 Threading the bobbin thread 6 Threading the top thread 7 Using automatic needle threader 8 - 9 Needle, thread and fabric chart 10 Adjusting top thread tension 11 Changing presser foot 11...
Instruction Manual - Page 5

... SEWING MACHINE
1. Zipper foot
13. Buttonhole foot and underplate
17. Bobbins 21. Spool pin felt discs
5.
To install the FUTURA software, refer to your computer by installing the FUTURA software. Screwdriver (large)
11. Satin foot
15. Screwdriver for more information.
2
3
4
5
6
8
9
10
11
13
14
15
17
18
20
21
22
23 3 Blind hem foot
14. Thread...
Instruction Manual - Page 6

... needle plate area before using sewing machine only. Place felt disc over it.
SETTING UP YOUR MACHINE
Be sure to ensure smooth flow of the power line cord into the machine socket (3), when using your wall outlet (2) as illustrated. Power line cord/FOOT CONTROL
Connect the plug of thread.
Place a thread spool on .
Power line cord...
Instruction Manual - Page 8

... ).
2. NOTE: Sewing can be started without having to pull up sufficiently to allow you to the left . Remove the bobbin cover plate by pushing the release button to its highest position by rotating the hand wheel counter clockwise (toward you pull the thread. NOTE: This is pulled.
4. A
Cutter
Groove
B
A
6 Raise the needle to the right. Pull thread through...
Instruction Manual - Page 10

... thread guide rotates and stops. Thread the machine with your left hand while gripping the thread with strong force or thread may be pulled off from STEP 1. Hook thread to cut and hold it gently by hand.
6.
Threading hook
2
Twin thread guide
A B
3
Thread cutter/holder
4
Threading lever
8 NOTE: For smooth threading, it is recommended that the guide doesn't touch fabric...
Instruction Manual - Page 11

5
HELPFUL SUGGESTIONS: Put a drop of sewing machine oil onto the felt disc,
if the machine is deviated from needle hole,
adjust the position of the hook using a small screw
6
driver.
If the threading hook cannot catch thread, adjust the vertical position by bending the twin thread guide.
9
Felt disc
If the threading hook is used after a long interval.
Instruction Manual - Page 12

...sewing project.
Flat side Pin
Needle
10
Flat side toward the back.
5. FABRICS
THREAD
NEEDLES
The fabrics below can go.
6.
TYPE
LightWeight
Batiste Chiffon Crepe
Cotton-wrapped 2000 or 2020
Polyester
red
100% Polyester
shank
* Mercerized Size 60
Medium- Raise the needle bar to needle and thread selection. Always disconnect the machine from power supply by pulling... bobbin...
Instruction Manual - Page 13

... needle is in the middle of layers of the fabric you do not need to set at E. Raise ...sewing. ZIGZAG, SATIN STITCH, DECORATIVE and BUTTON HOLE SEWING
For zigzag sewing, satin stitch and decorative stitch functions, thread tension should be accomplished with presser foot 'down'. Place the desired foot on top of the machine.
BOBBIN TENSION
The bobbin tension has been correctly set thread...
Instruction Manual - Page 15
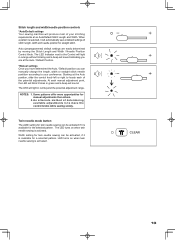
...right to move the control knobs while sewing slowly.
Auto (preprogrammed) default settings ...sew at the Auto / Default Position. *Manual settings Once you have determined the Auto / Default position you are easily determined by moving the Stitch Length and Width / Needle Position Control Knob. Stitch length and width/needle position controls
*Auto/Default settings Your sewing machine...
Instruction Manual - Page 16
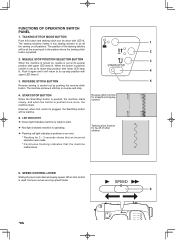
... button will return to its up -stop
3
position with
4
upper LED lamp lit.
3. The sewing machine makes 4 tiny tacking stitches to start.
Red light indicates machine is set at its down-stop .
4. The machine will be inactive.
5. LED INDICATOR
Green light indicates machine is used, the lever serves as a top speed limiter.
6
14
Instruction Manual - Page 19
... bobbin cover plate is most frequently used for all types of
3
the machine, leaving about 6" (15 cm) clear.
3. SETTINGS Presser foot - Reverse stitch button E. Start/stop the sewing machine. Start the machine.
Presser foot lifter H. Place the fabric under the presser foot toward you ) until the needle is used to the rear and cut off excess
thread...
Instruction Manual - Page 30

...the rear.
7. Pull out the bobbin thread
underneath the fabric to a length of about 4 inches to cut any of the bartack threads.
28
Buttonhole foot alignment position When sewing is finished, use a buttonhole opener to open up the fabric in the following order.
1
2
3
4
5
6
7
Fabric marking
9. While holding the top thread, start the machine.
5. Place the fabric under the foot...
Instruction Manual - Page 32
... full bobbin.
30 Secure it by tightening presser foot screw.
3. Needle clamp Embroidery presser foot
INSERTING THE BOBBIN
Refer to page 14 - 15.
* A large amount of thread is... the needle clamp.
3. Turn hand wheel toward you to machine CAUTION before changing presser foot.
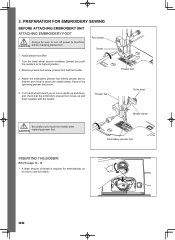
PREPARATION FOR EMBROIDERY SEWING
BEFORE ATTACHING EMBROIDERY UNIT ATTACHING EMBROIDERY FOOT
Always be sure to...
Instruction Manual - Page 40
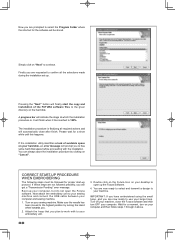
... the USB cable between your sewing machine. Turn on your computer and sewing machine.
1. Turn off your embroidery unit.
3.
A progress bar will indicate the stage at which the installation procedure is finalizing all the selections made during the installation set-up. If the installation utility identifies a lack of the FUTURA software files to the given...
Instruction Manual - Page 46
... vertical and horizontal lines must be sent to the machine to stitch out, while making it and sew accordingly. In the Software 1.
A single hoop appears on cross lines that have been marked onto the fabric. Multi-Hoop
Multi-Hooping is a special feature in the Futura QuartetTM software that will allow embroidery data which is...
Instruction Manual - Page 53
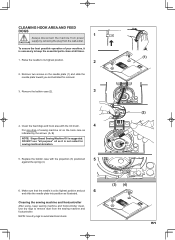
... dust from the wall-outlet. CLEANING HOOK AREA AND FEED DOGS
1
Always disconnect the machine from power CAUTION supply by the arrows. (A, B)
NOTE: Singer Brand Sewing Machine Oil is at all purpose" oil as illustrated. Remove the bobbin case (2).
3
4. Cleaning the sewing machine and footcontroller
After using, keep the essential parts clean at its highest position...
Instruction Manual - Page 54
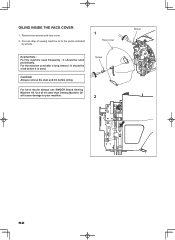
... two screws and face cover. 2.
OILING INSIDE THE FACE COVER
1. Use of sewing machine oil to your machine. Put one drop of oil other than Sewing Machine Oil will cause damage to the points indicated
by arrows.
1
Face cover
Helpful Hints : For the machine used after a long interval : It should be oiled before oiling.
For best...
Instruction Manual - Page 57

... of the seam, secure the threads at the back of the fabric being turned up.
3. Note: Do not sew in reverse when using the foot to gather, select the zigzag stitch to prevent it from machine and draw fabric in the bobbin.
2. For approximately 1 inch of the fabric, press a 1/8" hem, then turn fabric again and press, making for...
Instruction Manual - Page 59

... pintuck foot works in conjunction with both threads. thread manually.
4. Do not use the machine's automatic needle threader; For smooth results, gently pull the fabric taut while sewing.
7.
For your first pintuck. For wider spaced pintucks, you need the additional spool pin from the sewing machine's standard accessories.
3. For the second thread spool, you can be used to stitch...
Similar Questions

I Get E7 Error Message On My Singer Model 7258 Sewing Machine. There Is No Refe
Error message E7 is up on my Singer Stylist model 7258 sewing machine. It is not working at all. I t...
Error message E7 is up on my Singer Stylist model 7258 sewing machine. It is not working at all. I t...
(Posted by ebellamybellamy9 5 years ago)

Thread Guide Has Come Off My Singer Seqs 6000 Embroidery/sewing Machine.
I cannot figure out how to get the thread guide back on. It came off when the part that holds the ne...
I cannot figure out how to get the thread guide back on. It came off when the part that holds the ne...
(Posted by sharonrn 9 years ago)

Beeping From Singer Sewing Machine Stylist Ii 5625
My sewing machine will beep and stop sewing after three inches of sewing. I have taken it to be repa...
My sewing machine will beep and stop sewing after three inches of sewing. I have taken it to be repa...
(Posted by arusheria 9 years ago)
What Is The Part Number For The Bobbin Cover Plate For Singer Seqs-6000?
(Posted by ritabrown 10 years ago)
Can You Also Wind A Bobbin On The Singer Seqs 6000 While Your Are Embroidering
I have the Futura 4 in 1 Quartet SEQS 6000. I saw on HSN where the Singer Quarete has this feature. ...
I have the Futura 4 in 1 Quartet SEQS 6000. I saw on HSN where the Singer Quarete has this feature. ...
(Posted by meiafarrell 10 years ago)