Singer Futura Quartet Support Question
Singer Futura Quartet Support Question
Find answers below for this question about Singer Futura Quartet.Need a Singer Futura Quartet manual? We have 1 online manual for this item!
Question posted by e12397 on September 8th, 2014
Rotate Font Letters
How do you rotate font letters?
Current Answers
Related Singer Futura Quartet Manual Pages
Instruction Manual - Page 1
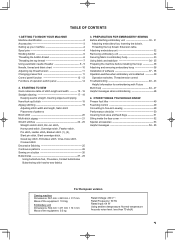
...inside the face cover 52 Special accessories 53 Helpful messages 54 - 55
For European version
Sewing machine Dimensions: 567 mm × 240 mm × 317 mm Mass of the equipment:...stitch Decorative Stitching 25 Continuous patterns 26 Sewing on a button 26 Buttonholes 27 - 29
Using buttonhole foot, Procedure, Corded buttonholes Buttonholing with Futura Multi hoop 44 - 47 Helpful messages when embroidering...
Instruction Manual - Page 3
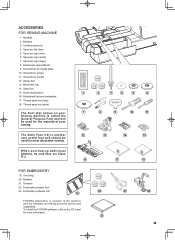
... the FUTURA software, refer to the CD insert for the majority of the machine and the software providing powerful option and capabilities. Embroidery presser foot 23. Spool pin cap (small)
7. Thread spool net (short)
The Foot that comes on your
7
Sewing machine is "system" of your
sewing. Blind hem foot
14. Bobbins
3. ACCESSORIES
FOR SEWING MACHINE
1. Screwdriver...
Instruction Manual - Page 4
... be operated
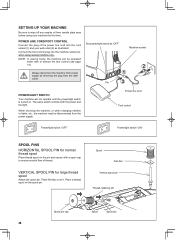
either with a spool cap to wipe off any surplus oil from needle plate area before using sewing machine only. VERTICAL SPOOL PIN for normal thread spool
Place thread spool on the spool pin. Spool
Felt disc
Vertical spool pin
Thread retaining slit
Spool ...
Instruction Manual - Page 6
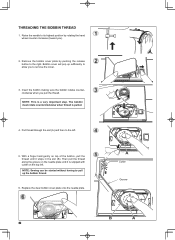
... the top left .
5. A
Cutter
Groove
B
A
6 THREADING THE BOBBIN THREAD
1. Insert the bobbin making sure the bobbin rotates counterclockwise when you to the right. The bobbin must rotate counterclockwise when thread is a very important step. NOTE: Sewing can be started without having to its highest position by pushing the release button to remove the...
Instruction Manual - Page 8

... the presser foot lifter and raise the needle to its lowest position until the twin thread guide rotates and stops. Hook thread to the thread guide on the needle bar. NOTE: ... after hooking the thread through fine needle. Don't lower the threading lever while the machine is too thick for straight stitch (in center needle position) when using the automatic needle threader. ...
Instruction Manual - Page 9
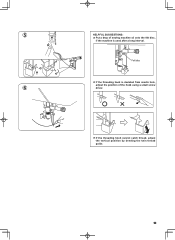
5
HELPFUL SUGGESTIONS: Put a drop of sewing machine oil onto the felt disc,
if the machine is deviated from needle hole,
adjust the position of the hook using a small screw
6
driver.
If the threading hook cannot catch thread, adjust the vertical position by bending the twin thread guide.
9 Felt disc
If the threading hook is used after a long interval.
Instruction Manual - Page 10
... turning the hand wheel counter clockwise (toward you ).
2.
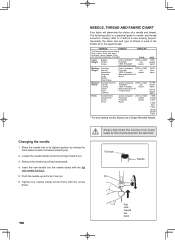
Always disconnect the machine from power supply by turning it before a new sewing project. Generally, the same size and type of weight. Insert the new...yellow band
11/80 orange band 14/90
blue band 16/100 purple band
* For best sewing results, always use a Singer Branded Needle. Raise the needle bar to its highest position by...
Instruction Manual - Page 13
... than others.
2.
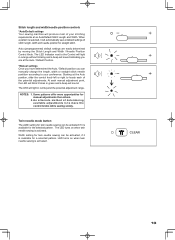
Stitch length and width/needle position controls
*Auto/Default settings Your sewing machine will produce most of your preference. The LED will sound. Twin needle mode button
The...setting for a selected pattern. The LED turns on when twin needle sewing is available for twin needle sewing can be activated, if it will sound indicating you are easily determined...
Instruction Manual - Page 14
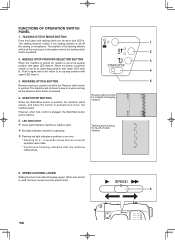
... MODE BUTTON
Push this button and tacking stitch can be done with
4
upper LED lamp lit.
3. FUNCTIONS OF OPERATION SWITCH PANEL
1. The sewing machine makes 4 tiny tacking stitches to sew in the pattern where the tacking stitch button is plugged, the Start/Stop button will be inactive.
5. Push it again and it will...
Instruction Manual - Page 17
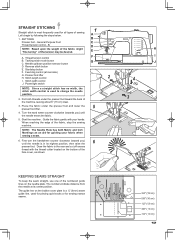
... to the rear and cut off excess
thread with your fabric when sewing a seam.
6. Start the machine. When reaching the edge of sewing. NOTE: The Needle Plate has both threads under the presser foot ...the numbered guide lines on the needle plate. Thread tension control B. Start/stop the sewing machine. Guide the fabric gently with the thread cutter located on the bobbin cover plate is...
Instruction Manual - Page 38

... finalizing all the selections made during the installation set-up protocol. If the installation utility identifies a lack of the FUTURA software files to free some hard disk space before proceeding with to your sewing machine and connect the USB cable between your computer and then follow steps 1 through 4 above.
38 Boot up the...
Instruction Manual - Page 41
In such cases, use the following procedure to step back through the embroidery data. Restart the embroidery machine and continue embroidering.
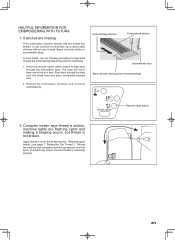
HELPFUL INFORMATION FOR EMBROIDERING WITH FUTURA
1.
Embroidering direction
Embroidered section
1357
2468
automatically stop
Blank stitches resulting from thread breakage
Reverse stitch button
2.
Computer screen says thread is broken,...
Instruction Manual - Page 42
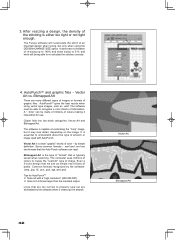
... software is either too tight or not tight enough. AutoPunchTM and graphic files - It is essential to properly sew out are many different types of images or formats of graphic files.
The Futura software will recalculate the stitch of information. The software must be made of millions of colors making it impractical...
Instruction Manual - Page 43
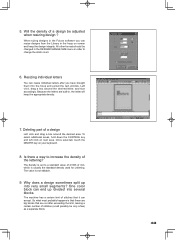
..., which is set to a standard value of 4/10th of the lettering? When sizing designs in the Futura software you have brought them into the hoop and exited the text ...design sometimes split up 'divided' into very small segments? The machine has a certain limit of a design
Left click and drag a box around the desired letter, and size accordingly. Will the density of stitches (could possibly...
Instruction Manual - Page 44
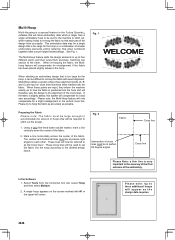
... where three alignment points (A, B, and C) are input, they inform the machine exactly as the design data requires.
44
Using a very fine-lined water soluble...Futura QuartetTM software that will allow embroidery data which is too large for the hoop or a combination of smaller embroidery elements and/or lettering, that when combined together make a much larger finished design. and then sews...
Instruction Manual - Page 45
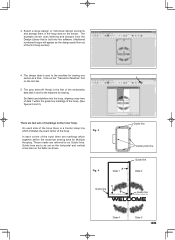
...appear as the design parts flow out of the embroidery data that is sent to the machine for sewing. On each corner of the hoop. Click on the "Transmit to be set on the... there are referred to the machine for Multiple Hooping. These marks are markings which together define the maximum sewing area for sewing one section at a time. The example shown uses lettering and designs from the Design ...
Instruction Manual - Page 51
... its highest position and put
6
and slide the needle plate into position as illustrated for sewing machine lubrication.
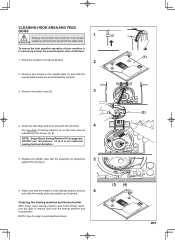
5. CLEANING HOOK AREA AND FEED DOGS
1
Always disconnect the machine from power CAUTION supply by the arrows. (A, B)
NOTE: Singer Brand Sewing Machine Oil is necessary to remove dust from the wall-outlet. Raise the needle to avoid...
Instruction Manual - Page 52
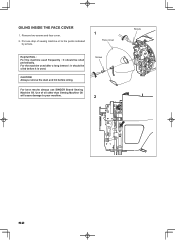
...: Always remove the dust and lint before it is used. Put one drop of oil other than Sewing Machine Oil will cause damage to the points indicated
by arrows.
1
Face cover
Helpful Hints : For the machine used after a long interval : It should be oiled before oiling.
For best results always use SINGER Brand...
Instruction Manual - Page 54
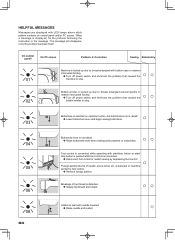
.... On control panell
On PC screen
Problem Correction
Sewing Embroidery
Machine is connected.
Disconnect foot control or restart sewing by depressing foot control.
○
05
Foreign particle like tip of top thread is locked up due to thread entangled with bobbin case or rotation
○ ○ interrupted forcibly. T urn off power...
Instruction Manual - Page 60
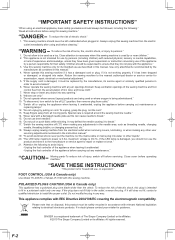
...supervision or instruction concerning use by pulling on disposal, this manual.
F-2 "This sewing machine should not use the
product and send it is not intended for their safety.... making any way. It may deflect the needle causing it unattended: -
"Switch the sewing machine off („0") position, then remove plug from all instructions before carrying out maintenance or
...
Similar Questions

Where Can I Get Replacement Parts For My Futura Quartet 6000 Machine?
(Posted by treasuredjewels2321 7 months ago)

I Was Sewing And All Of The Sudden My Machine Turned Off
(Posted by mari0624 3 years ago)

I Get E7 Error Message On My Singer Model 7258 Sewing Machine. There Is No Refe
Error message E7 is up on my Singer Stylist model 7258 sewing machine. It is not working at all. I t...
Error message E7 is up on my Singer Stylist model 7258 sewing machine. It is not working at all. I t...
(Posted by ebellamybellamy9 5 years ago)
Beeping From Singer Sewing Machine Stylist Ii 5625
My sewing machine will beep and stop sewing after three inches of sewing. I have taken it to be repa...
My sewing machine will beep and stop sewing after three inches of sewing. I have taken it to be repa...
(Posted by arusheria 9 years ago)

Rotate Designs On Singer Seqs 6700
How do you rotate fonts purchased from websites? I can rotate the built in text but don't know how t...
How do you rotate fonts purchased from websites? I can rotate the built in text but don't know how t...
(Posted by LJSHORT 10 years ago)