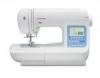
Singer 9970 Support Question
Singer 9970 Support Question
Find answers below for this question about Singer 9970.Need a Singer 9970 manual? We have 1 online manual for this item!
Question posted by chata37334 on April 8th, 2015
Singer 9970 Making Moaning Sound
As long as I sew slowly the machine is fine, but if I speed up it will make a moaning sound.
Current Answers
Related Singer 9970 Manual Pages
Instruction Manual - Page 1
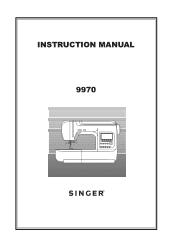
INSTRUCTION MANUAL 9970
Instruction Manual - Page 2
... persons without supervision. To reduce the risk of The Singer Company Limited S.à.r.l. Never operate this machine from the electrical outlet when removing covers, lubricating, or when making any other user servicing adjustments mentioned in this manual. Close attention is necessary when this sewing machine only for its intended use by an authorized service representative...
Instruction Manual - Page 3
...14
A. PREPARING TO THREAD MACHINE 16 B. SINGLE CORDING 40 B. SEWING 41
DARNING/FREE-HAND ...SEWING 28 MULTI-STITCH ZIGZAG 28 FREE ARM SEWING 28 OVERCASTING-OVERLOCKING 29
A. INSERTING PATTERN 51 E. REVERSE STITCH BUTTON 10 C. SPEED...TO SEW 18
A. SEWING THE SELECTED PATTERNS 54 I. TURNING CORNERS 20 E. CONTENTS
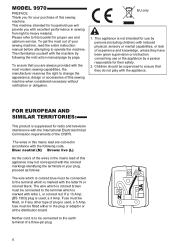
IMPORTANT SAFETY INSTRUCTIONS 2 MODEL 9970 4...
Instruction Manual - Page 4
... by a person responsible for their safety.
2.
MODEL 9970
PREFACE Thank you for your purchase of this booklet for proper use and optimum service. FOR EUROPEAN AND SIMILAR TERRITORIES:
This product is used , a 3 Amp. Fuse must be fitted, or if any other type of this sewing machine when considered necessary without notification or obligation...
Instruction Manual - Page 6
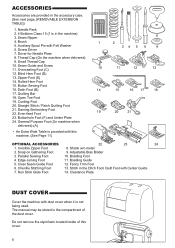
... 15 (1 is in the accessory case.
(See next page, [REMOVABLE EXTENSION
7
TABLE])
1. Seam Ripper
8
4. Thread Cap (On the machine when delivered)
9. Seam Guide and Screw 11. Even-feed Foot
19
20
21
23. Parallel Sewing Foot
10. Braiding Guide
5. Screw Driver
1
2
34 5 6
9
7. Edge Joining Foot
11. ACCESSORIES
Accessories are provided in the...
Instruction Manual - Page 14
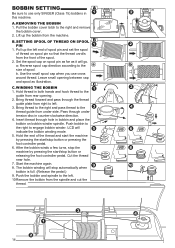
... SPOOL PIN
1.
WINDING THE BOBBIN 1. Bring thread forward and pass through the thread
guide plate from under tension disc in this machine. Use the small spool cap when you use only SINGER (Class 15) bobbins in counter-clockwise direction. 4. Bring thread to the right and pass thread to the
thread guide from...
Instruction Manual - Page 15

...the left tab into the hole in this machine.
15 Replace the bobbin cover. NOTE: Be sure to use only SINGER (Class 15) bobbins in needle plate ...and push the right side of bobbin cover down until it clicks into bobbin holder with the thread
unwinding counter clockwise.
2. Pull thread out about 10 cm (4 inches). Draw thread into notch (c) making...
Instruction Manual - Page 23
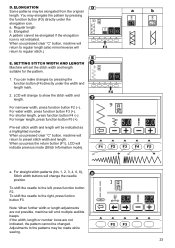
... A pattern cannot be changed. SETTING STITCH WIDTH AND LENGTH Machine will change to preset stitch width and length. You can make changes by pressing the function button (F3) directly under the... button, machine will be indicated as a highlighted number.
LCD will return to the right, press funtion button F3. To shift the needle to the patterns may be made while sewing.
23 For...
Instruction Manual - Page 26
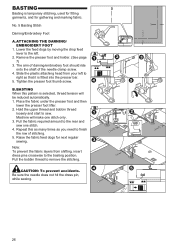
...the feed dogs by moving the drop feed lever to the left to the basting position.
Machine will be reduced automatically. 1.
Place the fabric under the presser foot and then
lower the... this pattern is selected, thread tension will make one stitch. 4. Remove the presser foot and holder. (See page 7)
3. Pull the bobbin thread to sew. Hold the upper thread and bobbin thread
...
Instruction Manual - Page 28
... for Removing The Extension Table.
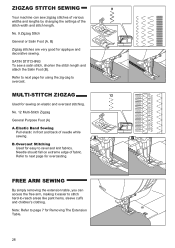
28 Refer to ravel and knit fabrics. ZIGZAG STITCH SEWING
Your machine can access the free arm, making it easier to stitch hard-to overcast. Note: Refer to next page for applique and decorative sewing. Refer to page 7 for overcasting. B. No. 9 Zigzag Stitch General or Satin Foot (A, B) Zigzag stitches...
Instruction Manual - Page 37
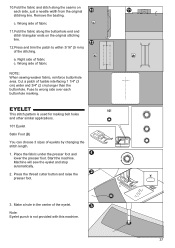
... a needle width from the original stitching line. Cut a patch of fabric c. Start the machine. Note: Eyelet punch is used for making belt holes and other similar applications.
101 Eyelet
Satin Foot (B)
You can choose 3 sizes of fabric
NOTE: When sewing weaker fabric, reinforce buttonhole area. 10.Fold the fabric and stitch along the...
Instruction Manual - Page 39
....
3. You may break.
5.
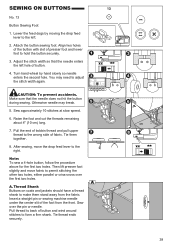
Sew approximately 10 stitches at slow speed.
6. Pull the end of fabric. Tie them stand away from the front.
Tie thread ends securely.
39 Attach the button sewing foot.
Insert a straight pin or sewing machine needle under the center slit of button and wind around stitches to make them together.
8. Sew over the first...
Instruction Manual - Page 40

...1/8" (3 mm), then fold it over again 1/8" (3 mm) for Triple Cording
Cording Foot
A. B. Sew several stitches and raise the presser foot. Set stitch pattern to 6.0-7.0. Adjust the stitch width so that the...Straight Stitch (Center Needle Position) Rolled Hem Foot
1. Lower the presser foot and start sewing slowly, while guiding raw edge of fabric scroll evenly into the fold by turning the hand ...
Instruction Manual - Page 43

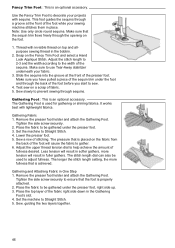
...outside of the bracket, into the groove on the left side of the machine and bobbin with bias tapes. Sew slowly, keeping the fabric to be bound snugly under the presser foot. 5. ...Trim Foot, Gathering Foot, Non-Stick Foot, Seam Guide Foot or Stitch in the Ditch Foot. Machine Preparation 1. OPTIONAL ACCESSORIES
Shank : This is an optional accessory. Adjustable Bias Binder, Braiding Foot, ...
Instruction Manual - Page 44

...sew, lightly support the trim, braid or cord as 3/8" (10 mm) wide.
3. The Braiding Foot is an optional accessory. Guide trim, braid or cord from the top of the Braiding Guide into the slot at a slow speed... smoothly fed into the Braiding Foot.
3. Sew at the top of the Guide and into the Braiding Foot.
1. Select a Straight Stitch. 6. Machine wash on the Chenille Stitching Foot. 4. ...
Instruction Manual - Page 45
... the Clearance Plate. 4.
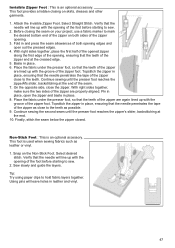
While holding the Clearance Plate, guide the needle into the needle slot, making sure that the flat side of the Edge Joining
Foot's guide. Remove the needle. 3. Insert ...the jeans hem and pin it sews on the machine. Turn the hand wheel toward you to lower the needle into the fabric, then raise the presser foot. 6. Begin sewing slowly, and continue until the back ...
Instruction Manual - Page 46
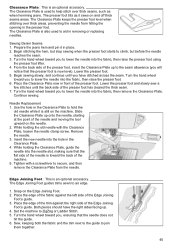
...the sequins into the groove at the front of fabric. 5. Sew slowly to Straight Stitch. 4.
Set the machine to prevent sewing through the back of the presser foot. The stitch length ... Fancy Trim Foot to be gathered under the presser foot. 3. Make sure that is an optional accessory. Gathering Fabric 1. Sew a row of stitching. Gathering and Attaching Fabric in softer gathers...
Instruction Manual - Page 47
... close to the teeth. Topstitch the zipper in place, open out the pressed edges.
4.
Sew slowly and guide the layers. Using pins will line up with the opening .
3. Attach the ... the foot before starting to sew.
2.
Continue sewing until the presser foot reaches the zipper's slider, backstitching at the creased edge.
5. With right sides together, make sure the two sides of...
Instruction Manual - Page 49

... spindle.
5.
Press the twin needle button.
Note: Twin needle sewing may break. Twin needle icon will be used . Always make test samples to help you did not switch to purchase. General Purpose Foot or Satin Foot (A, B)
Note: A twin needle is not provided with this machine
(SINGER Style 2025). Use only needle designed for this...
Instruction Manual - Page 57
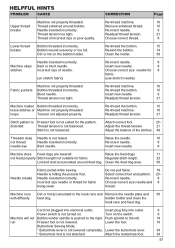
...holder.
50
Machine skips stitches
Needle inserted incorrectly. Re-thread machine.
16
Re-thread the bobbin.
15
Insert new needle.
8
Readjust thread tension.
21
Machine makes Bobbin threaded ... stretch needle)
Fabric puckers
Machine not properly threaded. Needle inserted incorrectly. Clean the feed dog area.
50
Needle breaks
Fabric pulled while sewing. Bobbin winder spindle is ...
Similar Questions

Singer 170th Additio Making Unusual Sound During Sewing. Breaking Of Thread, Ad
my machine red 170th addition making unusual sound during sewing , thread is breaking many times, al...
my machine red 170th addition making unusual sound during sewing , thread is breaking many times, al...
(Posted by Sufiaafrin26 7 months ago)

Classes On How To Use Singer 9970 Sewing Machine
I bought the sewing machine during the pandemic and would like to learn how to use it- functions, st...
I bought the sewing machine during the pandemic and would like to learn how to use it- functions, st...
(Posted by Connienm 1 year ago)

Singer 9970 Not Sewing Correctly On Bottom Thread
stop stitches look great but bottom thread shows top top thread loops
stop stitches look great but bottom thread shows top top thread loops
(Posted by patejbja 4 years ago)

9970 Beeps 3 Times And Won't Sew
I have a 9970. The needle broke, I have replaced it and made sure nothing is caught in the bobbin ar...
I have a 9970. The needle broke, I have replaced it and made sure nothing is caught in the bobbin ar...
(Posted by Gawlynn 9 years ago)
Speed On The 7466
The machine is sewing slowly-- how do I make it sew faster?
The machine is sewing slowly-- how do I make it sew faster?
(Posted by shbinns 9 years ago)