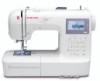
Singer 9100 Professional Support Question
Singer 9100 Professional Support Question
Find answers below for this question about Singer 9100 Professional.Need a Singer 9100 Professional manual? We have 2 online manuals for this item!
Question posted by brenthenry1991 on August 9th, 2021
The Lcd Screen Is Very Dim.
The screen still works, but it is so dim that I can barely read it. The backlighting seems to be bright, but the letters need to be darker, sort of needs to increase the contrast. Is there any way to do that? Or do I need to replace the screen?
Current Answers
Answer #1: Posted by SonuKumar on August 9th, 2021 8:15 AM
SonuKumar

Member since:
May 9th, 2021 Points: 16,613,800

Member since:
May 9th, 2021 Points: 16,613,800
https://sewing-machine-ratings.com/sewingmachinemanuals/Singer-9100-Professional-Manual.pdf
check the reset guide, ideally it should work, if not contact singer warrenty support desk - high chance of issue with light or its related hardware.
Please respond to my effort to provide you with the best possible solution by using the "Acceptable Solution" and/or the "Helpful" buttons when the answer has proven to be helpful.
Regards,
Sonu
Your search handyman for all e-support needs!!
Related Singer 9100 Professional Manual Pages
Instruction Manual - Page 2
...damaged, or dropped into any opening. 12. Never operate this appliance is not working properly, if it is used by or near children.
2. Special care is...when making any other user servicing adjustments mentioned in this sewing machine. Switch the sewing machine off or unplug the machine if it to be used or where oxygen is 75dB(A).... following: Read all instructions before
cleaning.
Instruction Manual - Page 3
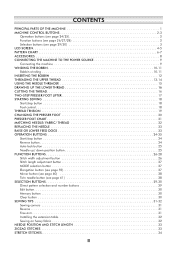
...26/27/28 2 Selection buttons (see page 29/30 3 LCD SCREEN 4-5 PATTERN CHART 6-7 ACCESSORIES 8 CONNECTING THE MACHINE TO THE POWER SOURCE 9 Connecting the machine 9 WINDING THE BOBBIN 10-11 Bobbin winding 10-11 INSERTING...Memory button 30 Clear button 30 SEWING TIPS 31-32 Sewing corners 31 Reverse 31 Free arm 31 Installing the extension table 32 Sewing on heavy fabric 32 NEEDLE ...
Instruction Manual - Page 4
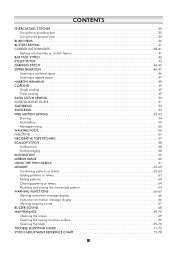
... Editing patterns 64 Clearing patterns or letters 64 Recalling and sewing the memorized pattern 65 WARNING FUNCTIONS 66-67 Warning animation message display 66 Instruction animation message display 66 Warning beeping sound 67 BUZZER SOUND 68 MAINTENANCE 69-70 Cleaning the screen 69 Cleaning the sewing machine surface 69 Cleaning the hook 69-70 TROUBLE...
Instruction Manual - Page 5
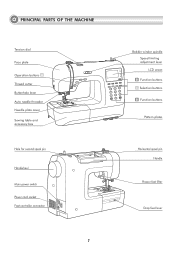
PRINCIPAL PARTS OF THE MACHINE
Tension dial Face plate Operation buttons A Thread cutter Buttonhole lever Auto needle threader Needle plate cover Sewing table and accessory box
Hole for second spool pin
Handwheel Main power switch Power cord socket Foot controller connector
1
Bobbin winder spindle Speed limiting adjustment lever LCD screen
B Function buttons C Selection buttons B Function...
Instruction Manual - Page 9

LCD SCREEN
Pattern
Reverse Auto-lock Needle up
position
Twin needle
Suggested presser foot and identification letter
Bobbin winding
Buttonhole lever Sound on
Pattern
Needle position
Tension
Stitch length
Auto-stop Mirror
Needle down position
Pattern number
Sound off
Alphabet
Stitch width Stitch length
Suggested presser foot and identification letter
Pattern number
Stitch width
Tension...
Instruction Manual - Page 10

LCD SCREEN
Memory Editing patterns
Edit mode Memory group
Number of current unit
M EDIT
Total number of unit
Sewing the memorized pattern
Memory mode
M
Elongation
Elongation
Pattern to edit Amount of elongation
5
Instruction Manual - Page 16
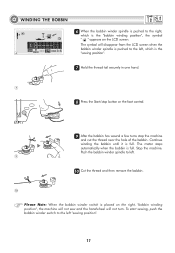
... the right, "bobbin winding position", the machine will not sew and the handwheel will not turn. Push the bobbin winder spindle to the left .
9
10 Cut the thread and then remove the bobbin.
10
Please Note: When the bobbin winder switch is placed on the LCD screen. The motor stops automatically when the bobbin...
Instruction Manual - Page 29
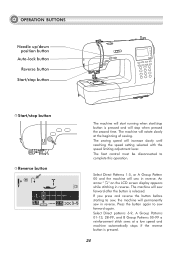
An arrow " " on the LCD screen display appears while stitching in reverse.
Press the button again to complete this operation. The foot control must be disconnected to sew forward again. The machine will rotate slowly at a low speed and machine automatically stops if the reverse button is released. The sewing speed will permanently sew in reverse. Select Direct...
Instruction Manual - Page 30
... stopped.
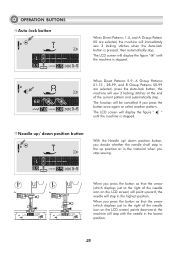
When you press the button so that the arrow (which displays just to the right of the needle icon on the LCD screen) points downward, the machine will immediately sew 3 locking stitches when the Auto-lock button is stopped. When Direct Patterns 5-9, A Group Patterns 01-13 , 28-99, and B Group Patterns 00-99...
Instruction Manual - Page 31
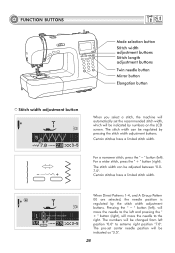
... length adjustment buttons
Twin needle button Mirror button
Elongation button
Stitch width adjustment button
When you select a stitch, the machine will automatically set center needle position will be indicated by numbers on the LCD screen. For a narrower stitch, press the " – " button (left position "0.0" to the right. The pre-set the recommended stitch...
Instruction Manual - Page 32
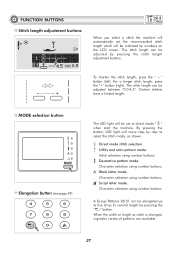
... Stitch selection using number buttons. Certain stitches have a limited length. Script letter mode: Character selection using number buttons. The stitch length can be adjusted ...machine.
For a longer stitch length, press the "+" button (right). The stitch length can be adjusted by pressing the " " button. By pressing the button, LED light will move step by numbers on the LCD screen...
Instruction Manual - Page 33
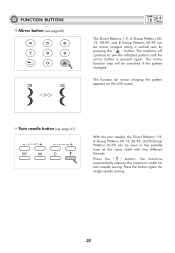
... pressing the " " button. Press the button again for mirror imaging the pattern appears on the LCD screen. The machine will be sewn in two parallel lines of the same stitch with two different threads. The function for single needle sewing.
28 Twin needle button (see page 60)
The Direct Patterns 1-9, A Group Patterns 0013, 28...
Instruction Manual - Page 44
... with the center of upper
thread and start sewing.
5
39 Starting
3
point
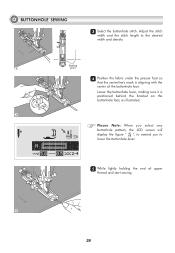
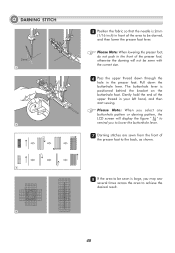
4 Position the fabric under the presser foot so
that the centerline's mark is positioned behind the bracket on the buttonhole foot, as illustrated.
4
Please Note: When you select any buttonhole pattern, the LCD screen will display the figure " ", to remind you...
Instruction Manual - Page 50
....
77 Darning stitches are sewn from the front of the upper thread in your left hand, and then start sewing. Please Note: When lowering the presser foot, do not push in the presser foot.
The buttonhole lever is large... lever. Please Note: When you select any buttonhole pattern or darning pattern, the LCD screen will not be sewn is positioned behind the bracket on the buttonhole foot.
Instruction Manual - Page 65
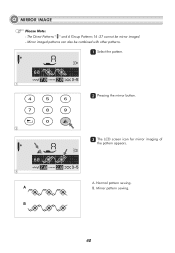
Mirror imaged patterns can also be mirror imaged. - The Direct Patterns " " and A Group Patterns 14 -27 cannot be combined with other patterns.
11 Select the pattern.
1
22 Pressing the mirror button.
2
3
A B
33 The LCD screen icon for mirror imaging of
the pattern appears. Normal pattern sewing. B.
A. Mirror pattern sewing.
60 MIRROR IMAGE
Please Note: -
Instruction Manual - Page 67
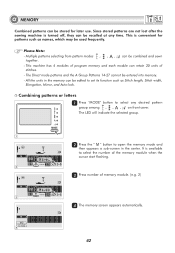
... the sewing machine is turned off, they can retain 20 units of
stitches. -
This machine has 4 modules of memory module. (e.g. 2)
M
3
44 The memory screen appears automatically. This is available
to set its function such as names, which may be entered into memory. - All the units in the center. Please Note: - Combining patterns or letters 11...
Instruction Manual - Page 68
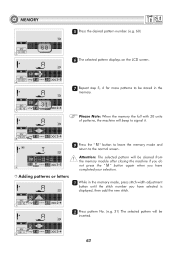
...Press the " " button to leave the memory mode and
return to the normal screen.
9
Adding patterns or letters
M
Attention: The selected pattern will be cleared from the memory module after closing the machine if you do not press the " " button again when you have completed ...
inserted. MEMORY
55 Press the desired pattern number. (e.g. 60)
M
5
66 The selected pattern displays on the LCD screen.
Instruction Manual - Page 70
M
1
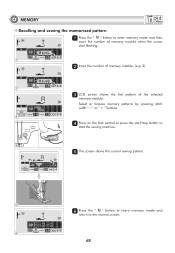
22 Input the number of memory module. (e.g. 2)
M
2
33 LCD screen shows the first pattern of memory module when the cursor start the sewing machine.
4
M
55 The screen shows the current sewing pattern.
5
66 Press the "000" button to leave memory mode and
return to the normal screen.
6
65
MEMORY
Recalling and sewing the memorized pattern 11 Press the " " button...
Instruction Manual - Page 71
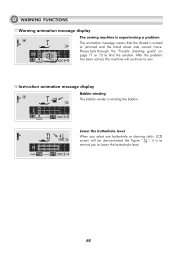
... and the hand wheel axle cannot move. After the problem has been solved, the machine will be demonstrated the figure " ", it is to remind you to sew. Lower the buttonhole lever When you select any buttonhole or darning stitch, LCD screen will continue to lower the buttonhole lever.
66 Please look through the "Trouble...
Instruction Manual - Page 74
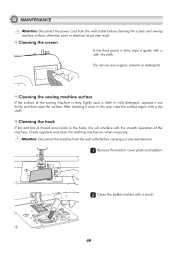
... in the hook, this way, wipe the surface again with a brush.
2
69 Do not use any maintenance.
11 Remove the bobbin cover plate and bobbin.
1
22 Clean the bobbin holder with a dry cloth. MAINTENANCE
Attention: Disconnect the power cord from the wall outlet before cleaning the screen and sewing machine surface, otherwise injury or...
Similar Questions

Singer 44s Heavy Duty Sewing Machine
can this machine be installed in a sewing machine cabine
can this machine be installed in a sewing machine cabine
(Posted by Lhcajun2004 3 years ago)

Singer 9100 Sewing Machine
Brand new machine, on switch on, loud noise, needle area seems to vibrate, unable to sew, help.
Brand new machine, on switch on, loud noise, needle area seems to vibrate, unable to sew, help.
(Posted by jimluisanelson 8 years ago)

Sewing Machine Will Start Sewing By Itself
I tuen the sewing machine on and c it starts sewing by itself. I try to stop it and the only way is ...
I tuen the sewing machine on and c it starts sewing by itself. I try to stop it and the only way is ...
(Posted by susienolen 9 years ago)

Beeping From Singer Sewing Machine Stylist Ii 5625
My sewing machine will beep and stop sewing after three inches of sewing. I have taken it to be repa...
My sewing machine will beep and stop sewing after three inches of sewing. I have taken it to be repa...
(Posted by arusheria 9 years ago)

Lcd Screen
I cannot get my LCD screen to change the stitch pattern. It will not do anything With the screen but...
I cannot get my LCD screen to change the stitch pattern. It will not do anything With the screen but...
(Posted by Shanncantwell09 10 years ago)