Singer 8500Q MODERN QUILTER Support Question
Singer 8500Q MODERN QUILTER Support Question
Find answers below for this question about Singer 8500Q MODERN QUILTER.Need a Singer 8500Q MODERN QUILTER manual? We have 1 online manual for this item!
Question posted by pennyott on December 26th, 2021
I'm Getting A Code 09 On My Singer Modern Quilter Machine
I turned it off and on but still same code 09 I have a Singer modern quilter machine
Current Answers
Answer #1: Posted by SonuKumar on December 27th, 2021 8:25 AM
SonuKumar

Member since:
May 9th, 2021 Points: 16,622,280

Member since:
May 9th, 2021 Points: 16,622,280
https://www.manualsdir.com/manuals/639664/singer-8500q-modern-quilter-instruction-manual-8500q-modern-quilter.html?page=70
troubshooting steps
Please respond to my effort to provide you with the best possible solution by using the "Acceptable Solution" and/or the "Helpful" buttons when the answer has proven to be helpful.
Regards,
Sonu
Your search handyman for all e-support needs!!
Related Singer 8500Q MODERN QUILTER Manual Pages
Instruction Manual - Page 2
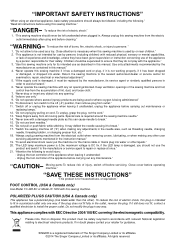
³,03257$176$)(7
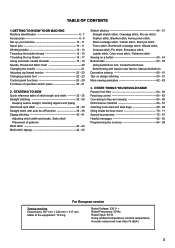
Instruction Manual - Page 5
...84 - 89
For European version
Sewing machine Dimensions: 567 mm × ...sewing 60 - 61 Tips on a button 50 - 51 Buttonholes 52 - 59
Using buttonhole foot, Corded buttonholes Buttonholing with auto tie-off function 38 - 39 Zigzag stitching 40 - 41
Adjusting stitch width and length, Satin stitch Placement of operation switch panel 30 - 31
2. TABLE OF CONTENTS
1.GETTING TO KNOW YOUR MACHINE...
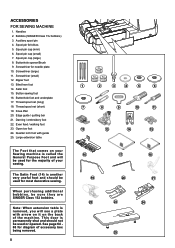
Instruction Manual - Page 8

... thread guide
21. Needle
23. Presser foot release button
14
27. Bobbin winding tension disk
3. Needle bar
13
25. Foot control
19
34. 1. GETTING TO KNOW YOUR MACHINE
MACHINE IDENTIFICATION
2
1
1. Pre-tension guide
2. Threading lever
4. Thread cutter/holder
6. Bobbin winder spindle
8. Horizontal spool pin 11. Hand wheel
13. Power/light switch
14...
Instruction Manual - Page 10
... table is another very useful foot and should not be sure they are SINGER Class 15J bobbins.
Auxiliary spool pin 4. Screwdriver for most decorative sewing. The Satin Foot (14) is removed, you will be used for the majority of your Sewing machine is permanently shut and should be used for needle plate 10. Spool...
Instruction Manual - Page 12

... operate until the power/light switch is turned on the spool pin. When servicing the machine, or when changing needles or lights, etc., the machine must be operated either
with a spool ...FOOT CONTROL
Connect the plug of the power line cord into the machine socket (3), when using sewing machine only. Always disconnect the machine from power supply by removing the plug from the walloutlet. The ...
Instruction Manual - Page 14
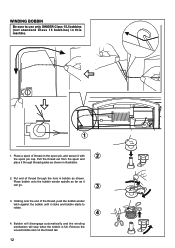
Pull the thread out from the spool and
place it clicks and bobbin starts to use only SINGER Class 15J bobbins (not standard Class 15 bobbins) in this machine.
1
1. Place bobbin onto the bobbin winder spindle as far as shown. Bobbin will disengage automatically and the winding mechanism will stop when the bobbin...
Instruction Manual - Page 18

... as illustrated. * Guide the thread through thread guides (1 & 2), and then pull it .
16 Turn the hand wheel counter clockwise (toward you) until the needle is in its highest position.
&7KUHDGWKH... thread towards the back of the Automatic Needle Threader.)
IMPORTANT: To verify that the machine is not raised, correct thread tension cannot be obtained.)
B. Always be sure to back. (See...
Instruction Manual - Page 20
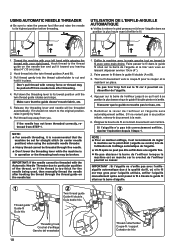
...WKUHDGFDQQRWEHWKUHDGHGWKURXJK¿QHQHHGOH º Don't lower the threading lever while the machine is recommended that the guide doesn't touch fabric, etc.
5. Hook thread to the thread guide on...should not return to the original position, raise it is in place.
Make sure that the
machine be set for the needle being used, then manually thread the needle after threading.
4.
NOTE:...
Instruction Manual - Page 22
... band
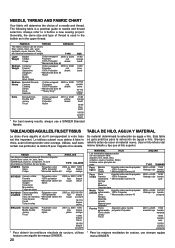
14/90 blue band
16/100 purple band
* For best sewing results, always use siempre agujas marca SINGER.
Peso Batista ligero Gasa
Crepé
Algodón sobre mecha polyester...meilleurs résultats de couture, utilisez toujours une aiguille de marque SINGER.
20
* Para los mejores resultados de costura, use a SINGER Branded Needle. They are listed as in the upper thread.
...
Instruction Manual - Page 24
... HOLE SEWING
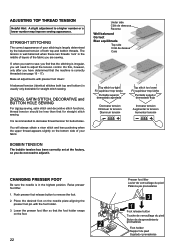
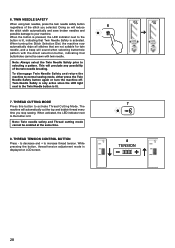
For zigzag sewing, satin stitch and decorative stitch functions, thread tension should be less than that the machine is in the middle of layers of the fabric you are sewing.
,I... of your fabric. Push presser foot release button to decrease thread tension for straight stitch sewing. ADJUSTING TOP THREAD TENSION
Helpful Hint: A slight adjustment to adjust it. STRAIGHT STITCHING
...
Instruction Manual - Page 26
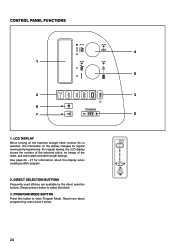
CONTROL PANEL FUNCTIONS
4 1
5
2
3
6
7
8
1. The information on the machine straight stitch number 00, is selected. PROGRAM MODE BUTTON
Press this button to select that stitch.
3. See page 26 - 27 for regular sewing and programming. Simply press a button to enter Program Mode. For regular sewing, the LCD display shows the number of the selected stitch, an...
Instruction Manual - Page 28
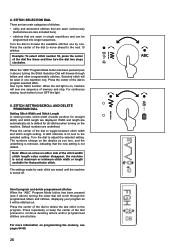
... in the program. The numbers change on programming the memory, see 3 above ) turning the lower dial will be stitched out.
For continuous sewing, touch button to the selected setting. A LED indicator is turned off.
Note: When an arrow on the machine. Scroll program and delete programmed stitches When the "ABC" Program Mode button has...
Instruction Manual - Page 30
.... to decrease and + to selecting a pattern. THREAD TENSION CONTROL BUTTON
Press - THREAD CUTTING MODE
Press this button to normal sewing mode, either press the Twin Needle Safety button again or turn the machine off. When the button is pressed, the LED indicator next to the button is activated. To disengage Twin Needle Safety...
Instruction Manual - Page 32
...
5
threads.
3. REVERSE STITCH BUTTON
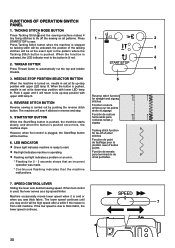
Reverse sewing is pushed once more, the machine stops. LED INDICATOR
¿ Green light indicates machine is stopped
so tacking stitch will be activated...Press Tacking Stitch button when the machine is ready to its up -stop position with lower LED lamp lit. NEEDLE STOP POSITION SELECTOR BUTTON
When the machine is turned on, needle is operating. ...
Instruction Manual - Page 38
...WXQLQJ´RIWKHWHQVLRQPD\EHGHVLUHG
1
A B C D E
A. Thread cutter B. Start/stop the sewing machine. Thread tension control button I
4
2. Power/light switch
F G
2
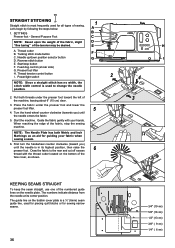
NOTE: Since a straight stitch has no ...thread with your fabric when sewing a seam.
6. Turn the hand wheel counter clockwise (towards you )
until
the needle enters the fabric.
5. Start the machine. NOTE: The Needle ...
Instruction Manual - Page 40
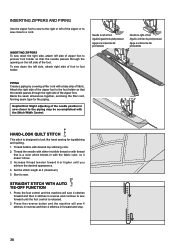
... on the left side of the foot. Start to a cord.
Press the foot control and the machine will sew 4 stitches in reverse and then 4 stitches in forward and stop.
38 Press the reverse button and the machine will sew 4 stitches forward and then 4 stitches in with the fabric color, so it doesn't show.
3.
Helpful...
Instruction Manual - Page 46
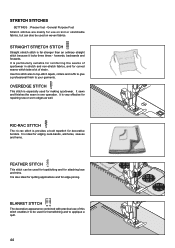
...which take a lot of sportswear in stretch and non-stretch fabrics, and for making sportswear.
It sews DQG¿QLVKHVWKHVHDPLQRQHRSHUDWLRQ,WLVYHU\HIIHFWLYHIRU repairing raw or worn edges...straight stitch because it to give DSURIHVVLRQDO¿QLVKWR\RXUJDUPHQWV
OVEREDGE STITCH 09
This stitch is especially used for topstitching and for attaching lace and trims. It is particularly ...
Instruction Manual - Page 70
... shock.
68
(3) (4)
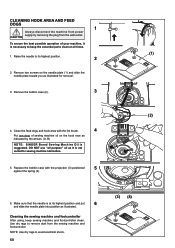
CLEANING HOOK AREA AND FEED DOGS
1
Always disconnect the machine from power
CAUTION supply by the arrows. (A, B)
NOTE: SINGER Brand Sewing Machine Oil is VXJJHVWHG '2 127 XVH ³DOO SXUSRVH´ RLO DV LW LV QRW
suited for removal.
3. Cleaning the sewing machine and footcontroller
After using, keep the essential parts clean at its...
Instruction Manual - Page 72
... the points indicated
by arrows.
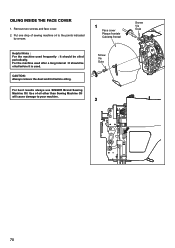
1
Face cover Plaque frontale Cubierta frontal
Helpful Hints : For the machine used after a long interval : It should be oiled before oiling.
Use of sewing machine oil to your machine.
For best results always use SINGER Brand Sewing Machine Oil. Remove two screws and face cover. 2. CAUTION: Always remove the dust and lint...
Instruction Manual - Page 74
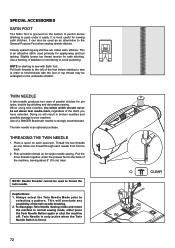
... the underside of the twin needle breaking. 2. Use a backing of a SINGER Brand twin needle is strongly recommended.
Use of stabilizer or interfacing to avoid puckering.
To disengage Twin Needle Sewing mode and return the machine to
selecting a pattern. NOTE on starting to sew with Satin foot: Pull both threads to the left of the...
Similar Questions

I Have Er Code 5 On My Singer Modern Quilter 8500q. What Can I Do To Get It Work
I have Er code 5 on my Singer Modern Quilter 8500Q. What can I do to get it working again? I brought...
I have Er code 5 on my Singer Modern Quilter 8500Q. What can I do to get it working again? I brought...
(Posted by val2102 2 years ago)

Error Code 9 On 8500q Modern Quilter
Keep getting a Code 9 Error on my Modern Quilter 8500Q...How to fix, Please
Keep getting a Code 9 Error on my Modern Quilter 8500Q...How to fix, Please
(Posted by madison66008 6 years ago)

I Keep Getting Error Po1 On My Modern Quilter
I keep getting error po 1 on my modern quilter and the hand wheel seems very tight how do I fix this...
I keep getting error po 1 on my modern quilter and the hand wheel seems very tight how do I fix this...
(Posted by Mryharvey 6 years ago)

Getting Error 6 On My New Singer Mq 8500q
When I am sewing a straight stitch, it runs for a few seconds then stops and gives me error 6 even t...
When I am sewing a straight stitch, it runs for a few seconds then stops and gives me error 6 even t...
(Posted by ymcaninch 7 years ago)

I Am Getting Error E7 And The Machine Won't Work At All. Can You Help Me?
(Posted by Cindybernstein 8 years ago)