Singer 8500Q MODERN QUILTER Support Question
Singer 8500Q MODERN QUILTER Support Question
Find answers below for this question about Singer 8500Q MODERN QUILTER.Need a Singer 8500Q MODERN QUILTER manual? We have 1 online manual for this item!
Question posted by donalori on June 29th, 2015
On The Singer 8500q Machine.
Does anyone know what error message Er 16 means on this Singer 8500Q sewing machine ? On the digital displace it shows an Er on the top and on the bottom it shows 16 at the sometime. Manuel doesn't say anything about Er 16. Anyone have knowledge of this error message? Thank in advance!!
Current Answers
Answer #1: Posted by TommyKervz on June 30th, 2015 5:20 AM
TommyKervz

Member since:
January 10th, 2013 Points: 17,776,813

Member since:
January 10th, 2013 Points: 17,776,813
Please contact Singer tech center concerning this error code' Singer contact details here: http://www.singerco.com/contact-us, recommended to use the contact form or email address given on the link. Singer should be able to help you with this error code.
Related Singer 8500Q MODERN QUILTER Manual Pages
Instruction Manual - Page 2
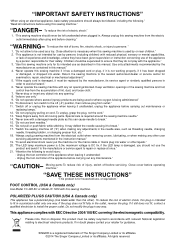
³,03257$176$)(7
Instruction Manual - Page 5
...sewing examples 62 - 63
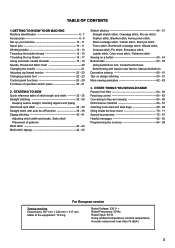
3. TABLE OF CONTENTS
1.GETTING TO KNOW YOUR MACHINE 0DFKLQHLGHQWL¿FDWLRQ 6 - 7 Accessories 8 - 9 Set up your machine 10 - 11 Spool pins 10 - 11 Winding bobbin 12 - 13 Threading the bobbin thread 14 - 15 Threading the top thread 16... 72 - 81 Helpful messages 82 - 83 Programming the memory 84 - 89
For European version
Sewing machine Dimensions: 567 mm &#...
Instruction Manual - Page 10
...
13
14
15
16
17
18
19
20
21
22
23
24
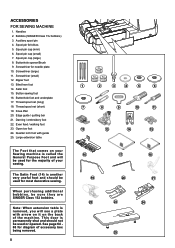
25 Spool pin cap (large) 8. Screwdriver (large) 11. Even feed / walking foot 23.
Screwdriver for most decorative sewing. This door is another very useful foot and should not be sure they are SINGER Class 15J bobbins. ACCESSORIES FOR SEWING MACHINE
1. Buttonhole opener/Brush...
Instruction Manual - Page 12

...
Connect the plug of the power line cord into the machine socket (3), when using sewing machine only. POWER/LIGHT SWITCH
Your machine will not operate until the power/light switch is turned on... del pasador carrete
Spool Bobine Carrete
Spool pin Porte-bobine Pasador carrete
10 NOTE: In sewing mode, the machine can be disconnected from the power supply.
Place a thread spool on the spool pin....
Instruction Manual - Page 14
....
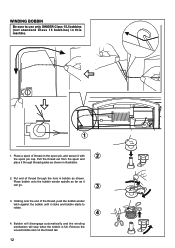
3
3. Put end of thread through thread guides as shown in bobbin as it clicks and bobbin starts to use only SINGER Class 15J bobbins (not standard Class 15 bobbins) in this machine.
1
1. Holding onto the end of thread on the spool pin, and secure it through the hole in illustration.
2. Pull the...
Instruction Manual - Page 24
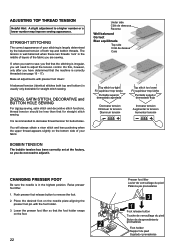
...BUTTON HOLE SEWING
For zigzag sewing, satin stitch and decorative stitch functions, thread tension should be less than that for straight stitch sewing. It ... PRESSER FOOT
Be sure the needle is correctly threaded (see page 16 - 17). ADJUSTING TOP THREAD TENSION
Helpful Hint: A slight adjustment...the presser foot lifter so that the machine is in the middle of layers of both top and bottom...
Instruction Manual - Page 26
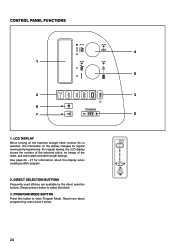
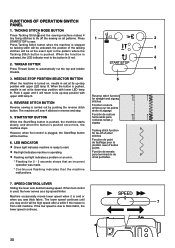
... press a button to enter Program Mode. For regular sewing, the LCD display shows the number of the selected stitch, an image of the stitch, and stitch width and stitch length settings. Read more about the display when creating a stitch program.
2. The information on the machine straight stitch number 00, is selected. CONTROL PANEL...
Instruction Manual - Page 28
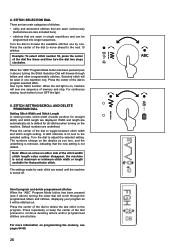
... stitch will be stitched out. STITCH SETTING/SCROLL AND DELETE PROGRAM DIAL
Setting Stitch Width and Stitch Length In sewing mode, stitch width (needle position for all stitches when turning on the machine. The numbers change on either side of memory and stop. Note: When an arrow on the display as it...
Instruction Manual - Page 30
... to the Twin Needle button is activated. When activated, the LED indicator next to normal sewing mode, either press the Twin Needle Safety button again or turn the machine off. When turning the Stitch Selection Dial, the machine now automatically skips all stitches that buttonholes cannot be enabled at the same time.
8. To...
Instruction Manual - Page 32
... WR WLH RII WKH VHZLQJ RQ DOO SDWWHUQV 3UHVV
1
2
START/STOP to start. ¿ Red light indicates machine is ready to sew. LED INDICATOR
¿ Green light indicates machine is operating. ¿ Flashing red light indicates a problem or an error.
* Flashing for 2 - 3 seconds shows that an incorrect operation was made.
* Continuous flashing indicates that the...
Instruction Manual - Page 38
... the presser foot toward you ) until the needle is in its center position.
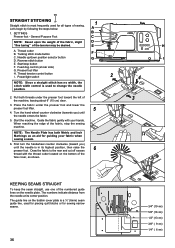
SETTINGS Presser foot - Start the machine. STRAIGHT STITCHING 00
Straight stitch is most frequently used for sewing narrow seams.
36
3/4" (19 mm) 5/8" (16 mm) 1/2" (13 mm) 3/8" ( 9 mm) 1/4" ( 6 mm) When reaching the edge of the fabric, slight ³¿QHWXQLQJ...
Instruction Manual - Page 40
...thread or with thread that is released.
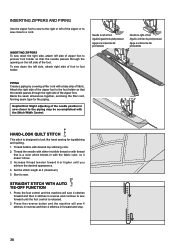
2. STRAIGHT STITCH WITH AUTO
TIE-OFF FUNCTION
16
1. To sew down the right side, attach left side of zipper foot to presser foot holder so ..., so it doesn't show.
3. Start to the piping may be accomplished with the Stitch Width Control.
Set the stitich length at 4 (maximum).
5.
Press the foot control and the machine will sew 4 stitches in reverse ...
Instruction Manual - Page 56
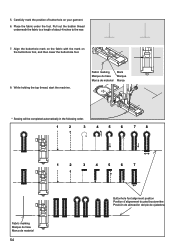
...the position of about 4 inches to the rear.
7. Place the fabric under the foot. Fabric marking Marque du tissu Marca de material
Mark Marque Marca
* Sewing will be completed automatically in the following order.
1
2
3
4
5
6
7
8
1
2
3
4
5
6
7
Fabric marking Marque du tissu ...foot, and then lower the buttonhole foot.
8. While holding the top thread, start the machine. 5.
Instruction Manual - Page 66
...Abaisse-griffe d'entraînement Control de dientes
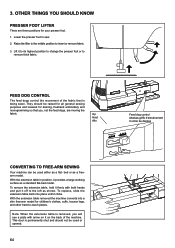
CONVERTING TO FREE-ARM SEWING They should be raised for all general sewing purposes and lowered for your presser foot. 1. Lower the presser foot.... Lift it to its highest position to change the presser foot or to sew. 2.
3. OTHER THINGS YOU SHOULD KNOW
PRESSER FOOT LIFTER
There are moving the fabric. FEED DOG CONTROL
The feed ...
Instruction Manual - Page 68
... - 69).
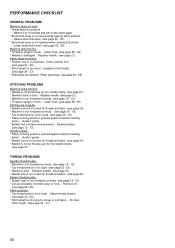
Guide it gently. * Bobbin has not been wound evenly. - Raise feed dogs. (see page 22 - 23). * Needle is not lowered when sewing buttonhole.
-
THREAD PROBLEMS Needle thread breaks. * Machine is not threaded correctly. (see page 16 - 19). * Top thread tension is caught in bobbin case or hook. - Shorten
stitch length. (see page...
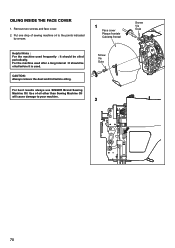
Instruction Manual - Page 70
... to its highest position and put
6
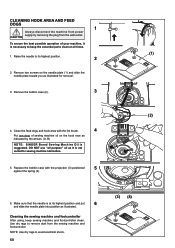
and slide the needle plate into position as illustrated for sewing machine lubrication.
5. CLEANING HOOK AREA AND FEED DOGS
1
Always disconnect the machine from power
CAUTION supply by the arrows. (A, B)
NOTE: SINGER Brand Sewing Machine Oil is VXJJHVWHG '2 127 XVH ³DOO SXUSRVH´ RLO DV LW LV QRW
suited...
Instruction Manual - Page 72
... indicated
by arrows.
1
Face cover Plaque frontale Cubierta frontal
Helpful Hints : For the machine used frequently : It should be oiled periodically. For best results always use SINGER Brand Sewing Machine Oil. Screw Vis Guia
2
Screw Vis Guia
70
For the machine used . CAUTION: Always remove the dust and lint before it is used after a long...
Instruction Manual - Page 74
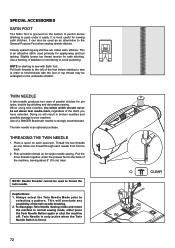
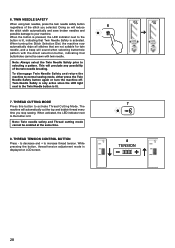
...presser foot to thread the twin needle.
Doing so will preclude any possibility of a SINGER Brand twin needle is strongly recommended. This is an optional purchase. When using twin-... used primarily for pin tucks, double top stitching and decorative sewing.
The twin needle is an attractive stitch used to the back of the machine, leaving about 6" (15 cm) clear. Draw one ...
Instruction Manual - Page 76
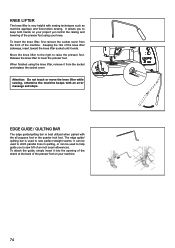
... or move the knee lifter while sewing, otherwise the machine beeps with sewing techniques such as machine applique and free-motion sewing. Release the knee lifter to raise the presser foot.
To attach the guide, simply insert it ends. KNEE LIFTER
The knee lifter is very helpful with an error message and stops. To insert the knee...
Instruction Manual - Page 78
... Stitch.
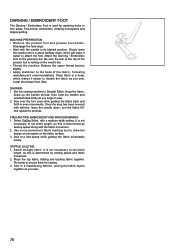
Place the top fabric, batting and backing fabric together. DARNING / EMBROIDERY FOOT
The Darning / Embroidery Foot is resting on the fabric surface. 3.
Set the sewing machine to draw the design or monogram on the needle bar. ‡ 7KUHDG WKH PDFKLQH 5HGXFH WKH XSSHU WKUHDG WHQVLRQ slightly. ‡ $SSO\ VWDELOL]HU WR...
Similar Questions

Buttonholes
Where can I get complete instructions for making buttonholes on the Singer 6800C heavy duty machine?...
Where can I get complete instructions for making buttonholes on the Singer 6800C heavy duty machine?...
(Posted by darahml 2 years ago)

I Have Er Code 5 On My Singer Modern Quilter 8500q. What Can I Do To Get It Work
I have Er code 5 on my Singer Modern Quilter 8500Q. What can I do to get it working again? I brought...
I have Er code 5 on my Singer Modern Quilter 8500Q. What can I do to get it working again? I brought...
(Posted by val2102 2 years ago)

Error Code 9 On 8500q Modern Quilter
Keep getting a Code 9 Error on my Modern Quilter 8500Q...How to fix, Please
Keep getting a Code 9 Error on my Modern Quilter 8500Q...How to fix, Please
(Posted by madison66008 6 years ago)

Why Is The Bobbin Side Jamming With Big Loops. I Have A Singer 8500q Machine.
I have the 8500 q for 6 months. I have a persistent problem with the threading mechanism. Every time...
I have the 8500 q for 6 months. I have a persistent problem with the threading mechanism. Every time...
(Posted by soukup16728 7 years ago)
I Have A Singer Sew Mate 5400. It Shows A Backward C & A Frontward C & It Will
(Posted by ausmth 8 years ago)