Singer 7258 Stylist Support Question
Singer 7258 Stylist Support Question
Find answers below for this question about Singer 7258 Stylist.Need a Singer 7258 Stylist manual? We have 1 online manual for this item!
Question posted by threadsavvy on July 11th, 2017
Breaking Needles
My needle keeps hitting the cutter blade foot. Please help!
Current Answers
Related Singer 7258 Stylist Manual Pages
Instruction Manual - Page 3
... YOUR SEWING MACHINE Machine identification 6 - 7 Accessories 8 - 9 Setting up your machine 10 - 11 Spool pins, Presser foot lifter 12 - 13 Darning plate 12 - 13 Converting to free-arm sewing 14 - 15 Large extension table 14 - 15 Winding the bobbin 16 - 17 Threading the bobbin thread 18 - 19 Threading the top thread 20 - 23
Using automatic needle threader Picking...
Instruction Manual - Page 6
... guide
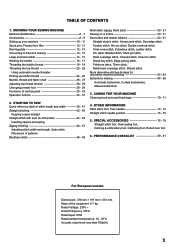
11. Handle 14. Hand wheel
6
15. Presser foot lifter
19. Automatic needle threader
22. Foot release lever
15
30. Presser foot
16
32. Bobbin cover release button
35. Horizontal spool pin
13. Presser foot screw
25. Power line cord
37. KNOWING YOUR SEWING MACHINE
MACHINE IDENTIFICATION
1. Thread cutter
3
6. Cord socket
17. Thread guide 23. Thread guide...
Instruction Manual - Page 8
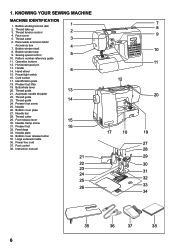
...for most decorative sewing. ACCESSORIES
1. Needles 2. Spool pin cap (mini) 6. Gathering foot 18. When purchasing additional bobbins, be used for needle plate 10. Spool pin cap (small) 7.
Spool pin felt discs (2) 5. Darning plate 11. Zipper foot 12. Darning & embroidery foot 17. Rolled hem foot
The Foot that comes on your Sewing machine is another very useful foot and should...
Instruction Manual - Page 10
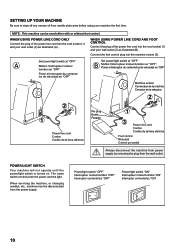
... (1) and your wall outlet (2) as illustrated (A). WHEN USING POWER LINE CORD AND FOOT CONTROL
Connect the plug of the power line cord into the machine socket (3).
When servicing the machine, or changing needles, etc., machine must be used either with or without foot control. Poner el Interruptor de corriente/luz de velocidad en "OFF"
Poner el...
Instruction Manual - Page 18
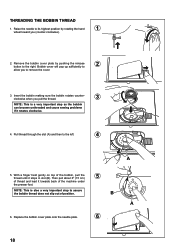
... slip out of thread and lead it rotates clockwise.
4. Replace the bobbin cover plate onto the needle plate.
6
18 THREADING THE BOBBIN THREAD
1.
Then pull about 6" (15 cm)
5
of position...toward you to the right. With a finger held gently on top of the machine under
the presser foot. Raise the needle to its highest position by pushing the release button to remove the cover.
...
Instruction Manual - Page 24

.... Your machine will appear through the needle plate slot.
4. Always stopping with the needle "fully up the bobbin thread is one down-up cycle and stop with your computer sewing machine.
3. Lightly pull up the top thread, and pick up bobbin thread,
3
which will perform one of the features of the machine under the presser foot, leaving...
Instruction Manual - Page 26
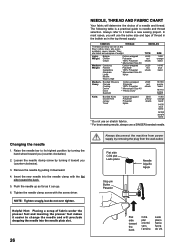
... it before a new sewing project. Insert the new needle into the needle plate slot.
26
Always disconnect the machine from power supply by turning the hand wheel toward the back
Côté plat orienté vers l'arrière
Lado plano hacia fuera de Vd.
Raise the needle bar to it downward. 4. Helpful Hint: Placing a scrap...
Instruction Manual - Page 28
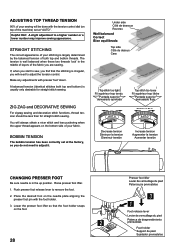
... decorative stitch functions, thread tension should be done with the tension control dial (on the needle plate aligning the
presser foot pin with presser foot 'down'.
Lower the presser foot lifter so that the stitching is usually only desirable for straight stitch sewing.
Push presser foot release lever to a higher number or a lower number may improve...
Instruction Manual - Page 30
... del número de puntada
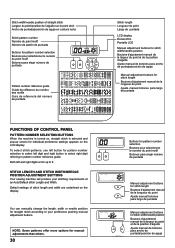
FUNCTIONS OF CONTROL PANEL
PATTERN NUMBER SELECTION BUTTONS
When the machine is turned on, straight stitch is selected and pop-up to 9.
STITCH LENGTH AND STITCH WIDTH/NEEDLE POSITION ADJUSTMENT BUTTONS
Your sewing machine will produce your preference pushing manual adjustment buttons. To select stitch patterns, use left button...
Instruction Manual - Page 34
... on all patterns except straight, zigzag and buttonhole stitches.
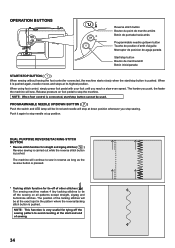
PROGRAMMABLE NEEDLE UP/DOWN BUTTON ( )
Push the switch and LED lamp will sew. Push it is pressed.
* Tacking stitch function for tying off the sewing on foot pedal to stop needle at its highest position.
The machine will stop at the start /stop button is pushed. When...
Instruction Manual - Page 42
... when sewing a seam.
6.
General Purpose Foot
D
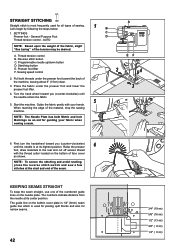
Thread tension control - A. Reverse stitch button C. Turn the hand wheel toward you (counter-clockwise) until the needle is at the start and end of
the machine, leaving about 6" (15cm) clear.
3. Start the machine. Guide the fabric gently with the thread cutter located on the bottom of sewing. KEEPING SEAMS STRAIGHT
To keep the...
Instruction Manual - Page 44
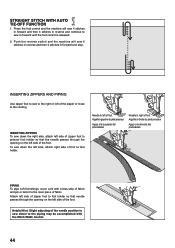
... or close to the cording. Attach left side of zipper foot to the right or left side of the needle position to sew closer to sew in forward and stop. Press the foot control and the machine will sew 4 stitches in reverse and then 4 stitches in forward until the foot control is released.
2. Helpful Hint: Slight adjusting of the...
Instruction Manual - Page 54
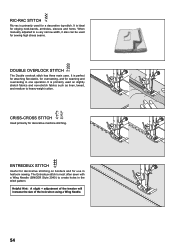
... perfect for attaching flat elastic, for overcasting, and for seaming and overcasting in heirloom sewing.
It is most often sewn with a Wing Needle (SINGER Style 2040) to a very narrow width, it also can be used for decorative machine stitching. ENTREDEUX STITCH
Useful for decorative stitching on slightly stretch fabrics and non-stretch fabrics...
Instruction Manual - Page 68
Spur Saliente Tige
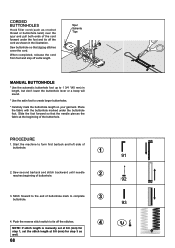
MANUAL BUTTONHOLE
* Use the automatic buttonhole foot up to 1 3/4 "(45 mm) in the illustration. Start the machine to create larger buttonholes.
* Carefully mark the buttonhole length on your garment. Sew buttonhole so that the needle pierces the fabric at 0.8 (mm) for step 1, set the stitch length at the beginning of buttonhole.
2
3. When...
Instruction Manual - Page 70
....
5
(2)
(A) (B)
(3) (4)
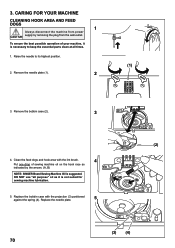
70 To ensure the best possible operation of sewing machine oil on the hook race as it is necessary to its highest position. 2. Raise the needle to keep the essential parts clean at all purpose" oil as
indicated by removing the plug from the wall-outlet. 3. DO NOT use "all times.
1. Clean the ...
Instruction Manual - Page 72
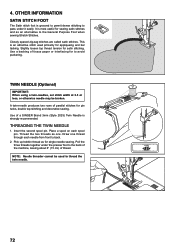
... alternative to the back of the machine, leaving about 6" (15 cm) of a SINGER Brand 3mm (Style 2025) Twin Needle is most useful for sewing satin stitches and as for single needle sewing. This is grooved to permit dense stitching to pass under the presser foot to the General Purpose Foot when sewing Stretch Stitches. Insert the second spool...
Instruction Manual - Page 76
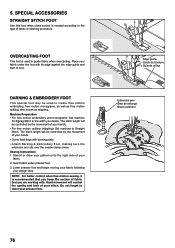
... edge guide and start to sew. OVERCASTING FOOT
This foot is used to Straight Stitch. Machine Preparation • For free motion embroidery and monograms: Set machine
for Zigzag Stitch in the width you are working with darning plate. • Attach Darning & Embroidery Foot, making sure the extension arm sits over the needle clamp screw.
The stitch length...
Instruction Manual - Page 78
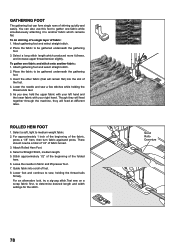
... fabric: 1. Though they will feed together through the machine, they will remain flat) into scroll of the fabric,
press a...Foot. 4. Leave the needle in fabric and lift presser foot. 7. Lower foot and continue to be gathered underneath the gathering
foot. 3. Place the fabric to sew, holding the
thread ends taut. 5. Attach gathering foot and select straight stitch. 2. As you sew...
Instruction Manual - Page 80
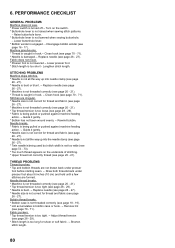
... underside of stitching. * Upper thread not correctly thread (see page 28 - 29). * Fabric is not lowered when sewing buttonhole.
- Lower presser foot. * Stitch length is caught in hook. - Replace needle (see page
26 - 27). * Machine is not threaded correctly (see page 28 - 29). * Needle is too long for thread and fabric (see page
26 - 27...
Instruction Manual - Page 84
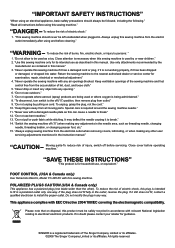
... a qualified electrician to break." 12.
"CAUTION--
Do not modify the plug in this can cause a needle to install the proper outlet. SINGER is being used as described in a polarized outlet only one blade wider than the other user servicing adjustments mentioned in the needle area, such as this manual." 3. "This sewing machine should always be followed...
Similar Questions

My Machine Keeps Breaking Needles. It Is Hitting The Plate
(Posted by Jaihill 4 years ago)


I Get E7 Error Message On My Singer Model 7258 Sewing Machine. There Is No Refe
Error message E7 is up on my Singer Stylist model 7258 sewing machine. It is not working at all. I t...
Error message E7 is up on my Singer Stylist model 7258 sewing machine. It is not working at all. I t...
(Posted by ebellamybellamy9 5 years ago)

I Need An Extnesion Table For My Sewing Machine Singer 7258 Stylist
(Posted by loucksd 10 years ago)

Singer 5523 Scholastic Manual For The Needle Is Hitting The Pressure Foot
(Posted by anndvs3 10 years ago)