Singer 7258 Stylist Support Question
Singer 7258 Stylist Support Question
Find answers below for this question about Singer 7258 Stylist.Need a Singer 7258 Stylist manual? We have 1 online manual for this item!
Question posted by Amyporter76 on July 5th, 2020
Oil Wicks
Does the 7258 have a wick If so I think I may have pulled it out thinking it was waddled up old jam how can I replace if so? Very little info found to determine if it even has wick
Current Answers


Related Singer 7258 Stylist Manual Pages
Instruction Manual - Page 3
... stitch foot, Overcasting foot, Darning & embroidery foot, Gathering foot, Rolled hem foot
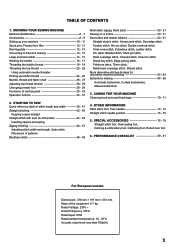
6. KNOWING YOUR SEWING MACHINE Machine identification 6 - 7 Accessories 8 - 9 Setting up your machine 10 - 11 Spool pins, Presser foot lifter 12 - 13 Darning plate 12 - 13 Converting to free-arm sewing 14 - 15 Large extension table 14 - 15 Winding the bobbin 16 - 17 Threading the...
Instruction Manual - Page 6
...13. Bobbin cover plate
27. Needle plate
34. Operation buttons
12. Needle clamp screw
31. Bobbin winding tension disk
1
2. Sewing speed control
5
10. Foot control
38. Thread tension control
2
4. Hand wheel
6
15. Large extension table
36. Power line cord
37. Identification plate
18. 1. KNOWING YOUR SEWING MACHINE
MACHINE IDENTIFICATION
1. Needle
26. Feed dogs
33.
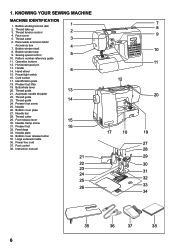
Instruction Manual - Page 8
...Gathering foot 18. ACCESSORIES
1. Spool pin cap (small) 7. Screwdriver for the majority of your Sewing machine is another very useful foot and should be sure they are Class I5 J.
1
2
3...16
17
18
8 Spool pin cap (mini) 6. Rolled hem foot
The Foot that comes on your sewing. Darning plate 11. Blind stitch foot 14.
Spool pin felt discs (2) 5. Buttonhole opener/Seam Ripper and...
Instruction Manual - Page 10
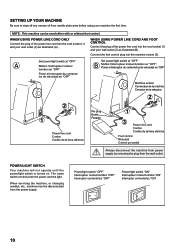
SETTING UP YOUR MACHINE
Be sure to wipe off any excess oil from the wall-outlet. WHEN USING POWER LINE CORD ONLY
Connect the plug of the power line cord into the cord socket (1) and your wall ...
Instruction Manual - Page 14
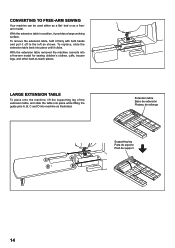
... A, B, C and D into a free-arm model for sewing children's clothes, cuffs, trouser legs, and other hard-to the left as illustrated. To remove the extension table, hold it firmly with both hands and pull it off to -reach places. With the extension table removed the machine converts into machine as shown.
extension table Base de...
Instruction Manual - Page 18
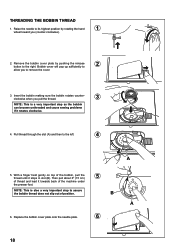
... the bobbin thread does not slip out of the bobbin, pull the thread until it towards back of the machine under
the presser foot. NOTE: This is a very important step as the bobbin can become unthreaded and cause sewing problems if it rotates clockwise.
4. Replace the bobbin cover plate onto the needle plate.
6
18...
Instruction Manual - Page 24

... appear through the needle plate slot.
4. PICKING UP BOBBIN THREAD
1. NOTE: A quick way to its highest position. Pull both top and bobbin threads together toward you (counter-clockwise) with your computer sewing machine.
3. Holding needle thread loosely with your left hand, turn
2
hand wheel toward the back of your right
hand, first lowering...
Instruction Manual - Page 26
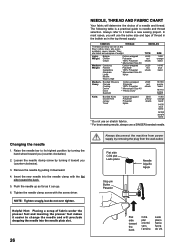
...needle. The following table is a practical guide to it before a new sewing project. In most cases, you (counter-clockwise).
2. They are listed... the machine from power supply by turning the hand wheel toward the back. 5. NEEDLE, THREAD AND FABRIC CHART
Your fabric will determine the choice... the needle clamp screw by pulling it toward the back
Côté plat orienté vers ...
Instruction Manual - Page 28
...find that the foot holder snaps
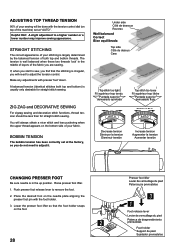
on top of the machine) set at "AUTO" . ZIG ZAG and DECORATIVE SEWING
For zigzag sewing and decorative stitch functions, thread tension should be done with...with the foot holder. 3. Place the desired foot on the bottom side of your stitching is largely determined by the balanced tension of both top and bottom) is well balanced when these two threads 'lock...
Instruction Manual - Page 30
...posición de aguja STITCH LENGTH AND STITCH WIDTH/NEEDLE POSITION ADJUSTMENT BUTTONS
Your sewing machine will produce your preference pushing manual adjustment buttons. Default settings of straight stitch ...250;mero de puntada
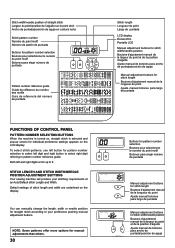
FUNCTIONS OF CONTROL PANEL
PATTERN NUMBER SELECTION BUTTONS
When the machine is turned on, straight stitch is selected and pop-up to pattern number reference...
Instruction Manual - Page 32
... to right (operating position) during sewing. Check bobbin winder and move it to push the reverse/tacking stitch button.
It is pulled out, while operating foot control. ...caused the machine
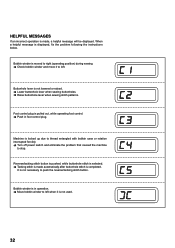
to stop. HELPFUL MESSAGES
If an incorrect operation is not lowered or raised. Lower buttonhole lever when sewing buttonholes. Raise buttonhole lever when sewing stitch patterns...
Instruction Manual - Page 34
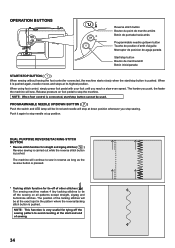
...Tacking stitch function for tie-off of other stitches ( ) The sewing machine makes 4 tiny tacking stitches to tie off the sewing pattern to avoid raveling at the start /stop button is pushed ...is pushed. Release pressure on all patterns except straight, zigzag and buttonhole stitches.
The machine will sew. The position of the tacking stitches will be lit red and needle will be at...
Instruction Manual - Page 36
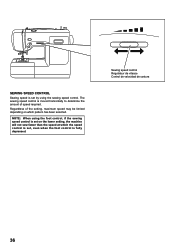
..., even when the foot control is fully depressed. NOTE: When using the foot control, if the sewing speed control is moved horizontally to determine the amount of the setting, maximum speed may be limited depending on the lower setting, the machine will not sew faster than the speed at which pattern has been selected.
Instruction Manual - Page 42
...upon the weight of the fabric, slight "fine tuning" of the seam. A. Sewing speed control
EF
2
4
2. Pull both Metric and Inch Markings as shown. First turn the handwheel toward you (counter... raveling, press the reverse stitch switch and sew a few stitches at the start and end of the tension may be desired. Start/stop the sewing machine. When reaching the edge of face cover
...
Instruction Manual - Page 44
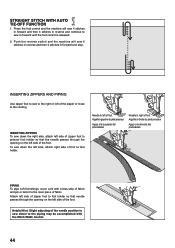
Needle to left side, attach right side of the foot. Press the foot control and the machine will sew 4 stitches in reverse and then 4 stitches in forward and stop. Push the reverse switch and the machine will sew 4 stitches in forward and then 4 stitches in forward until the foot control is released.
2.
INSERTING ZIPPERS To...
Instruction Manual - Page 54
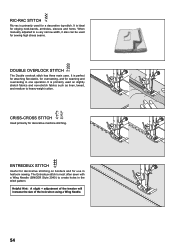
...CROSS STITCH
Used primarily for use in heirloom sewing. The Entredeux stitch is primarily used on borders and for decorative machine stitching.
ENTREDEUX STITCH
Useful for decorative stitching...can be used for a decorative top-stitch. RIC-RAC STITCH
Ric-rac is primarily used for sewing high stress seams.
DOUBLE OVERLOCK STITCH
The Double overlock stitch has three main uses. It is ...
Instruction Manual - Page 62
... bobbin to slightly lower the tension setting.
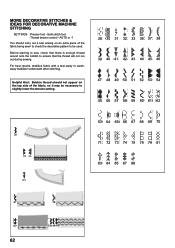
62 Before starting to sew, check that the thread will not run out during sewing. For best results, stabilize fabric with a tear-away or washaway stabilizer underneath when stitching. MORE DECORATIVE STITCHES & IDEAS FOR DECORATIVE MACHINE STITCHING
SETTINGS :Presser foot - Satin stitch foot :Thread tension control...
Instruction Manual - Page 66
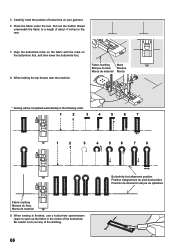
... mark on the fabric with the mark on your garment.
6.
When sewing is finished, use a buttonhole opener/seam
ripper to cut any of ...tissu Marca de material 9. While holding the top thread, start the machine. Place the fabric under the foot. Carefully mark the position of about 4 inches to the rear.
7. 5. Pull out the bobbin thread underneath the fabric to a length of buttonhole...
Instruction Manual - Page 70
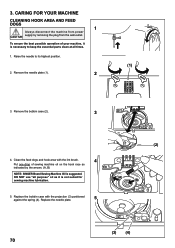
...case with the lint brush.
4
Put one drop of your machine, it is suggested. CARING FOR YOUR MACHINE
CLEANING HOOK AREA AND FEED DOGS
1
Always disconnect the machine from power CAUTION supply by the arrows. (A, B)
NOTE: SINGER Brand Sewing Machine Oil is not suited for sewing machine lubrication.
5. Replace the needle plate.
5
(2)
(A) (B)
(3) (4)
70 3. Clean the feed dogs and hook...
Instruction Manual - Page 84
... when this sewing machine." "Never sew with relevant National legislation relating to persons: "
1. "IMPORTANT SAFETY INSTRUCTIONS"
"When using and before cleaning."
2. "Do not pull or push fabric while stitching. "Always unplug sewing machine from all instructions before using this sewing machine is a registered trademark of
injury,
switch
off
before replacing light bulb...
Similar Questions


I Get E7 Error Message On My Singer Model 7258 Sewing Machine. There Is No Refe
Error message E7 is up on my Singer Stylist model 7258 sewing machine. It is not working at all. I t...
Error message E7 is up on my Singer Stylist model 7258 sewing machine. It is not working at all. I t...
(Posted by ebellamybellamy9 5 years ago)

Where To Oil Singer Sewing Machine 7256
My manual doesn't address where to oil my machine
My manual doesn't address where to oil my machine
(Posted by Anonymous-148513 9 years ago)

Beeping From Singer Sewing Machine Stylist Ii 5625
My sewing machine will beep and stop sewing after three inches of sewing. I have taken it to be repa...
My sewing machine will beep and stop sewing after three inches of sewing. I have taken it to be repa...
(Posted by arusheria 9 years ago)

I Need An Extnesion Table For My Sewing Machine Singer 7258 Stylist
(Posted by loucksd 10 years ago)