Singer 7258 Stylist Support Question
Singer 7258 Stylist Support Question
Find answers below for this question about Singer 7258 Stylist.Need a Singer 7258 Stylist manual? We have 1 online manual for this item!
Question posted by Debhokey on December 13th, 2020
Where Is My Blind Stitch
The person who posted this question about this Singer product did not include a detailed explanation. Please use the "Request More Information" button to the right if more details would help you to answer this question.
Current Answers
Answer #1: Posted by INIMITABLE on December 14th, 2020 2:26 AM
INIMITABLE

Member since:
April 3rd, 2020 Points: 2,069,600

Member since:
April 3rd, 2020 Points: 2,069,600
here is a video guide; https://www.youtube.com/watch?v=eBCc7fWJIas
I hope this is helpful? PLEASE "ACCEPT" and mark it "HELPFUL" to complement my little effort. Hope to bring you more detailed answers
-INIMITABLE
Related Singer 7258 Stylist Manual Pages
Instruction Manual - Page 3
..., Manual buttonhole
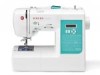
3. SPECIAL ACCESSORIES 76 - 79 Straight stitch foot, Overcasting foot, Darning & embroidery foot, Gathering foot, Rolled hem foot
6. TABLE OF CONTENTS
1. CARING FOR YOUR MACHINE Cleaning hook area and feed dogs 70 - 71
4. KNOWING YOUR SEWING MACHINE Machine identification 6 - 7 Accessories 8 - 9 Setting up your machine 10 - 11 Spool pins, Presser foot lifter 12...
Instruction Manual - Page 6
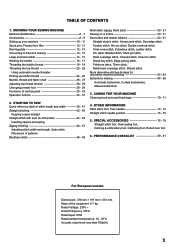
... pin
13. Buttonhole lever 20. Power line cord
37. Operation buttons
12. Needle plate
34. Bobbin winder shaft
8. Hand wheel
6
15. Needle
26. Sewing speed control
5
10. KNOWING YOUR SEWING MACHINE
MACHINE IDENTIFICATION
1. Bobbin winding tension disk
1
2. Feed dogs
33. Instruction manual
21
22 23 24 25
26
12
17
18
7 8 9
10 11
20...
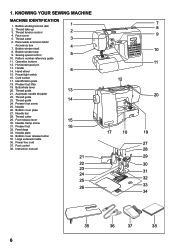
Instruction Manual - Page 8
Spool pin cap (mini) 6. Spool pin cap (small) 7. Blind stitch foot 14. When purchasing additional bobbins, be used for the majority of your sewing. Spool pin cap (large) 8. Overcasting foot 16.
Auxiliary spool pin 4. Darning plate 11. Rolled hem foot
The Foot that comes on your Sewing machine is another very useful foot and should be...
Instruction Manual - Page 24

... one of the features of the machine under the presser foot, leaving about 6"
4
(15 cm) clear.
24 NOTE: A quick way to its highest position. Your machine will appear through the needle plate... both top and bobbin threads together toward you (counter-clockwise) with your computer sewing machine.
3. PICKING UP BOBBIN THREAD
1. Always stopping with the needle "fully up the bobbin thread...
Instruction Manual - Page 28
... are sewing. Lower the presser foot lifter so that the stitching is in the middle of layers of the fabric you find that the foot holder snaps
on top of the machine) set at "AUTO" .
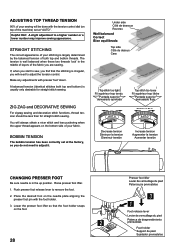
A balanced tension (identical stitches both top and bobbin threads. Raise presser foot lifter. 1. ADJUSTING TOP THREAD TENSION
90% of...
Instruction Manual - Page 30
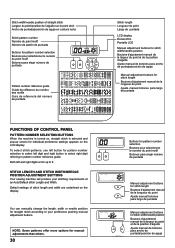
... Numéro du point motif Número de patrón de puntada
Buttons for individual preference settings appears on the display. STITCH LENGTH AND STITCH WIDTH/NEEDLE POSITION ADJUSTMENT BUTTONS
Your sewing machine will produce your preference pushing manual adjustment buttons.
NOTE: Some patterns offer more options for manual adjustments than others.
30...
Instruction Manual - Page 32
.... Raise buttonhole lever when sewing stitch patterns. Bobbin winder is moved to right (operating position) during sewing. Check bobbin winder and move it is not used.
32
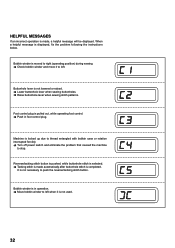
Reverse/tacking stitch button is pushed, while buttonhole stitch is selected. Tacking stitch is made , a helpful message will be displayed. Machine is locked up due to thread...
Instruction Manual - Page 34
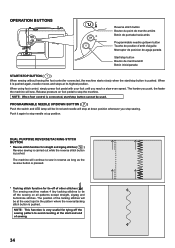
... position. When using foot control, simply press foot pedal with your foot until you stop button is pressed.
* Tacking stitch function for tie-off of other stitches ( ) The sewing machine makes 4 tiny tacking stitches to tie off the sewing pattern to stop button Bouton de marche/arrêt Botón inicio/parada
START/STOP BUTTON ( )
When...
Instruction Manual - Page 42
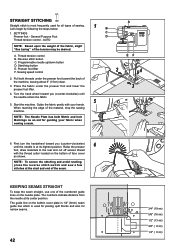
...the machine. NOTE: To secure the stitching and avoid raveling, press the reverse stitch switch and sew a few stitches at its center position. Let's begin by following the steps below.
1
B
1. Reverse stitch button... E. When reaching the edge of the tension may be desired.
Start/stop the sewing machine.
Programmable needle up/down button D.
The guide line on the bobbin cover plate ...
Instruction Manual - Page 44
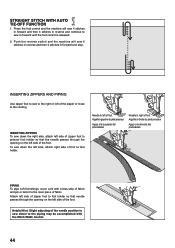
... that needle passes through the opening on the left side of the foot. Press the foot control and the machine will sew 4 stitches in reverse and then 4 stitches in forward until the foot control is released.
2.
Push the reverse switch and the machine will sew 4 stitches in forward and then 4 stitches in reverse and continue to the cording.
Instruction Manual - Page 48
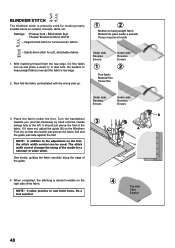
...
3. If it does not, adjust the guide (B) on the foot, the stitch width control can be used for normal woven fabrics
1
2
Medium to sew blind hems. Do a test sew first.
4
Top side Cara Endroit
48
When completed, the stitching is primarily used . Regular blind stitch for creating nearly invisible hems on curtains, trousers, skirts, etc. Place the...
Instruction Manual - Page 50
... button.
General Purpose Foot :Thread tension control - Place the fabric right side up so that the zigzag part of the stitch sews just over top of the fabric and tie together.
50
SEWING ON A BUTTON
SETTINGS :Presser foot - Turn the handwheel to make sure needle clears both threads to the backside of it...
Instruction Manual - Page 54
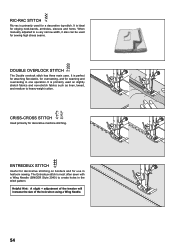
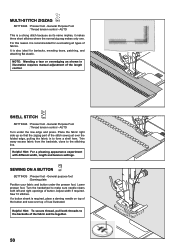
... to a very narrow width, it also can be used for a decorative top-stitch. The Entredeux stitch is primarily used on borders and for decorative machine stitching. RIC-RAC STITCH
Ric-rac is primarily used for sewing high stress seams.
DOUBLE OVERLOCK STITCH
The Double overlock stitch has three main uses. It is most often sewn with a Wing Needle...
Instruction Manual - Page 62
... :Thread tension control -
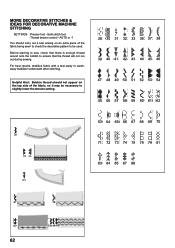
For best results, stabilize fabric with a tear-away or washaway stabilizer underneath when stitching. MORE DECORATIVE STITCHES & IDEAS FOR DECORATIVE MACHINE STITCHING
SETTINGS :Presser foot - Helpful Hint: Bobbin thread should carry out a test sewing on the top side of the fabric being sewn to check the decorative pattern to be necessary to...
Instruction Manual - Page 66
...
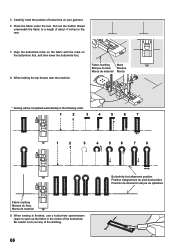
Fabric marking Marque du tissu Marca de material 9.
Fabric marking Marque du tissu Marca de material
Mark Marque Marca
* Sewing will be completed automatically in the center of the stitching.
66
Buttonhole foot alignment position Position d'alignement du pied boutonnière Posición de alineación del pie ... buttonhole. While holding the top thread, start the machine.
Instruction Manual - Page 68
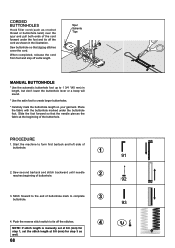
... buttonholes.
* Carefully mark the buttonhole length on your garment. Sew second bartack and stitch backward until needle reaches beginning of buttonhole mark to complete buttonhole.
3
4.
Slide the foot forward so that zigzag stitches cover the cord. Start the machine to tie off the stitches.
4
NOTE: If stitch length is manually set at 0.8 (mm) for step 3 as...
Instruction Manual - Page 70
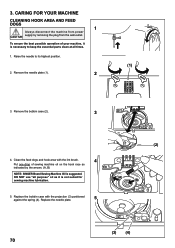
...removing the plug from power CAUTION supply by the arrows. (A, B)
NOTE: SINGER Brand Sewing Machine Oil is suggested. Clean the feed dogs and hook area with the projection (3) positioned ...against the spring (4). Replace the bobbin case with the lint brush.
4
Put one drop of your machine, it is necessary to its highest position. 2. Replace the needle plate.
5
(2)
(A) (B)
(3) ...
Instruction Manual - Page 72
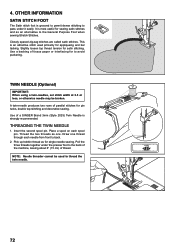
....
72 THREADING THE TWIN NEEDLE
1. Thread the two threads as an alternative to the back of the machine, leaving about 6" (15 cm) of tissue paper or interfacing for pin tucks, double top stitching and decorative sewing. Pull the three threads together under it easily. Insert the second spool pin.
NOTE: Needle threader cannot...
Instruction Manual - Page 80
... thread tension is too loose (see page 26 - 27). * Needle size is not raised when sewing stitch patterns.
- Raise buttonhole lever. * Buttonhole lever is caught in bobbin case or hook. - Machine jams/knocks. * Thread is not lowered when sewing buttonhole.
-
Draw both threads back under presser
foot before starting seam. - Adjust thread tension (see...
Instruction Manual - Page 84
... 8. Special care is for guidance. "Do not pull or push fabric while stitching. Moving parts-To machine."
This appliance complies with same type rated DC 6.5 V 2.8 Watts." "IMPORTANT ...SINGER is not working properly, if it is a registered trademark of electric shock, this sewing machine only for examination, repair, electrical or mechanical adjustment." 4. "Read all moving parts....
Similar Questions


I Get E7 Error Message On My Singer Model 7258 Sewing Machine. There Is No Refe
Error message E7 is up on my Singer Stylist model 7258 sewing machine. It is not working at all. I t...
Error message E7 is up on my Singer Stylist model 7258 sewing machine. It is not working at all. I t...
(Posted by ebellamybellamy9 5 years ago)

Beeping From Singer Sewing Machine Stylist Ii 5625
My sewing machine will beep and stop sewing after three inches of sewing. I have taken it to be repa...
My sewing machine will beep and stop sewing after three inches of sewing. I have taken it to be repa...
(Posted by arusheria 9 years ago)

I Need An Extnesion Table For My Sewing Machine Singer 7258 Stylist
(Posted by loucksd 10 years ago)
