Singer 5625 Stylist II Sewing Machine Support Question
Singer 5625 Stylist II Sewing Machine Support Question
Find answers below for this question about Singer 5625 Stylist II Sewing Machine.Need a Singer 5625 Stylist II Sewing Machine manual? We have 1 online manual for this item!
Question posted by pfish42 on December 6th, 2021
Model 5625 Lcd Screen Lights But No Words
is there a brightness control or is the screen bad
Current Answers
Answer #1: Posted by Technoprince123 on December 6th, 2021 11:39 PM
Technoprince123

Member since:
February 8th, 2021 Points: 1,205,190

Member since:
February 8th, 2021 Points: 1,205,190
Please response if this answer is acceptable and solw your problem thanks
Answer #2: Posted by SonuKumar on December 7th, 2021 3:47 AM
SonuKumar

Member since:
May 9th, 2021 Points: 16,609,790
Member since:
May 9th, 2021 Points: 16,609,790
https://www.manualslib.com/manual/780722/Singer-Stylist-Ii-5625.html?page=2#manual
How do I reset my singer stylist?
NOTE: To set the needle at the highest position, turn the hand wheel TOWARDS you, until the needle moves to the highest position. Finally, push the reverse button a couple of times, this will reset the machine.
try reset, mostly it should be fixed, if not then it has to repaired
Please respond to my effort to provide you with the best possible solution by using the "Acceptable Solution" and/or the "Helpful" buttons when the answer has proven to be helpful.
Regards,
Sonu
Your search handyman for all e-support needs!!
Related Singer 5625 Stylist II Sewing Machine Manual Pages
Instruction Manual - Page 2
... ).
reduce
risk
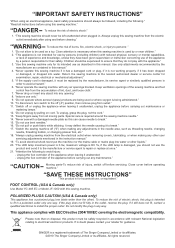
of the sewing machine and foot control free from outlet." 11.
If in the outlet, reverse the plug.
Keep ventilation openings of
injury,
switch
off ("0") when making any air openings blocked. "Do not pull or push fabric while stitching. FOOT CONTROL (USA & Canada only)
Use Model YC-485 EC or Model JF-1000 with...
Instruction Manual - Page 5
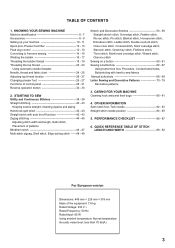
... panel 28 - 31 Reverse operation button 32 - 33
2. KNOWING YOUR SEWING MACHINE Machine identification 6 - 7 Accessories 8 - 9 Setting up your machine 10 - 11 Spool pins, Presser foot lifter 12 - 13 Feed dog control 12 - 13 Converting to -sew fabrics Manual buttonhole 68 - 69 Letter Sewing and Decorative Patterns 70 - 79 Decorative patterns
3. OTHER INFORMATION Satin stitch foot, Twin...
Instruction Manual - Page 8

.... 1. Thread cutter/holder 7. Reverse stitch button 11. Cord socket 16. Buttonhole lever 20. Foot release button 28. Power/light switch 15. Needle 24. Feed dogs 31. KNOWING YOUR SEWING MACHINE
MACHINE IDENTIFICATION
1. Handle 13. General purpose foot 30. Bobbin winder stop 10. Needle bar 26. Thread tension control 4. Thread guide 22. Needle clamp screw 29.
Instruction Manual - Page 10

.... Gathering foot 24. ACCESSORIES
1. Pintuck foot 25. Spool pin cap (large) 8. Open toe foot 27. Spool pin cap (small) 7. Screwdriver for the majority of your Sewing machine is another very useful foot and should be sure they are Class I5 J.
1
2
3
4
5
6
7
8
9
10
11
12
13
14
15
OPTIONAL ACCESSORIES
16. Spool pin felt...
Instruction Manual - Page 12
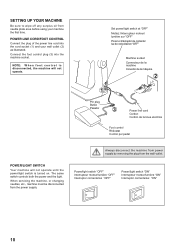
...
3
Power line cord
Cordon
Cordón de la linea eléctrica
Foot control Rhéostat Control por pedal
POWER/LIGHT SWITCH
Your machine will not operate.
Power/light switch "OFF" Interrupteur moteur/lumière "OFF" Interruptor corriente/luz "OFF"
Power/light switch "ON" Interrupteur moteur/lumière "ON" Interruptor corriente/luz "ON...
Instruction Manual - Page 14
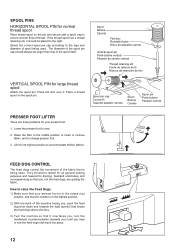
...diameter of the spool itself. FEED DOG CONTROL
The feed dogs control the movement of the fabric that is in the highest position.
2) With the back of the machine facing you, push the feed dog lever ... all general sewing purposes and lowered for your presser foot is in the raised (up) position, and that the needle is being used.
Place felt disc over it should be placed to sew.
2. Lower...
Instruction Manual - Page 16

... the extension table in position, it clicks. With the extension table removed the machine converts into place until it provides a large working surface as a standard flat-bed model. CONVERTING TO FREE-ARM SEWING
Your machine can be used either as a flat-bed or as shown. To remove the extension table, hold it firmly with...
Instruction Manual - Page 26
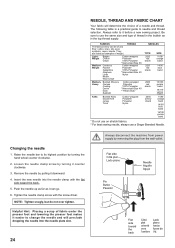
...Insert the new needle into the needle plate slot.
24
Always disconnect the machine from power supply by turning it easier to change the needle and will ...lowering the presser foot makes it counter clockwise.
3. The following table is a practical guide to it before a new sewing project. They are listed as examples of a needle and thread. Loosen the needle clamp screw by removing the plug...
Instruction Manual - Page 28
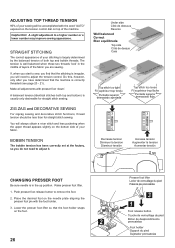
...so you have determined that the foot holder snaps
on the bottom side of the machine. Under side Côté de dessous Reverso
Well balanced Correct Bien equilibrada
Top ... for straight stitch sewing. ZIG ZAG and DECORATIVE SEWING
For zigzag sewing and decorative stitch functions, thread tension should be accomplished with the word "AUTO" exposed on the tension control dial on the needle...
Instruction Manual - Page 30
...sew repeatedly.
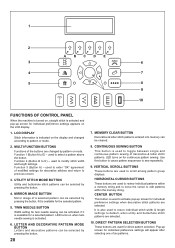
9. CONTINUOUS SEWING BUTTON
This button is activated.
6. Use this button to cause pattern sequences to edit patterns within the memory string. 1
2
A BC DE
3
6
4
7
5
8
9
10
FUNCTIONS OF CONTROL PANEL
When the machine...SELECTION BUTTONS
These buttons are used to pattern or mode.
2. LCD DISPLAY
Stitch information is used for individual preference settings will appear...
Instruction Manual - Page 32
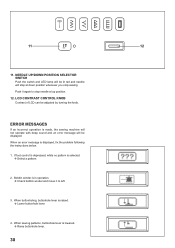
... stop sewing. LCD CONTRAST CONTROL KNOB
Contrast of LCD can be displayed. When an error message is lowered. Raise buttonhole lever.
30 Bobbin winder is made, the sewing machine will ...left.
3. When buttonholing, buttonhole lever is selected. Select a pattern.
2. If foot control is depressed, while no pattern is raised. Lower buttonhole lever.
4.
11
12
11. ...
Instruction Manual - Page 34

... at the start and end of other stitches ( ) The sewing machine makes 4 tiny tacking stitches to avoid raveling at the exact spot in the pattern where the reverse/tacking stitch button is pushed. The position of the tacking stitches will continue to sew in reverse as long as the reverse button is pressed...
Instruction Manual - Page 36
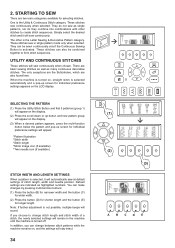
... the machine until the machine is turned on the LCD display. SELECTING THE PATTERN
(1) Press the Utility Stitch Button and first 5 patterns (group 1) will appear on the display.
(2) Press the scroll down or up screen for longer length. These stitches sew continuously when selected. If you can be combined together to change between stitch patterns...
Instruction Manual - Page 38
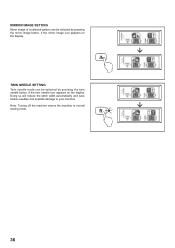
Note: Turning off the machine returns the machine to your machine. TWIN NEEDLE SETTING
Twin needle mode can be selected by pressing the mirror image button, if the mirror image icon appears on the display. Doing so will reduce the stitch width automatically and save broken needles and possible damage to normal sewing mode.
...
Instruction Manual - Page 42
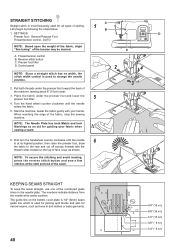
... of the fabric, slight "fine tuning" of the fabric, stop the sewing machine.
Control panel
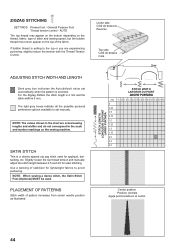
NOTE: Since a straight stitch has no width, the stitch width control is used to the rear and cut off excess threads with your fabric when sewing a seam.
6. Start the machine.
Let's begin by following the steps below.
1
B
1. General Purpose Foot
Thread...
Instruction Manual - Page 44
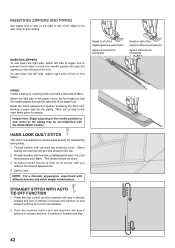
... opening on the left side of the foot. Then, pin or tack to sew.
Start to the main fabric piece for sewing. Needle to left of the zipper or to sew close to the cording. Press the foot control and the machine will sew 4 stitches forward and then 4 stitches in forward and stop.
42
Increase thread...
Instruction Manual - Page 46
...a backing of stabilizer for appliqué, bartacking, etc.
The light grey boxes indicate all the possible personal preference options available to avoid... are experiencing puckering, slightly reduce the tension with the Thread Tension Control. Slightly loosen the top thread tension and manually adjust the stitch ...sewing speed, but the bobbin thread must never appear on the sewing machine.
Instruction Manual - Page 64

... into the buttonhole foot. (Refer to "Changing presser foot" on a scrap of buttonhole required. Select one of the garment where buttonholes are using. SEWING A BUTTONHOLE USING BUTTONHOLE FOOT
Your machine offers you are placed.
Stabilizer or regular interfacing can be used.
* Make a practice buttonhole on page 26 - 27.)
3. Lower the buttonhole lever...
Instruction Manual - Page 66
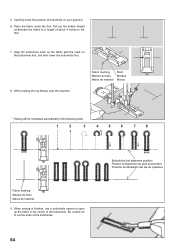
... the buttonhole foot.
8. While holding the top thread, start the machine. Be careful not to the rear.
7. Align the buttonhole mark on the fabric with the mark on your garment.
6. Fabric marking Marque du tissu Marca de material
mark Marque Marca
* Sewing will be completed automatically in the center of the buttonhole...
Instruction Manual - Page 70
...foot Pied boutonnière Prensatelas de ojales
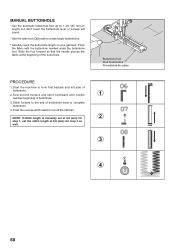
PROCEDURE
1. Start the machine to form first bartack and left side of buttonhole mark to the ... will sound.
* Use the satin foot (Optional) to tie off the stitches. Stitch forward to complete buttonhole.
4. Sew second bartack and stitch backward until needle
1
reaches beginning of the buttonhole. NOTE: If stitch length is manually set the...
Similar Questions

The Lcd Screen Is Very Dim.
The screen still works, but it is so dim that I can barely read it. The backlighting seems to be bri...
The screen still works, but it is so dim that I can barely read it. The backlighting seems to be bri...
(Posted by brenthenry1991 2 years ago)

How Can I Find How To Buy A Satin Stitch Foot For A Singer Stylus 11 5625?
I'm trying to find a satin stitch foot for singer model # 5625
I'm trying to find a satin stitch foot for singer model # 5625
(Posted by hhobbs 9 years ago)

Beeping From Singer Sewing Machine Stylist Ii 5625
My sewing machine will beep and stop sewing after three inches of sewing. I have taken it to be repa...
My sewing machine will beep and stop sewing after three inches of sewing. I have taken it to be repa...
(Posted by arusheria 9 years ago)

Lcd Screen
I cannot get my LCD screen to change the stitch pattern. It will not do anything With the screen but...
I cannot get my LCD screen to change the stitch pattern. It will not do anything With the screen but...
(Posted by Shanncantwell09 10 years ago)
