Singer 5511 SCHOLASTIC Support Question
Singer 5511 SCHOLASTIC Support Question
Find answers below for this question about Singer 5511 SCHOLASTIC.Need a Singer 5511 SCHOLASTIC manual? We have 1 online manual for this item!
Question posted by waya on July 3rd, 2013
Stitch Names
where can I find a list of what the different stitches are and their uses that are on the dial of the machine?
Current Answers
Related Singer 5511 SCHOLASTIC Manual Pages
Instruction Manual - Page 2
... near children. 2.
Never operate the appliance with
same type rated 15 watts (110-120V area / 220-240V area). Do not pull or push fabric while stitching. Always unplug sewing machine from the electric outlet immediately
after using and before changing the light bulb. Never place anything on cord. EN IMPORTANT SAFETY INSTRUCTIONS
When...
Instruction Manual - Page 6
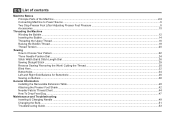
... Foot Pressure 8 Accessories ...10
Threading the Machine Winding the Bobbin ...12 Inserting the Bobbin ...14 Threading the Upper Thread ...16 Raising the Bobbin Thread ...18 Thread Tension...20
Sewing How to Choose Your Pattern ...22 Three Needle Position Dial...24 Stitch Width Dial & Stitch Length Dial ...26 Sewing Straight Stitch ...28 Reverse Sewing/ Removing the Work/ Cutting the Thread 30...
Instruction Manual - Page 9
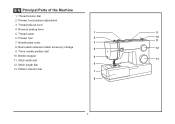
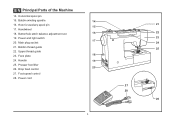
Thread tension dial
2. Reverse sewing lever
5. Bobbin stopper
5
11. Pattern selector dial 7
8
2 Removable extension table/ accessory storage
4
12
9. Stitch length dial
6
13. Three needle position dial
10. Presser foot
2
10
11
7. Stitch width dial
13
12. Needle plate cover
3
8. EN Principal Parts of the Machine
1. Presser foot pressure adjustment
3. Thread ...
Instruction Manual - Page 11
Bobbin thread guide
22. Face plate
18
24. Foot speed control 28. Buttonhole stitch balance adjustment slot
16
19. EN Principal Parts of the Machine
14. Horizontal spool pin
15. Bobbin winding spindle
14
16. Power and light switch 17
20. Upper thread guide
23. Presser foot lifter 20
26. ...
Instruction Manual - Page 13
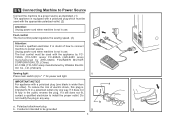
... the other). To reduce the risk of how to connect machine to fit in a polarized outlet only one blade is not in the outlet, reverse the plug. If it does not fit fully in use .
Foot control The foot control pedal regulates the sewing speed. (3)
Attention: Consult a qualified electrician if in any way...
Instruction Manual - Page 15
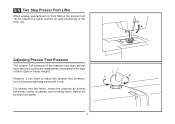
... of the work. (A)
A
Adjusting Presser Foot Pressure
The presser foot pressure of the machine has been pre-set and requires no particular readjustment according to adjust the presser foot pressure, turn the presser adjusting screw with a coin. For sewing very thin fabric, loosen the pressure by turning it clockwise.
8 However, if you...
Instruction Manual - Page 17
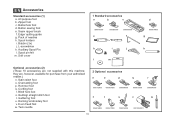
All purpose foot b. Button sewing foot e. Edge/ quilting guide g. Spool pin felt m. Soft cover
1 Standard accessories
a
b
c
006918008
e
006905008... f. L-screwdriver k. Satin stitch foot o. Pack of needles h. Overcasting foot p. Cording foot r. Quilting/ straight stitch foot t. Spool holders i. Bobbin (3x) j. they are not supplied with this machine; Gathering foot u. Hemmer ...
Instruction Manual - Page 19

Push bobbin spindle to left
(sewing position).
4
3
5
6
7
8
9
10
12 To start sewing, push the bobbin winder spindle to spool pin. (1/2)
- Place thread and corresponding spool holder on foot control pedal... and place on spindle. (5)
-
Please Note:
When the bobbin winder spindle is in "bobbin winding"
position, the machine will not sew and the handwheel turn.
Instruction Manual - Page 27
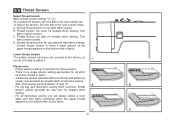
... fabric puckering when the upper thread
appears on the bottom side of your fabric. C
D
20
Turn
dial to higher number. To reduce the tension, turn the dial to the next number up.
For zig zag and decorative sewing stitch functions, thread
tension should generally be between "3" and "5". EN Thread Tension
Upper thread tension Basic...
Instruction Manual - Page 29
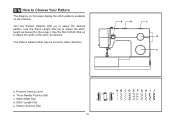
... be turned in either direction.
Three Needle Position Dial c. Pattern Selector Dial
ABCDE FGH I J
3
4
2
1
22 Stitch Length Dial e.
Reverse Sewing Lever b. Turn the Pattern Selector Dial (e) to Choose Your Pattern
The diagram on this page display the stitch patterns available on the machine. Stitch Width Dial d.
Use the Stitch Length Dial (d) to adjust the width of the...
Instruction Manual - Page 31
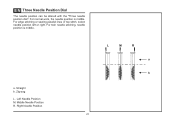
... work, the needle position is middle. a. Middle Needle Position R. Right Needle Position
24
L
M
R
a b EN Three Needle Position Dial
The needle position can be altered with the "Three needle position dial".
Straight b. Left Needle Position M. Zig-zag L. For edge stitching or sewing parallel lines of top stitch, select needle position left or right. For twin needle...
Instruction Manual - Page 33

...lighter weight fabrics or when using a thicker needle or thread. EN Stitch Width Dial & Stitch Length Dial
Function of stitch width dial The maximum zigzag stitch width for when straight stitching
For straight stitch sewing, turn the Pattern Selector Dial to zig-zag. The density of zig-zag stitches increase as the dial
approached "0". Turn the Stitch Length Dial, and the
length of the...
Instruction Manual - Page 35

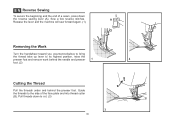
EN Sewing Straight Stitch
To begin sewing, set the machine for straight stitch. (1) Place the fabric under the presser foot with the fabric edge lined up with the desired seam guide line on the needle plate. (2) Lower the presser foot lifter, and then step on the foot controller to start sewing. (3)
1
2
3
28
Instruction Manual - Page 37
Sew a few reverse stitches. Pull threads down
the reverse sewing lever (A). EN Reverse Sewing
To secure the beginning and the end of a seam, press down to the side of the face plate and into thread cutter (B). Guide the threads to cut. (3)
30
B 3
A
Release the lever and the machine will sew forward again. (1)
Removing the Work
Turn the...
Instruction Manual - Page 39

... for lighter weight
fabrics, and a wider stitch is completed and press.
2 Note: To make sure the machine settings are normally sewn
with a longer stitch length setting.
Blind hem for firm fabrics....page. Set the Stitch Width Dial at the right.
Blind Hem:
Turn up the hem to catch one or two fabric threads. (2)
Unfold the fabric when hemming is used for the weight/type...
Instruction Manual - Page 41
..., so that marking on the buttonhole foot aligns with the Pattern Selector Dial.
Use a stabilizer for stretch or knit
fabrics. Note: Density varies according to sew the buttonhole. Take care not to set stitch density. Adjust the Stitch Length Dial in the " " to sew too many stitches in steps 1 and 3. Take off the all purpose foot and attach...
Instruction Manual - Page 43
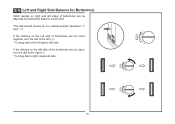
... can be in a neutral position (between "+" and "-") If the stitches on the left side of buttonhole are too open, turn the dial to the left (+). * Turning dial to right closes left side. This dial should usually be adjusted by buttonhole balance control dial. If the stitches on the left side of the buttonhole are too close...
Instruction Manual - Page 45
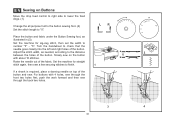
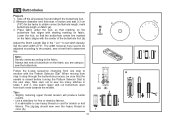
For buttons with about 10 stitches. Set the machine for straight
a
2
ba b
stitch again, then sew a few securing stitches to the distance between the holes of the button and sew. Turn the handwheel to number "3" - Slowly sew on Buttons
Move the drop feed control to right side to lower the feed dogs. (1)
Change the all purpose foot to...
Instruction Manual - Page 51
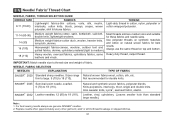
... weight of fabric. Leather, vinyl, upholstery. (Leaves smaller hole than standard large needle.)
Note : 1.
For best sewing results always use the same thread on natural woven fabrics for best
Heavyweight fabrics-canvas, woolens, outdoor tent and quilted fabrics, denims, ...Replace needle often (approximately every other garment ) and/ or at first thread breakage or skipped stitches.
44
Instruction Manual - Page 60
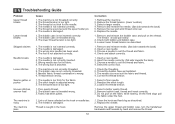
... has been used. 4. The needle is threaded wrong. 3. Reduce the thread tension. (lower number) 3. Replace the needle.
1. Correct the thread tension.
1. Lint or oil have collected on the thread. Thread the bobbin case as illustrated. 3. The machine is not threaded correctly. 2. Readjust the stitch length. 3. Do not pull on the fabric while sewing, let...
Similar Questions

Needle Won't Go All The Way Up In Slot After Replacing It.
(Posted by lgardner064 10 months ago)

Jammed Sewing Machine
How can i unjam my machine the manual wheel will not turn foward or backward
How can i unjam my machine the manual wheel will not turn foward or backward
(Posted by msdebra3 4 years ago)
I Get E7 Error Message On My Singer Model 7258 Sewing Machine. There Is No Refe
Error message E7 is up on my Singer Stylist model 7258 sewing machine. It is not working at all. I t...
Error message E7 is up on my Singer Stylist model 7258 sewing machine. It is not working at all. I t...
(Posted by ebellamybellamy9 5 years ago)

Beeping From Singer Sewing Machine Stylist Ii 5625
My sewing machine will beep and stop sewing after three inches of sewing. I have taken it to be repa...
My sewing machine will beep and stop sewing after three inches of sewing. I have taken it to be repa...
(Posted by arusheria 9 years ago)

How To Thread The Serger On A 5511
Singer Sewing Machine
cannot find information on how to thread the serger that ispart of the sewing machine
cannot find information on how to thread the serger that ispart of the sewing machine
(Posted by Anonymous-93910 11 years ago)