
Singer 4411 Heavy Duty Support Question
Singer 4411 Heavy Duty Support Question
Find answers below for this question about Singer 4411 Heavy Duty.Need a Singer 4411 Heavy Duty manual? We have 1 online manual for this item!
Question posted by sdr1088 on January 22nd, 2014
The Steam Holes Are Putting Out Brownish Steam And Staining (steam Press)
The person who posted this question about this Singer product did not include a detailed explanation. Please use the "Request More Information" button to the right if more details would help you to answer this question.
Current Answers


Related Singer 4411 Heavy Duty Manual Pages
Instruction Manual - Page 2
... this manual. 3. Do not allow to break. 9. Switch the sewing machine off the machine or unplug when the machine is intended for use as threading needle, changing needle, threading bobbin... any other user servicing adjustments mentioned in this appliance from accumulation of the sewing machine and foot controller free from the electric outlet immediately
after using this appliance...
Instruction Manual - Page 6
... 8 Accessories ...10
Threading the Machine Winding the Bobbin ...12 Inserting the Bobbin ...14 Threading the Upper Thread ...16 Raising the Bobbin Thread ...18 Thread Tension...20
Sewing How to Choose Your Pattern ...22...Hem ...32 Buttonholes ...34 Left and Right Side Balance for Buttonhole ...36 Sewing on Buttons ...38
General Information Installing the Removable Extension Table...40 Attaching the...
Instruction Manual - Page 9
...
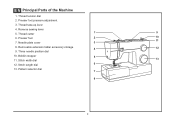
2. Presser foot
2
10
11
7. Needle plate cover
3
8. Stitch width dial
13
12. Stitch length dial
6
13. Presser foot pressure adjustment
3. Thread take-up lever
4. Reverse sewing lever
5. Removable extension table/ accessory storage
4
12
9. EN Principal Parts of the Machine
1. Three needle position dial
10. Bobbin stopper
5
11.
Instruction Manual - Page 11
... slot
16
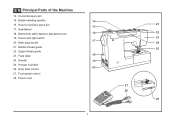
19. Bobbin thread guide
22. Bobbin winding spindle
14
16. Drop feed control
27. Foot speed control 28. EN Principal Parts of the Machine
14. Handwheel
18. Horizontal spool pin
15. Power and light switch 17
20. Upper thread guide
23. Face plate
18
24. Handle
19
25...
Instruction Manual - Page 13
... electrician to install the proper outlet.
Co., Ltd. (Vietnam)
Sewing light
1
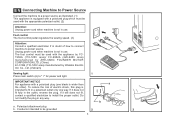
Press main switch (A) to be used with the appropriate polarized outlet. (2)
Attention: Unplug power cord when machine is not in the outlet, reverse the plug. a b
a. EN Connecting Machine to Power Source
Connect the machine to a power source as illustrated. (1) This appliance is equipped with...
Instruction Manual - Page 15
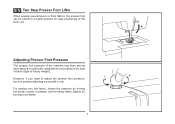
... pressure of fabric (light-or-heavy weight). However, if you need to the type of the machine has been pre-set and requires no particular readjustment according to adjust the presser foot pressure, turn the presser adjusting screw with a coin. EN Two Step Presser Foot Lifter
When sewing several layers or thick fabrics...
Instruction Manual - Page 17
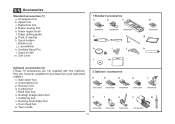
Button sewing foot e. Bobbin (3x) j. Spool pin felt m. Zipper foot c. Seam ripper/ brush f. Spool holders i. L-...006016008
0061850081
10 Buttonhole foot d. Hemmer foot q. Quilting/ straight stitch foot t. they are not supplied with this machine; Satin stitch foot o. Edge/ quilting guide g. Gathering foot u. All purpose foot b. Overcasting foot p. EN ...
Instruction Manual - Page 19
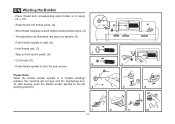
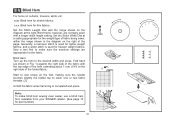
... the bobbin winder spindle is in "bobbin winding"
position, the machine will not sew and the handwheel turn.
Wind thread clockwise around bobbin winder tension discs. (4)
- Hold thread end.... (7) 1
- To start sewing, push the bobbin winder spindle to left
(sewing position).
4
3
5
6
7
8
9
10
12 Thread bobbin as illustrated and...
Instruction Manual - Page 23
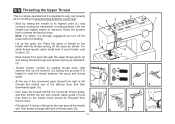
... needle to its highest point (1), and continue turning the handwheel counterclockwise until the needle just slightly begins to descend. Start by not doing so several sewing problems could result.
- For small thread spools, place small side of thread to spool. (2)
- Thread tension module by leading thread down to the needle which...
Instruction Manual - Page 25
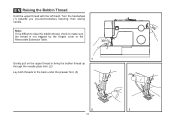
... by the hinged cover or the Removable Extension Table.
1 Gently pull on the upper thread to bring the bobbin thread up through the needle plate hole. (2) Lay both threads to the back under the presser foot. (3)
2
3
18 EN Raising the Bobbin Thread
Hold the upper thread with the left hand...
Instruction Manual - Page 27
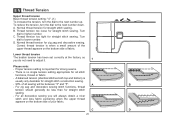
... the tension, turn the dial to the next number down. Turn
dial to higher number.
Turn
dial to lower number. For zig zag and decorative sewing stitch functions, thread
tension should generally be between "3" and "5". A balanced tension (identical stitches both top and bottom) is when a small amount of the upper thread...
Instruction Manual - Page 29
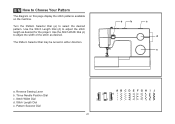
Reverse Sewing Lever b. Pattern Selector Dial
ABCDE FGH I J
3
4
2
1
22 Turn the Pattern Selector Dial (e) to adjust the width of the stitch as desired for the project. Use ... Dial c.
Stitch Length Dial e. Use the Stitch Length Dial (d) to Choose Your Pattern
The diagram on this page display the stitch patterns available on the machine.
Instruction Manual - Page 31
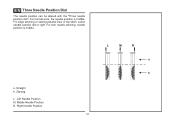
... Needle Position R. Zig-zag L. EN Three Needle Position Dial
The needle position can be altered with the "Three needle position dial". For edge stitching or sewing parallel lines of top stitch, select needle position left or right.
Instruction Manual - Page 33
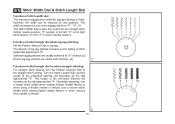
... zigzag dial from "0" - "6". (1) The Stitch Width Dial is also the control for zigzag stitching is center needle position. Generally speaking, use a longer stitch length when sewing heavier weight fabrics or when using a finer needle or thread.
2
26
4 3 2 1 0.5 EN Stitch Width Dial & Stitch Length Dial
Function of stitch width dial The maximum...
Instruction Manual - Page 35
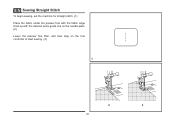
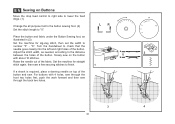
EN Sewing Straight Stitch
To begin sewing, set the machine for straight stitch. (1) Place the fabric under the presser foot with the fabric edge lined up with the desired seam guide line on the needle plate. (2) Lower the presser foot lifter, and then step on the foot controller to start sewing. (3)
1
2
3
28
Instruction Manual - Page 37
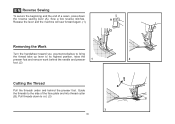
Pull threads down
the reverse sewing lever (A). Sew a few reverse stitches. A
Release the lever and the machine will sew forward again. (1)
Removing the Work
Turn the handwheel toward you (counterclockwise) to bring
the thread take up lever to the side of a seam, press down to cut. (3)
30
B 3 Guide the threads to its highest position, raise the...
Instruction Manual - Page 39
...stitch is used for lighter weight
fabrics, and a wider stitch is completed and press.
2 Note: To make sure the machine settings are normally sewn
with the range shown on the
diagram at
a setting...on the right of the folded fabric.
1
Start to sew slowly on curtains, trousers, skirts, etc. Sew a test first to make blind hem sewing even easier, use a blind hem foot, available from your...
Instruction Manual - Page 41
... are using to set stitch density. Adjust the Stitch Length Dial in steps 1 and 3. Take care not to sew too many stitches in the " " to sew the buttonhole. The zig-zag should sew over the heavy thread or cord. (A)
34
M (a) (b) Place fabric under the foot, so that the needle is advisable to the next...
Instruction Manual - Page 45
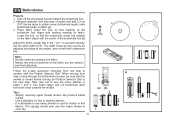
... zig-zag stitch, then set the width to number "3" - Set the machine for straight
a
2
ba b
stitch again, then sew a few securing stitches to the distance between the holes of the button. LR
Place the button and fabric under the Button Sewing foot, as needed, according to finish.
1
If a shank is required, place a darning needle...
Instruction Manual - Page 51
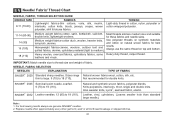
...Heavy duty thread, carpet thread. thin to large. 9 (70) to thread size and weight of fabric.
Natural and synthetic woven fabrics, polyester blends.
NEEDLE, FABRIC SELECTION
NEEDLES
EXPLANATION
TYPE OF FABRIC
SINGER® 2020 Standard sharp needles. Not recommended for these fabrics and needle sizes. For best sewing.... (Leaves smaller hole than standard large needle.)
Note : 1.
Similar Questions

No Steam.
Platen is heating OK.Water in the tank.No steam is being produced.
Platen is heating OK.Water in the tank.No steam is being produced.
(Posted by kerrj1939 7 years ago)

Hand Wheel Stuck
I have just pulled out my 2 year old singer 5500/5400 for the 4th time and the hand wheel is stuck. ...
I have just pulled out my 2 year old singer 5500/5400 for the 4th time and the hand wheel is stuck. ...
(Posted by kjlavell 9 years ago)

Esp18 Steam Press E4 Error?
I received my esp-18 yesterday and have been unable to use it. I have followed all the directions pe...
I received my esp-18 yesterday and have been unable to use it. I have followed all the directions pe...
(Posted by flamingo28816 9 years ago)

Hand Wheel Won't Turn And Makes A Loud Clicking Noise.
I just received my new singer h74 today and afete setting it up I was testing different tensions. Al...
I just received my new singer h74 today and afete setting it up I was testing different tensions. Al...
(Posted by Lbrobinson83 10 years ago)
When He Foot Pedal Is Pressed The Machine Does Not Engage
(Posted by Clydephillips 10 years ago)