
Sharp CV10NH Support Question
Sharp CV10NH Support Question
Find answers below for this question about Sharp CV10NH - 10,000 BTU Portable Air Conditioner.Need a Sharp CV10NH manual? We have 1 online manual for this item!
Question posted by wilddr on August 10th, 2013
How To Open The Sharp Cv-10nh
The person who posted this question about this Sharp product did not include a detailed explanation. Please use the "Request More Information" button to the right if more details would help you to answer this question.
Current Answers
Related Sharp CV10NH Manual Pages
CV-10NH Operation Manual - Page 3
... LIMITED WARRANTY E-3 • PRECAUTIONS E-4 • LOCATION E-7 • INCLUDED E-7 • PART NAMES E-8 • INSTALL WINDOW PANEL E-10 • INSTALLATION AND REMOVAL OF EXHAUST HOSE .........E-14 • PRE-OPERATION CHECKS E-16 • COOL MODE E-18 • DEHUMIDIFICATION MODE ... reference. ENGLISH
ENGLISH
This manual explains the proper use of your new air conditioner.
CV-10NH Operation Manual - Page 4
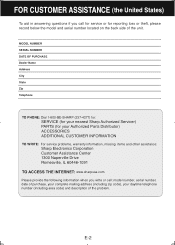
... call for service or for your Authorized Parts Distributor) ACCESSORIES ADDITIONAL CUSTOMER INFORMATION
TO WRITE: For service problems, warranty information, missing items and other assistance:
Sharp Electronics Corporation Customer Assistance Center 1300 Naperville Drive Romeoville, IL 60446-1091 TO ACCESS THE INTERNET: www.sharpusa.com
Please provide the following information when...
CV-10NH Operation Manual - Page 5
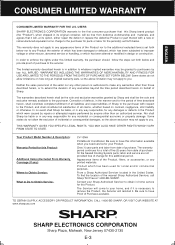
... the period(s) set forth below . Appearance items of all liabilities and responsibilities of Sharp to the Product, and shall constitute full satisfaction of the Product, filters, or ...warranty lasts, so the above exclusion may not apply to Obtain Service:
CV-10NH
Portable Air Conditioner. From a Sharp Authorized Servicer located in its option, either repair the defect or replace the...
CV-10NH Operation Manual - Page 6
... power plug functions normally.
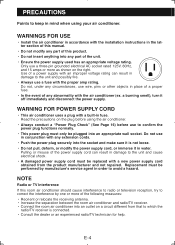
• This power plug must be replaced with the proper amp rating. WARNING FOR POWER SUPPLY CORD
• This air conditioner uses a plug with the air conditioner (ex. Read the precautions on the right.
Use of any abnormality with a built-in fuse.
a burning smell), turn it is connected. • Consult...
CV-10NH Operation Manual - Page 7
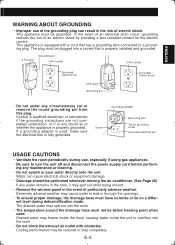
...drained water may spill out into a socket that has a grounding wire connected to leak in through the openings. • To ensure proper drainage, the drainage hose must be on a differ- This appliance is properly...fication mode. Drained water may be performed whenever moving the air conditioner. (See Page 26)
If any maintenance or cleaning. • Do not splash or pour water directly...
CV-10NH Operation Manual - Page 8
...unit.
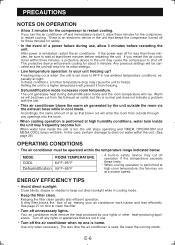
• This air conditioner blows the warm air generated by your air conditioner work harder and less ef...air, making your lights or other heat-producing appliances. When water tank inside the unit is performed at high room temperature, the fan may run at high humidity conditions, water tank inside the unit may occur when the unit is set close to restart cooling. Turn off any openings...
CV-10NH Operation Manual - Page 9
...but it should be cut down in size because the
window is too narrow for efficient air-conditioning. Do not attempt to roll the unit over objects.
• The unit must be ...
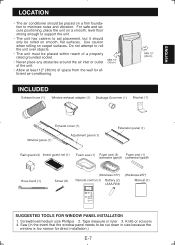
SUGGESTED TOOLS FOR WINDOW PANEL INSTALLATION 1. ENGLISH
LOCATION
• The air conditioner should only be placed within reach of a properly rated grounded socket.
• Never place any obstacles around ...
CV-10NH Operation Manual - Page 10
... signal receiver
4
window
5
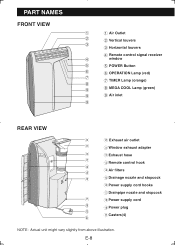
5 POWER Button
6
6 OPERATION Lamp (red)
7 7 TIMER Lamp (orange)
8
9
8 MEGA COOL Lamp (green)
9
9 Air inlet
9
REAR VIEW
0
0 Exhaust air outlet
q
q Window exhaust adapter
w
w Exhaust hose
e
e Remote control hook
r
t
r Air filters
y
t Drainage nozzle and stopcock
y Power supply cord hooks
u Drainpipe nozzle and stopcock
u
i Power supply...
CV-10NH Operation Manual - Page 12
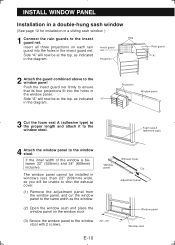
... will now be at the top, as indicated "A" in the diagram. Side "A" will be at the top, as the window.
(2) Open the window sash and place the window panel on each rain Insect guard guard into the holes in the window panel.
Foam seal A (... all three projections on the window stool
(3) Secure the window panel to the window 22"~ 24" stool with 2 screws. E-10
Cut
Window panel Window stool
CV-10NH Operation Manual - Page 13
...) and 48" (1219mm) inclusive.
(1) Attach the extension panel to the adjustment panel.
(2) Open the window sash and place the window panel on the window stool.
(2) Slide the adjustment panel...If the inner width of the window is between 24" (609mm) and 36.8" (934mm) inclusive.
(1) Open the window sash and place the window panel on the window stool.
(3) Slide the adjustment and extension panels ...
CV-10NH Operation Manual - Page 14

...seal A (adhesive type)
Cut
22"~24"
INSTALL WINDOW PANEL
Installation in a sliding sash window
(See page 10 for installation in a double-hung window.)
1 Connect the rain guards to the window panel. Insert all three ...as indicated
in the diagram. Side "A" will be at the top, as the window.
(2) Open the window sash and place the window panel on each rain guard into the holes in the ...
CV-10NH Operation Manual - Page 15

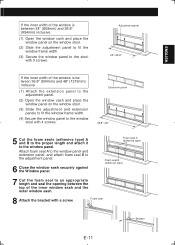
...If the inner height of the window is between 24" (609mm) and 36.8" (934mm) inclusive.
(1) Open the window sash and place the window panel on the window frame.
(3) Slide the adjustment and extension ...(934mm) and 48" (1219mm) inclusive.
(1) Attach the extension panel to the adjustment panel.
(2) Open the window sash and place the window panel on the window frame.
(2) Slide the adjustment panel to ...
CV-10NH Operation Manual - Page 16
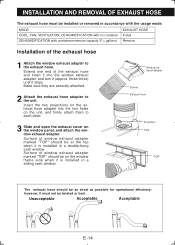
... adapter into the window exhaust adapter, and turn it stops. Surface of the exhaust hose
1 Attach the window exhaust adapter to each other.
3 Slide and open the exhaust cover on the window panel, and attach the window exhaust adapter. Unacceptable
Acceptable
Acceptable
E-14 Extend one end of window exhaust adapter marked...
CV-10NH Operation Manual - Page 18
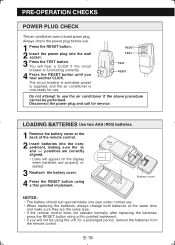
... back of the remote control.
2 Insert batteries into the wall
socket.
3 Press the TEST button. The circuit breaker is activated, power is supplied, and the air conditioner is functioning correctly.
4 Press the RESET button until you will appear on the display when batteries are the same type. • If the remote control...
CV-10NH Operation Manual - Page 21
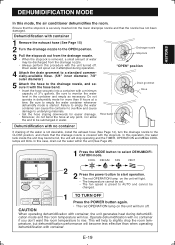
...empty the water container whenever dehumidify mode is started.
In this mode, the air conditioner dehumidifies the room.
DEHUMIDIFICATION MODE
ENGLISH
In this case, drain out...(See Page 26).
1 Press the MODE button to select DEHUMIDIFICATION mode. Drainage nozzle Stopcock
"OPEN" position
4 Attach the drain grommet to a standard commercially-available hose. (5/8" inner diameter, 7/8"...
CV-10NH Operation Manual - Page 22
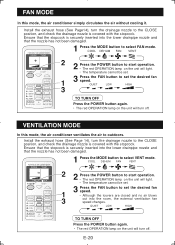
VENTILATION MODE
In this mode, the air conditioner simply circulates the air without cooling it. QUIET
LOW
HIGH
TO TURN OFF Press the POWER button again.... been damaged.
1 Press the MODE button to select FAN mode.
E-20 FAN MODE
In this mode, the air conditioner ventilates the air to outdoors. QUIET
LOW
HIGH
3
TO TURN OFF
Press the POWER button again. • The red OPERATION ...
CV-10NH Operation Manual - Page 25
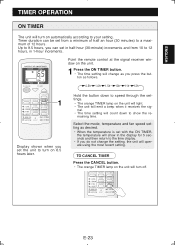
... ON TIMER button. • The time setting will change the setting, the unit will operate using the most recent setting.
Timer duration can set from 10 to speed through the settings. • The orange TIMER lamp on the unit will show the re-
CV-10NH Operation Manual - Page 26
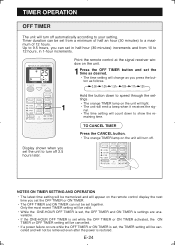
... TIMER.
• The OFF TIMER and ON TIMER can not be retrieved even after the power is set, the TIMER setting will be set from 10 to turn off 2.5 hours later. Timer duration can set together.
Only the most recent TIMER setting will be valid.
• While the ONE-HOUR OFF...
CV-10NH Operation Manual - Page 28
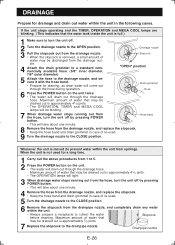
...running out from the hose, turn the unit off .
2 Turn the drainage nozzle to the OPEN position. Whenever the unit is not used for a long time.
1 Carry out the above procedures... Attach the drain grommet to a standard commercially available hose. (5/8" inner diameter, 7/8" outer diameter)
Stopcock
"OPEN" position
5 Attach the hose to the drainage nozzle, and secure it with the hose band.
•...
CV-10NH Operation Manual - Page 60

ESPAÑOL
SHARP ELECTRONICS CORPORATION
Sharp Plaza, Mahwah, New Jersey 07430-2135 U.S.A
SHARP CORPORATION
S-31
Printed in Thailand TINSEA541JBRZ 07M- TH 1
Similar Questions

How To Drain Sharp 10000 Btu Portable Air Conditioner
(Posted by jddans 9 years ago)

What Does The Open Close Valve Do On Sharp Portable Air Conditioner
(Posted by mescjsgarc 10 years ago)

Where Can I Buy The Window Panel Kit For Sharp 10,000 Btu Portable Air
conditioner
conditioner
(Posted by buEdna 10 years ago)

How To Install Sharp 10000 Btu Portable Air Conditioner #cv10ctxb
(Posted by cmarbi 10 years ago)
How To Drain Water From 10,000 Btu Sharp Portable Air Conditioner
(Posted by DBIBLEto 10 years ago)