
Sanyo DP55441 Support Question
Sanyo DP55441 Support Question
Find answers below for this question about Sanyo DP55441.Need a Sanyo DP55441 manual? We have 1 online manual for this item!
Question posted by pajohnso on July 7th, 2014
What Size Screws Are Needed For The Base Mount On A Sanyo Dp55441 Hdtv
The person who posted this question about this Sanyo product did not include a detailed explanation. Please use the "Request More Information" button to the right if more details would help you to answer this question.
Current Answers
Related Sanyo DP55441 Manual Pages
Owners Manual - Page 3

...particular, specifies that produce heat. The product should not be
mounted to an antenna discharge unit,
size of grounding conductors, location of your safety. If the ... Follow all instructions to obtain maximum benefit of antenna discharge
unit, connection to the television equipment, be maintained. Clean only with one wider than the other apparatus (including ... choosing SANYO.
Owners Manual - Page 4

... hazards. Changing Picture Settings may void the user's authority to
this television meet rigid U.L. To ensure your television is not maintained properly. HDMI, the HDMI logo and High-Definition ...the user is encouraged to try to radio or television reception, which the receiver is connected. -
"As an Energy Star® Partner, Sanyo Electric co., Ltd. Do not use excessive pressure ...
Owners Manual - Page 5

...INFORMATION 3 ENERGY STAR® USER INFORMATION.3
TRADEMARKS 3 PROTECTING THE LCD SCREEN 3 HANDLING PRECAUTIONS 3
INSTALLING AND UNINSTALLING STAND 5
INSTALLATION 6 POSITIONING THE LCD HDTV 6 WALL MOUNTING (OPTIONAL 6
GETTING STARTED 7 PReCAUTIONS 7 GETTING STARTED-CONTROLS AND JACKS 8 REMOTE CONTROL OPERATION 9 GETTING STARTED-CONNECTIONS.....10 POWER CONNECTION 11 INITIAL SETUP 11...
Owners Manual - Page 6

...stand should be installed on a flat surface place where
2 Secure the stand to the TV with 4 screws.
English
INSTALLING AND UNINSTALLING STAND
...screw driver.
3 12 4
5 The desk must be larger than the LCD Display's screen size. The display may fall, causing not only serious damage to the products but serious injury to the installer. SAFETY NOTE
For correct installing, mounting...
Owners Manual - Page 7

... shall be able to a wall mounting kit. Wall Mounting kit is not supplied. 2.
NOTE: 1. VESA standard interface: TV 200 x 400mm
Wall Mounting Inserts
Mounting screws measurements: 55" TV M8 Diameter, Length - 13mm (min.); 16mm (max.)
Wall
• (60mm)
6
English
INSTALLATION POSITIONING THE LCD HDTV
Always use a firm-flat surface when positioning your HDTV to secure it to sustain...
Owners Manual - Page 8

....
Digital and Analog off -air signals. ANTENNA
OR
ANALOG/DIGITAL ANTENNA IN
CABLE
THE TUNER IN THIS HDTV CAN RECEIVE:
a. Match the "+" and "-" signs on -screen MENU to moisture or heat such as sunshine. (the size of battery is AAA). Please recycle used up batteries.
2 Antenna Connection for Clear QAM Cable channels...
Owners Manual - Page 9

...-SIDE PANEL
Y
PC INPUT
PC AUDIO
INPUT
Pb
Pr
Pb
L
Pr
R
L
R
DEO3 INPUT V DEO2 INPUT
Y/VIDEO
DV
L
INPUT1
INPUT2
ANT R
COMPOSITE VIDEO INPUT VIDEO1, PAGE 10 -
ANALOG / DIGITAL ANTENNA INPUT, PAGE 7 - A digital AV interface that accepts uncompressed video signals for updating the television's firmware and accessing JPEG files.
8
STEREO AUDIO OUT (L/R) JACKS...
Owners Manual - Page 10

... button to execute Channel Scan after RESET. If you execute RESET function, the TV will need to select digital channel. SLEEP Button- NOTE : The Off Timer will be canceled when the...the menu.
1-- Numeric Buttons-
Press to select digital channel D6.
Press these buttons to display on your HDTV screen.( only for digital channels).
Button - GUIDE Button-
Channel Up / Down (CH+ / - )...
Owners Manual - Page 11

... like VIDEO1 (Shared with older analog devices such as a VCR. (Cables are included on your HDTV to provide continued compatibility with Component-Y).
• You may follow the VIDEO2 OPERATION to choose suitable ...set Green, Blue, and Red video jacks asVIDEO2 or VIDEO3(YPbPr) on the HDTV andto your analog AV equipment as VIDEO2 or VIDEO3(YPbPr). NOTES:
• The VIDEO2 with Component-Y)....
Owners Manual - Page 13

...interface that accepts uncompressed video signals for the best picture quality possible. BACK-SIDE VIEW OF HDTV
DIGITAL AUDIO 1 Connect the Digital Audio output to a
multichannel receiver as shown.
NOTE:... and allows transmission of a Digital input on the screen.
BACK-SIDE VIEW OF HDTV
(Coaxial) DIGITAL AUDIO CABLE (Not supplied)
MULTICHANNEL RECEIVER
AUDIO OUT JACKS 1 Connect...
Owners Manual - Page 14

... on the remote
control to exit the current menu.
V-Position- Move the image vertically.
1 Use the CURSOR ▲and ▼ buttons on the HDTV and tighten the screws. (Monitor Cable not supplied).
2 Insert one end of a Stereo Mini-Audio cable into the PC Audio Out jack and the other end into the...
Owners Manual - Page 18

...and ► buttons to highlight
V-Chip. If the password is correct, it
will need to highlight PARENT menu. If the password is wrong, you can enter the password again...OPERATION (CONTINUED)
English
PARENT ADJUSTMENT
This SANYO television is equipped with an electronic V-Chip to highlight Change Password. When these codes are detected, the HDTV will appear in turn. V-Chip ...
Owners Manual - Page 19

... want to PARENT menu.
An advanced V-Chip ratings system for digital channels that it is correct, it will appear in the squared region). When the HDTV detects compatible RRT5 data, it will appear in memory and the menu is wrong, you want to adjust and press the OK button. (A yellow lock...
Owners Manual - Page 22

... 50.
Press the OK button.
4 Use the CURSOR ▲ and ▼ buttons to select
Backlight. Divided into three categories. NOTE:
• This item will not need noise reduction. Press the OK button. Press the OK button.
3 Use the CURSOR ▲ and ▼ buttons to select Off,
Weak, Medium or Strong.
Press...
Owners Manual - Page 24

...and ▼ buttons to highlight
Power Saving. Automatic power saving, when no TV signal input display on your panel.
1 Press the MENU button on the remote control to display the Main menu.
2 Use the CURSOR &#... choice of setting the desired caption type to be displayed with Digital TV signal programs on your HDTV.
1 Press the MENU button on the remote control to display the Main menu.
2 Use ...
Owners Manual - Page 25

... OPERATION
Reset System- Reset the previous adjustment settings under the CC Style Setting for your HDTV memory.
1 Use the CURSOR ◄ and ► buttons to close the ON-...Display / Muted=On / Off
CC Priority
Automatic / Analog CC / Digital CC
Digital CC Preset
Default / Custom
Font Size
Standard / Large / Small
Font Color
White / Red / Green / Blue / Yellow / Magenta / Cyan / Black...
Owners Manual - Page 26
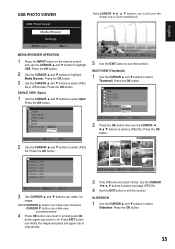
... to select JPEG
file or JPEG folder. Press the OK button.
2 Press the OK button then use the CURSOR ▲ and ▼ buttons to original size.
3 If the JPEG file more than 15 files. Press EXIT button can minify the image and press exit again can zoom in x2 and press...
Owners Manual - Page 29

...one or more possible solutions. Problems / Solutions
If you are having problems with your HDTV, please visit our website at http://www.sanyoctv.com or call us toll free at ...8226; Replace batteries. • Aim remote control at 1-800877-5032 We can Help! Before returning your HDTV, check this trouble shooting chart to
Closed -
Cannot display picture on a full screen
• Press ...
Owners Manual - Page 30
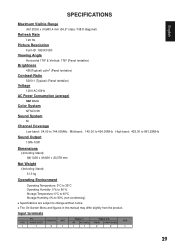
... /138.8 diagonal)
Refresh Rate
120 Hz
Picture Resolution
Full HD 1920X1080
Viewing Angle
Horizontal 178° & Vertical: 178° (Panel tentative)
Brightness
450(Typical) cd/m2 (Panel tentative)
Contrast Ratio
5000:1 (Typical) (Panel tentative)
Voltage
120V AC 60Hz
AC Power Consumption (average)
342 Watts
Color System
NTSC3.58
Sound System
M
Channel Coverage
Low...
Similar Questions

Sanyo Dp19241 Tv Base Mount Screw Size
what is the screw size for Sanyo DP19241 TV base mount
what is the screw size for Sanyo DP19241 TV base mount
(Posted by klmccarthy 3 years ago)

Screws For Base Are Lost. It Had Been Wall Mounted.
I have a 55" Sanyo DP55441 TV. I need screw size for the plastic base on bottom stand
I have a 55" Sanyo DP55441 TV. I need screw size for the plastic base on bottom stand
(Posted by whatawurld 5 years ago)

Lost Screws To Base Of Sanyo 42' Dp42840 Flat Screen
What size screws are needed to attach the DP42840 42" flat screen base to the tv? I do not want to a...
What size screws are needed to attach the DP42840 42" flat screen base to the tv? I do not want to a...
(Posted by debraymond53 8 years ago)
