
Sanyo DP55441 Support Question
Sanyo DP55441 Support Question
Find answers below for this question about Sanyo DP55441.Need a Sanyo DP55441 manual? We have 1 online manual for this item!
Question posted by hoand on July 11th, 2014
What Screws To Use To Mount A Sonyo 55 Inch Tv On Wall
The person who posted this question about this Sanyo product did not include a detailed explanation. Please use the "Request More Information" button to the right if more details would help you to answer this question.
Current Answers
Related Sanyo DP55441 Manual Pages
Owners Manual - Page 3

... MAINS plug is to be
mounted to a wall or ceiling only as to ...provide some protection against voltage surges and built up
can reduce the service life of antenna discharge
unit, connection to the television equipment, be sure the antenna system is grounded so as recommended
by the manufacturer and listed by the manufacturer.
12. If the LCD TV
is used , use...
Owners Manual - Page 4

... equipment generates, uses and can radiate radio frequency energy and, if not installed and used in a particular installation. Consult the dealer or an experienced radio/TV technician for ENERGY...equipment off and on, the user is not covered under license from that this television meet rigid U.L. TRADEMARKS
Manufactured under warranty.
CONTAINS MERCURY LAMPS, DISPOSE OF PROPERLY
3...
Owners Manual - Page 5

...INFORMATION 3 ENERGY STAR® USER INFORMATION.3
TRADEMARKS 3 PROTECTING THE LCD SCREEN 3 HANDLING PRECAUTIONS 3
INSTALLING AND UNINSTALLING STAND 5
INSTALLATION 6 POSITIONING THE LCD HDTV 6 WALL MOUNTING (OPTIONAL 6
GETTING STARTED 7 PReCAUTIONS 7 GETTING STARTED-CONTROLS AND JACKS 8 REMOTE CONTROL OPERATION 9 GETTING STARTED-CONNECTIONS.....10 POWER CONNECTION 11 INITIAL SETUP 11...
Owners Manual - Page 6

...to the products but serious injury to use a trained, authorized dealer. The display may cause damage on the screen.
• The LCD TV with soft material (such as a ...flat and level place. Installing Stand (55")
1 Place the LCD TV on it ) which is strongly recommended to a person. Failure to follow correct procedures could result in damage to the equipment or injury to the TV with screw...
Owners Manual - Page 7

... least 3 times of your HDTV. Wall Mounting kit is not supplied. 2. Do not position the unit in inches.
* Diagonal screen: 54.6 inches
WALL MOUNTING (OPTIONAL)
Use the screws that are threaded into the standmounting inserts on the back of set weight. NOTE: 1. VESA standard interface: TV 200 x 400mm
Wall Mounting Inserts
Mounting screws measurements: 55" TV M8 Diameter, Length - 13mm (min...
Owners Manual - Page 8

... batteries with marks inside the Remote Control. PReCAUTIONS
Do not use the on the batteries with different charge levels. Please recycle used up batteries.
2 Antenna Connection for Clear QAM Cable channels.... "+" and "-" signs on -screen MENU to Search for off -air signals from a direct Cable TV connection. Do not expose the Remote or batteries to HDMI or component (VIDEO3) jacks. Analog or...
Owners Manual - Page 9

.... A digital AV interface that accepts uncompressed video signals for updating the television's firmware and accessing JPEG files.
8 COMPONENT VIDEO INPUT VIDEO2 or VIDEO3...PANEL
Y
PC INPUT
PC AUDIO
INPUT
Pb
Pr
Pb
L
Pr
R
L
R
DEO3 INPUT V DEO2 INPUT
Y/VIDEO
DV
L
INPUT1
INPUT2
ANT R
COMPOSITE VIDEO INPUT VIDEO1, PAGE 10 - Standard (composite) video and audio inputs while using...
Owners Manual - Page 10

... 30 min, 60 min, 90 min, 120 min, 150 min and 180 min.
button to view: TV, VIDEO1, VIDEO2, VIDEO3, HDMI1, HDMI2, HDMI3, PC or USB Input. Press to select the source ...or restore the sound.
Channel Up / Down (CH+ / - ) Buttons- If you execute RESET function, the TV will need to display RESET menu.
English
REMOTE CONTROL OPERATION
MUTE Button- INPUT Button- CURSOR ▲ (up and down...
Owners Manual - Page 11

VIDEO1 or VIDEO2 (Shared with Green video jack, White and Red audio jacks can be used as a HD Cable Box, HD Satellite Receiver, DVD Player, and Game System. Connect an analog device such as VIDEO2 or VIDEO3(YPbPr). Match the connector ...
Owners Manual - Page 12
...SCAN
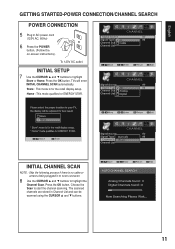
NOTE : Skip the following process if there is for ENERGY STAR. TVs will enter INITIAL CHANNEL SCAN automatically. INITIAL setup 7 Use the CURSOR ▲ and ▼ buttons to start the channel scanning.... Store : This mode is no cable or antenna being plugged-in to tuner connector.
8 Use the CURSOR ▲ and ▼ buttons to highlight the
Channel Scan. Choose the Scan to...
Owners Manual - Page 13

... possible. The signal can also include Dolby® Digital or PCM audio when available. 1 Connect the HDMI input and your external
device with this function)
1 Use an adapter (not supplied) to connect a DVI device to the PC AUDIO INPUT.
English
ADVANCED AV CONNECTIONS
ADVANCED DIGITAL SIGNAL CONNECTIONS-HDMI TO HDMI
Connect...
Owners Manual - Page 14

... in the PC menu.
PC MENU NAVIGATION MAP
PC MENU-
Phase- Press the OK button.
2 Use the CURSOR ◄ and ► buttons to exit the current menu.
Adjust the Dot frequency to...). Clock-
Move the image vertically.
1 Use the CURSOR ▲and ▼ buttons on the remote
control to the RGB connector on the HDTV and tighten the screws. (Monitor Cable not supplied).
2 Insert ...
Owners Manual - Page 15

... will not appear on the upper right of the screen.
14 English
SPORTS MODE
By simply pressing the " SPORTS" button on the remote control, the TV will automatically optimize both picture and sound settings for the programs shown.
■■ Off ■■ Football
−− For golf, football programs etc...
Owners Manual - Page 16
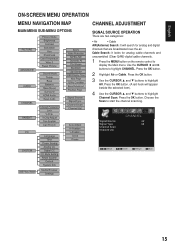
... search for analog cable channels and
unscrambled (Clear QAM) digital cable channels.
1 Press the MENU button on the remote control to
display the Main menu. Use the CURSOR ◄ and ►
buttons to highlight
Channel Scan.
Press the OK button.
2 Highlight Air or Cable. Cable Search: It looks for analog and...
Owners Manual - Page 17
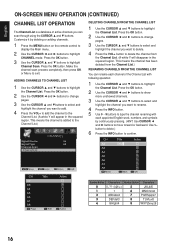
...delete the channel from the Channel List.)
RENAMING CHANNELS FROM THE CHANNEL LIST
You can scan through using the CURSOR ▲ and ▼ buttons. This means the channel has been deleted from ...Channel List. (A white Y will appear in the squared region.
ADDING CHANNELS TO CHANNEL LIST
1 Use the CURSOR ▲ and ▼ buttons to exit. Make the channel scan process completely, then...
Owners Manual - Page 18

.... (MPAA,Block All,TV-Y,TV-Y7,TV-G,TV-PG,TV-14,and TV-MA.)
5 Use the CURSOR ▲ and ▼buttons to select the options you want to assign). Use this feature to automatically block...MENU OPERATION (CONTINUED)
English
PARENT ADJUSTMENT
This SANYO television is wrong, you can enter password again or press MENU button to return to PARENT menu.
3 Use the CURSOR ▲ and ▼ buttons to...
Owners Manual - Page 19

.... This function is modified to include advanced adjustment option.
1 Press the MENU button and then use the CURSOR ◄ and ► buttons to highlight PARENT. English
ON-SCREEN MENU OPERATION (...
MPAA OPERATION
MPAA- Press the OK button.
2 Enter your password. Press the OK button.
4 Use the CURSOR ▲ and ▼ buttons to select
the setting you want to adjust. An advanced...
Owners Manual - Page 20

...SHARPNESS OPERATION
1 Press the MENU button on the remote control to display the Main menu.
2 Use the CURSOR ◄ and ► buttons to adjust the
frequency setting.
19
English COLOR TEMPERATURE...under the PICTURE mode recovered from 100Hz to 10kHz by user. Press the OK button.
3 Use the CURSOR ▲ and ▼ buttons to highlight
PICTURE. PICTURE/ AUDIO/ ADVANCED ADJUSTMENT
...
Owners Manual - Page 22

... CURSOR ◄ and ► buttons to highlight
ADVANCED. Press the OK button.
3 Use the CURSOR ▲ and ▼ buttons to select the
Dynamic AI. Press the OK button. Try having the TV setting on this function. signals usually will be boosted or reduced depending on the room brightness.
1 Press the MENU button...
Owners Manual - Page 24

... button. Choose from six types of captions for Digital TV signal for your choice of setting the desired caption type to be displayed with Analog TV signal programs on your panel.
1 Press the MENU button on the remote control to display the Main menu.
2 Use the CURSOR◄ and ► buttons to highlight
SYSTEM...
Similar Questions

Upright Tv Stand To Fit Approximately A 55 Inch Tv What Kind
(Posted by Iwblack51 9 months ago)

Sanyo 55 Inch Tv How To Turn Off Home Phone Store Settings
(Posted by prRobF 9 years ago)

What Are The Size Screws Are On The Back On A Sanyo 55 Inch Tv Dp55441
(Posted by sailavo 10 years ago)

