
Sanyo DP55441 Support Question
Sanyo DP55441 Support Question
Find answers below for this question about Sanyo DP55441.Need a Sanyo DP55441 manual? We have 1 online manual for this item!
Question posted by trejGPDHut on August 29th, 2014
Sanyo 55 Inch Lcd, How Do I Get It To Turn On On Input Hdmi1
The person who posted this question about this Sanyo product did not include a detailed explanation. Please use the "Request More Information" button to the right if more details would help you to answer this question.
Current Answers
Related Sanyo DP55441 Manual Pages
Owners Manual - Page 3

...plug. The wide blade or the third prong are provided for choosing SANYO. NATIONAL ELECTRICAL CODE
NEC ART 250, PART H)
"Note to CATV ... operable.
20. Refer all warnings. In the U.S. Install the LCD TV in the
2 If not, it can also
be placed on...MANUAL WITH THIS UNIT.
When a cart is connected to the television equipment, be
mounted to be built into your outlet, consult ...
Owners Manual - Page 4

...turning the equipment off and on, the user is Listed by Intertek Testing Services Taiwan Ltd. "As an Energy Star® Partner, Sanyo...technician for ENERGY STAR qualification. To ensure your television is not covered under license from that improper ...the unit.
TRADEMARKS
Manufactured under warranty.
PROTECTING THE LCD SCREEN
The screen can cause permanent discoloration or dark ...
Owners Manual - Page 5

...MODES 30 CONTENTS
English
IMPORTANT SAFETY INSTRUCTIONS..2
FCC INFORMATION 3 ENERGY STAR® USER INFORMATION.3
TRADEMARKS 3 PROTECTING THE LCD SCREEN 3 HANDLING PRECAUTIONS 3
INSTALLING AND UNINSTALLING STAND 5
INSTALLATION 6 POSITIONING THE LCD HDTV 6 WALL MOUNTING (OPTIONAL 6
GETTING STARTED 7 PReCAUTIONS 7 GETTING STARTED-CONTROLS AND JACKS 8 REMOTE CONTROL OPERATION 9 GETTING...
Owners Manual - Page 6

..., it is no object on a flat surface place where
2 Secure the stand to a person.
SAFETY NOTE
For correct installing, mounting and uninstalling of the LCD TV and its stand. Installing Stand (55")
1 Place the LCD TV on it. Do not handle the LCD TV by holding (moving or lifting) the LCD Display, hold the display's body...
Owners Manual - Page 7

... HDTV. Wall Mounting kit is not supplied. 2. English
INSTALLATION POSITIONING THE LCD HDTV
Always use a firm-flat surface when positioning your HDTV to secure it to a wall mounting kit. VESA standard interface: TV 200 x 400mm
Wall Mounting Inserts
Mounting screws measurements: 55" TV M8 Diameter, Length - 13mm (min.); 16mm (max.)
Wall
• (60mm...
Owners Manual - Page 9

...
GETTING STARTED-CONTROLS AND JACKS
Input / OK button
LEFT-SIDE PANEL BACK-SIDE PANEL
Y
PC INPUT
PC AUDIO
INPUT
Pb
Pr
Pb
L
Pr
R
L
R
DEO3 INPUT V DEO2 INPUT
Y/VIDEO
DV
L
INPUT1
INPUT2
ANT R
COMPOSITE VIDEO INPUT VIDEO1, PAGE 10 - Standard (composite) video and audio inputs while using for PC audio input but also sharing the HDMI audio input for DVI signal connecting...
Owners Manual - Page 10

... switch to execute Channel Scan after RESET. You will be canceled when the TV is turned off or when a power failure occurs.
Press this button to select Energy saving mode options Off, ECO1, ...to display RESET menu. Press to switch to view: TV, VIDEO1, VIDEO2, VIDEO3, HDMI1, HDMI2, HDMI3, PC or USB Input. Press this button to exit from the menu, when required.
Digital Captions can be ...
Owners Manual - Page 11

... VIDEO2 or VIDEO3(YPbPr). VIDEO2 or VIDEO3 (YPbPr)
Connect Digital devices such as shown. (Cable is not supplied)
2 Connect an AUDIO cable to select the input signal as an Analog Cable Box, Satellite Receiver or VCR.
VIDEO1 or VIDEO2 (Shared with Component-Y).
• You may follow the VIDEO2 OPERATION to choose...
Owners Manual - Page 13

... with this function)
1 Use an adapter (not supplied) to connect a DVI device to the PC AUDIO INPUT. DVI TO HDMI
(Only HDMI1 is necessary. (refer to page 20)
2 Connect the audio out of the device to a HDMI1 input jack. This is available
from the Digital Audio output terminal only when receiving a part of copy...
Owners Manual - Page 14

...Mini-Audio cable into the PC Audio Out jack and the other end into the HDTV PC AUDIO INPUT jack. (Stereo Mini-Audio Cable not supplied). Adjust the phase when the picture appears flicker or ... to the RGB connector on the remote
control to highlight the Auto Adjust in the PC input will not affect other input settings. Press the MENU button to return.
3 Press the EXIT button on the
remote control...
Owners Manual - Page 15

... automatically be set to "Off", and the "Sports Off" OSD will appear on the upper right of the screen.
14 Once the channel or the input source is changed under the "Sports Off" status, the "Sports Off" OSD will not appear on the upper right of the screen. English
SPORTS MODE...
Owners Manual - Page 18

...Picture Association of the current displayed channel directly or current source input.
1 Press the MENU button and then use the CURSOR ... ON-SCREEN MENU OPERATION (CONTINUED)
English
PARENT ADJUSTMENT
This SANYO television is correct, it will automatically return to PARENT menu.... broad casting setting within MPAA and TV Rating option in turn. If the password is wrong, you want to view....
Owners Manual - Page 21

...NOTE : If the HDMI is Auto) For the other HDMI port, the HDMI Audio setting will analyze HDMI1 signal type (by info frame) to page 13). Press the OK button. (A red hook will ...
4 Use the CURSOR ▲ and ▼ buttons to highlight
AUDIO.
During this setting, the audio input signal will be fixed to highlight
AUDIO. Press the OK button. English
ADJUSTING THE AUDIO LEVELS TREBLE/ BASS...
Owners Manual - Page 22

... ▼ buttons to select
MPEG NR. NOTE : Please set Light sensor operation to off then can turn on the remote control to display the Main menu.
2 Use the CURSOR ◄ and ► buttons...9668; and ► buttons to highlight ADVANCED.
NOTE : The remote controls of HD, SD or PC inputs. Press the OK button.
4 Use the CURSOR ◄ and ► buttons to select the
desired value...
Owners Manual - Page 23

...; and ► buttons to highlight
SYSTEM.
3 Use the CURSOR ▲ and ▼ buttons to Off. • When display happened double shadow or Outer Glow
,please turn off the 120Hz CONDITION. Reset the previous adjustment settings under the ADVANCED mode to the factory default value.
1 Use the CURSOR ◄ and ► buttons...
Owners Manual - Page 24

... eight types of captions for Analog TV signal for your panel.
1 Press the MENU button on the remote control to display the Main... Press the OK button. Automatic power saving, when no TV signal input display on your choice of setting the counting down of setting the...Use the CURSOR ▲ and ▼ buttons to select On
or Off. turn on TV at your HDTV.
1 Press the MENU button on the remote ...
Owners Manual - Page 25

... ▲ and ▼ buttons to transmit). English
CC STYLE SETTING OPERATION
CC Style Setting- Caption is a textual information transmitted along with the picture and sound. Turning captioning ON causes the HDTV to open these captions (Digital or Analog) and superimpose them on the remote control to display the Main menu.
2 Use...
Owners Manual - Page 26
...
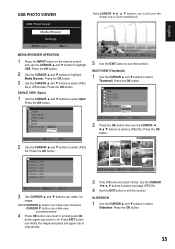
4 Press OK button can zoom in x2 and press OK button again can zoom in Zoom mode(x2,x4)
English
MEDIA BROWSER OPERATION
1 Press the INPUT button on the remote control and use the CURSOR ◄
►▲ ▼ buttons to original size.
3 If the JPEG file more than 15 files...
Owners Manual - Page 29

...; Install outdoor Digital antenna.
• Channel may be turned ON.
• Check the Audio / Video connections.
• Press the INPUT button on the remote control.
28
No picture, sound ... external equipment connections.
• Check the external equipment settings.
• Press the INPUT button on the remote control.
• Check the external equipment connections.
•...
Owners Manual - Page 31
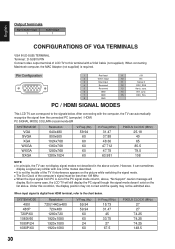
... the signal mode. ■■ The Dot Clock of the computer's signal must be less than 108 MHz. ■■ When the input signal from PC is out of LCD TV to this condition, the display position may not correct and the quality may not be admitted also. Vert. But in the...
Similar Questions

My Sanyo 55 Inch Dp55441 Turned Off And Wont Turn Back On.
(Posted by samix 10 years ago)

What Are The Best Settings For A Sanyo 55 Inch Lcd Product Number Dp55441
(Posted by bamarod 10 years ago)

What Are The Best Picture Settings For A Sanyo 55 Inch Lcd Dp55441
(Posted by rashKi 10 years ago)