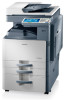
Samsung SCX-8230NA Support Question
Samsung SCX-8230NA Support Question
Find answers below for this question about Samsung SCX-8230NA.Need a Samsung SCX-8230NA manual? We have 1 online manual for this item!
Question posted by maciuraida on October 16th, 2014
Why When Installed A Toner But Yet It Says Toner Is Not Compatible.
Its happen when imaging unit is repace than toner not compatible.
Current Answers
Related Samsung SCX-8230NA Manual Pages
Installation Guide Easy Manual Ver.3.00 (English) - Page 4
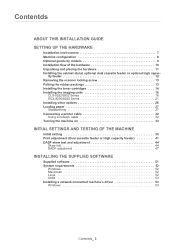
... or optional high capac- ity feeder 12 Removing the scanner locking screw 13 Putting the rubber packings 13 Installing the toner cartridges 14 Installing the imaging units 16
CLX-9252/9352 Series 16 SCX-8230/8240 Series 21 Installing other options 26 Loading paper 27 Standard tray 27 Connecting a printer cable 32 Using a network cable 32 Turning...
Installation Guide Easy Manual Ver.3.00 (English) - Page 5

... the
User's Guide CD. • Use Index to the troubleshooting chapter. This installation guide is valuable for installing and setting up the machine.
• Read the safety information before using the ...problem using the machine, refer to find information. • All the illustrations in this installation guide may differ from your machine depending on its options or models. • The ...
Installation Guide Easy Manual Ver.3.00 (English) - Page 6
... stand, optional dual cassette feeder or optional high capacity feeder • Removing the scanner locking screw • Putting the rubber packings • Installing the toner cartridges • Installing the imaging units • Installing other options • Loading paper • Connecting a printer cable • Turning the machine on the surface of a metal object brought from cold...
Installation Guide Easy Manual Ver.3.00 (English) - Page 8

..., vibration-free surface on a flat, stable surface in order to have the below recommended environment before you install the machine. • Range of temperature
- Setting up the hardware_ 7 Operation: 10 and 32 °C ...Allow extra space to open doors and trays.
• Place the machine on which to install the machine. • Select an area with adequate air circulation. • Avoid areas...
Installation Guide Easy Manual Ver.3.00 (English) - Page 11

... the Booklet finisher?
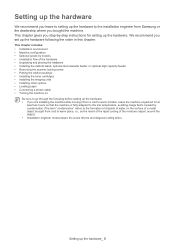
Setting up the hardware_ 10 Remove all the packing pads and tapes. Connect a printer cable to install the hardware. Set installation location and check included items in the package. Install Toner Cartridges and Imaging Units.
Installation flow of the hardware
We recommend you need to the machine and turn on the power.
Yes
No...
Installation Guide Easy Manual Ver.3.00 (English) - Page 12
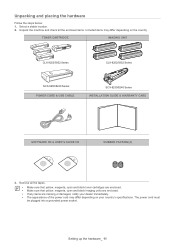
... your country's specifications. Remove all the enclosed items. Included items may differ depending on the country
TONER CARTRIDGE
IMAGING UNIT
CLX-9252/9352 Series
CLX-9252/9352 Series
SCX-8230/8240 Series POWER CORD & USB CABLE
SCX-8230/8240 Series INSTALLATION GUIDE & WARRANTY CARD
SOFTWARE CD & USER'S GUIDE CD
RUBBER PACKING(2)
3. Select a stable location. 2. Unpacking and...
Installation Guide Easy Manual Ver.3.00 (English) - Page 13
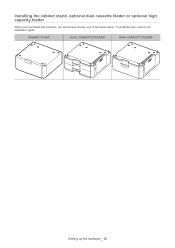
CABINET STAND
DUAL CASSETTE FEEDER
HIGH CAPACITY FEEDER
Setting up the hardware_ 12 Installing the cabinet stand, optional dual cassette feeder or optional high capacity feeder
When you purchased this machine, you would have chosen one of the below items. To install the item, refer to its installation guide.
Installation Guide Easy Manual Ver.3.00 (English) - Page 15
... tape out of the toner cartridge carefully. Open the front cover. Installing the toner cartridges
Follow the steps below: 1.
Thoroughly shake the new toner cartridge side to side five or six times to distribute the toner evenly inside the toner cartridge.
4. Setting up the hardware_ 14 CLX-9252/9258NA/9352/9358NA Series
SCX-8230/8238NA/8240/8248NA...
Installation Guide Easy Manual Ver.3.00 (English) - Page 16

Leave the front cover opened. CLX-9252/9258NA/9352/9358NA Series
SCX-8230/8238NA/8240/8248NA Series
Setting up the hardware_ 15 Hold the new toner cartridge by the handle and slide it into its corresponding positions until it off with a dry cloth and wash clothing in cold water.
Hot water sets toner into place. If toner gets on your clothing, wipe it locks into fabric.
5.
Installation Guide Easy Manual Ver.3.00 (English) - Page 17
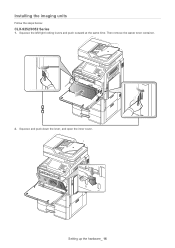
Squeeze the left/right locking levers and push outward at the same time. Setting up the hardware_ 16 Then remove the waste toner container.
2. Squeeze and push down the lever, and open the inner cover. Installing the imaging units
Follow the steps below:
CLX-9252/9352 Series
1.
Installation Guide Easy Manual Ver.3.00 (English) - Page 19
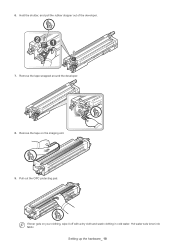
Remove the tape on your clothing, wipe it off with a dry cloth and wash clothing in cold water. Hot water sets toner into fabric. Setting up the hardware_ 18 If toner gets on the imaging uint. 9. Hold the shutter, and pull the rubber stopper out of the developer.
7.
Pull out the OPC protecting pad. 6.
Remove the tape wrapped around the developer.
8.
Installation Guide Easy Manual Ver.3.00 (English) - Page 21

Close the front cover.
Setting up the hardware_ 20 Insert the waste toner container until it locks in place.
13.
12. If the front cover is not completely closed, the machine will not operate.
Installation Guide Easy Manual Ver.3.00 (English) - Page 22

Setting up the hardware_ 21 Then remove the waste toner container. SCX-8230/8240 Series
1. Lift the locking lever upward.
Installation Guide Easy Manual Ver.3.00 (English) - Page 24

...; To prevent damage, do not expose the imaging unit to protect it with a dry cloth and wash clothing in cold water. Pull out the OPC protecting pad.
Pull out the rubber stopper
Setting up the hardware_ 23 Cover it if necessary. 5. Hot water sets toner into fabric. • Be careful not to scratch...
Installation Guide Easy Manual Ver.3.00 (English) - Page 26

Close the right door. 10. Insert the waste toner container until it locks in place. 9. Setting up the hardware_ 25
Installation Guide Easy Manual Ver.3.00 (English) - Page 28
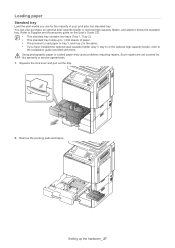
... 1, Tray 2). • This standard tray holds up the hardware_ 27 Using photographic paper or coated paper may cause problems requiring repairs. Refer to
the installation guide provided with them. Loading paper
Standard tray
Load the print media you have installed the optional dual cassette feeder (tray 3. Remove the packing pads and tapes.
Installation Guide Easy Manual Ver.3.00 (English) - Page 37
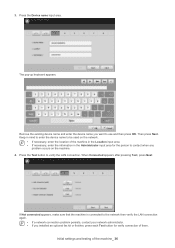
... your network administrator. • If you want to be used on the machine. 4.
Press the Device name input area. 3.
The pop-up keyboard appears. Keep in the Administrator input area for verify ...• If necessary, enter the location of them. Remove the existing device name and enter the device name you installed an optional fax kit or finisher, press each Test button for the person...
Installation Guide Easy Manual Ver.3.00 (English) - Page 52
... settings into one location. If you are available for installing the supplied software. Samsung Easy Printer Manager combines device settings as well as printing environments, settings/actions and ...documents for taking advantages in the PS language. • Scanner driver: TWAIN and Windows Image Acquisition (WIA) drivers are occasionally updated due to release of your machine's features. ...
Installation Guide Easy Manual Ver.3.00 (English) - Page 53

...11 (32/64bit) Debian 4.0, 5.0, 6.0 (32/64bit)
Pentium IV 2.4GHz (IntelCore2)
512 MB (1024 MB)
1 GB (2GB)
Installing the supplied software_ 52 Macintosh
OPERATING SYSTEM
CPU
REQUIREMENTS (RECOMMENDED) RAM
Mac OS X 10.4 Mac OS X 10.5
Mac OS X 10... systems. • Users who have an administrator right can install the software. • Windows Terminal Service is compatable with this machine.
Installation Guide Easy Manual Ver.3.00 (English) - Page 60
Index
C
connect
network cable 32
F
features
supplied software 51
I
initial setting 35 install
imaging unit 16, 21
optional high capacity feeder 12
optional tray 12 stand 12 toner cartridge 14
L
Linux
supplied softwares 51 system requirements 52
loading
paper in the standard tray 27
M
machine configuration 8 Macintosh
supplied softwares 51 system requirements 52
N
...
Samsung Knowledge Base Results
We have determined that the information below may contain an answer to this question. If you find an answer, please remember to return to this page and add it here using the "I KNOW THE ANSWER!" button above. It's that easy to earn points!-
How To Replace the Imaging Unit In Your CLX-2160 and CLX-3160 Printer SAMSUNG
Remove each cap from the defective imaging unit into your printer's front cover. the replacement imaging unit into your printer, and then close the printer's front cover. Install the toner waste container into your replacement imaging unit. Installing the Replacement Imaging Unit To install the replacement imaging unit, follow these steps: Unplug your printer from the wall outlet, and ... -
How To Replace the Imaging Unit In Your CLP-300 Printer SAMSUNG
... you can re-install it later. Set the toner cartridges aside in the image below . After removing the toner cartridges, remove the waste toner container from your printer. Installing the replacement imaging unit. Unplug your printer from the wall outlet, and then open your printer's Remove each toner cartridge from the imaging unit. Note: Be sure to the imaging unit, follow these... -
How To Replace the Imaging Unit In Your CLX-2160 and CLX-3160 Printer SAMSUNG
... : Printers & Multifunction > Instructions for both steps are below . Remove each toner cartridge from the imaging unit. Removing the Imaging Unit When replacing your printer by carefully pulling on the tab as shown in a safe place. After removing the toner cartridges, remove the waste toner container from your imaging unit it later. Failure to re-install the toner waste...
Similar Questions

Jam1 Or Install Toner Message
Whrn l issue a print command to scx4300 printer, it gives me jam 1 or install toner message
Whrn l issue a print command to scx4300 printer, it gives me jam 1 or install toner message
(Posted by georgecudjoe 7 years ago)

Relace/install Toner Waste Bin
I already tried cleaning and replacing the toner waste bin for Samsung CLP 3175 but this message sti...
I already tried cleaning and replacing the toner waste bin for Samsung CLP 3175 but this message sti...
(Posted by beena 11 years ago)

Install Toner
After a couple of days printing printer asks to install toner despite new cartridges being installed
After a couple of days printing printer asks to install toner despite new cartridges being installed
(Posted by roger37195 11 years ago)

How To Solve The Jam 1 Or Install Toner Problems Of Samsung Printer ?
how to solve the jam 1 or install toner problmes of samsung printer ?
how to solve the jam 1 or install toner problmes of samsung printer ?
(Posted by urdiamondpiece 11 years ago)