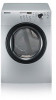
Samsung DV203AEW Support Question
Samsung DV203AEW Support Question
Find answers below for this question about Samsung DV203AEW.Need a Samsung DV203AEW manual? We have 1 online manual for this item!
Question posted by p409 on December 4th, 2021
How Do I Remove And Replace The Drawers Under The Dryer?
The person who posted this question about this Samsung product did not include a detailed explanation. Please use the "Request More Information" button to the right if more details would help you to answer this question.
Current Answers
Answer #1: Posted by SonuKumar on December 5th, 2021 8:03 AM
SonuKumar

Member since:
May 9th, 2021 Points: 16,633,680

Member since:
May 9th, 2021 Points: 16,633,680
Please respond to my effort to provide you with the best possible solution by using the "Acceptable Solution" and/or the "Helpful" buttons when the answer has proven to be helpful.
Regards,
Sonu
Your search handyman for all e-support needs!!
Related Samsung DV203AEW Manual Pages
User Manual (user Manual) (ver.1.0) (English) - Page 1
To receive a more complete service, please register your product at
www.samsung.com/global/register DV203
Gas and Electric Dryer
user manual
imagine the possibilities
Thank you for purchasing a Samsung product.
User Manual (user Manual) (ver.1.0) (English) - Page 2
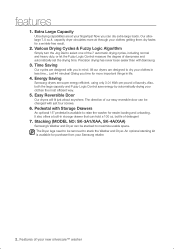
...dryers are designed with Storage Drawers
An optional 15" pedestal is available for a wrinkle-free result.
2. Also, both the large capacity and Fuzzy Logic Control save energy by automatically drying your fingertips! The direction of laundry...storage drawer that can be changed with Samsung.
3. Giving you can be removed to maximize usable space. Easy Reversible Door
Our dryers will...
User Manual (user Manual) (ver.1.0) (English) - Page 3
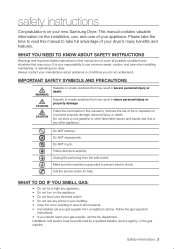
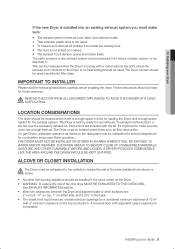
... pwer plug from a neighbor's phone. Installation and service must be performed by a qualified installer, service agency, or the gas supplier.
Always contact your new Samsung Dryer. Do NOT touch. Make sure the machine is your responsibility to use gasoline or other appliance.
Hazards or unsafe practices that may occur. Do NOT...
User Manual (user Manual) (ver.1.0) (English) - Page 4
... and in the user-repair instructions and you understand and have been removed.
Do not repair, replace, or attempt to service any part of the appliance.
Ensure pockets ...or spotted with large buckles, buttons, or other flammable or explosive substances.
Before discarding or removing your dryer.
Do not use by spontaneous combustion.
Do not sit on , in, or in homes,...
User Manual (user Manual) (ver.1.0) (English) - Page 5
...install a UL-approved gas detector. Always use in accordance with the manufacturer's instructions. Never remove these oils.
The potential for these kinds of items may contain significant amounts of these items... fabrics that have run through the Cool Down cycle. Gas leaks may occur in your dryer that contain vegetable oil or cooking oil can create a fire hazard. WARNING
Gas leaks ...
User Manual (user Manual) (ver.1.0) (English) - Page 6

... 12 Grounding 13 Electrical connections 13 Replacement parts and accessories 14 Installation 15 Final installation checklist 16 Dryer Exhaust Tips 17 Door Reversal
18...dryer properly 22 Getting started
CARE AND CLEANING
23
SPECIAL LAUNDRY TIPS
24
23 Control Panel 23 Tumbler 23 Stainless Steel Tumbler 23 Dryer Exterior 23 Dryer Exhaust System
TROUBLESHOOTING
25
25 Check these points if your dryer...
User Manual (user Manual) (ver.1.0) (English) - Page 7
...
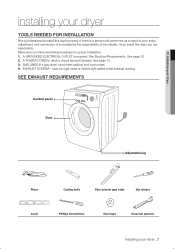
Cutting knife
Pipe wrench (gas only)
Nut drivers
Level
Phillips Screwdriver
Duct tape
Crescent spanner
Installing your dryer
TOOLS NEEDED FOR INSTALLATION
Hire a professional to install this dryer properly. See Electrical Requirements. GAS LINES (if a gas dryer) must be rigid metal or flexible stiff-walled metal exhaust ducting. See page 13. 3. If there...
User Manual (user Manual) (ver.1.0) (English) - Page 8
...29 ft.)
15.5 m (51 ft.)
7.6 m (25 ft.)
12.5 m (41 ft.)
6.5 m (21 ft.)
8_ Installing your dryer
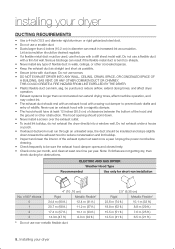
DUCTING REQUIREMENTS
• Use a 4-inch (10.2 cm) diameter rigid aluminum or rigid galvanized steel duct. • Do not use a ...area, the duct should be punctured, reduce airflow, extend drying times, and affect dryer operation. • Exhaust systems longer than 4 inches (10.2 cm) in diameter...
User Manual (user Manual) (ver.1.0) (English) - Page 9
... adjacent walls or other fuel-burning appliance should be less than 0. The Dryer tumbler should be empty and the lint filter clean. REMOVE THE DOOR FROM ALL DISCARDED APPLIANCES TO AVOID THE DANGER OF A CHILD WARNING SUFFOCATING. THE DRYER AREA IS TO BE KEPT CLEAR OF COMBUSTIBLE MATERIALS, GASOLINE, AND OTHER FLAMMABLE VAPORS...
User Manual (user Manual) (ver.1.0) (English) - Page 10
... space is required. Locate an area that is plastic, non-metal, or combustible, replace it with the exhaust duct termination securely fastened to ensure containment of exhaust air, heat, and lint.
10_ Installing your dryer
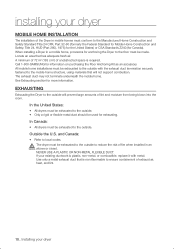
In Canada:
• All dryers must conform to local codes.
NEVER USE A PLASTIC OR NON-METAL FLEXIBLE DUCT.
User Manual (user Manual) (ver.1.0) (English) - Page 13
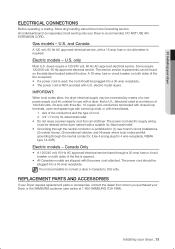
... supply cord kit, marked for 4 wire receptacle, NEMA type 14-30R.)
Electric models - REPLACEMENT PARTS AND ACCESSORIES
If your Dryer requires replacement parts or accessories, contact the dealer from an old Dryer. An individual branch (or separate) circuit serving only your dryer _13 and Canada
A 120 volt, 60 Hz AC approved electrical service, with tinned...
User Manual (user Manual) (ver.1.0) (English) - Page 14
... sure they are produced for tight installations: install a section of the duct sections must point away from your Dryer to the neutral conductor at the terminal block. Remove the pipe thread protective cap. installing your dryer
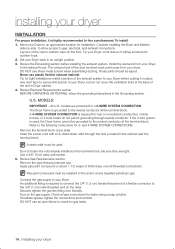
INSTALLATION
For proper installation, it is required to connect the 3/4" (1.9 cm) female thread end of a flexible connector...
User Manual (user Manual) (ver.1.0) (English) - Page 15
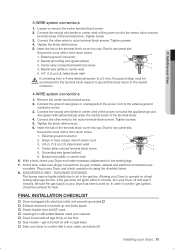
... gas models), exhaust and electrical connections are complete. Grounding wire (green/yellow) 6. 01 Installing your Dryer has been turned on a heat setting will purge the line. Loosen or remove the center terminal block screw. 2. Allowing your Dryer's rear panel slot.
Be sure the gas supply to operate on . Center silver-colored terminal block...
User Manual (user Manual) (ver.1.0) (English) - Page 17
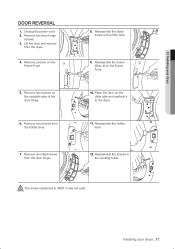
... on the other hole.
9. Reassemble the screws in STEP 4 may not exist. Remove one black screw from the dryer.
4.
Reassemble the holder lever.
12. Lift the door and remove
from the door hinge.
8. Remove two screws from the holder lever.
7. Remove two screws on the Frame Front
10. Reassemble the screw (Step 4) on the opposite...
User Manual (user Manual) (ver.1.0) (English) - Page 19
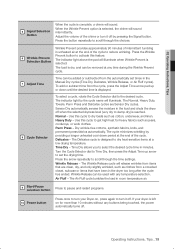
... the selected dryness level (very dry to reduce wrinkling. Press the button repeatedly to turn your dryer is displayed.
8 Cycle Selector
To select a cycle, rotate the Cycle Selector dial to dry ... the cycle. Adjust the volume of the cycle to damp dry) is dry, and can be removed at a low drying temperature. The load is reached. Perm Press - Wrinkle Release can be used...
User Manual (user Manual) (ver.1.0) (English) - Page 23

...finish may still be visible, but should be damaged by some laundry pre-treatment soil and stain remover products.
Tumble old towels or rags to maintain optimum performance. ... a mild, non-abrasive cleaner suitable for stainless steel surfaces. DRYER EXHAUST SYSTEM
Should be inspected and cleaned yearly to remove any spills or overspray immediately. Apply such products away from new...
User Manual (user Manual) (ver.1.0) (English) - Page 24

...minimize wrinkling.
• Dry these in small loads for best results and remove as soon as a guide. Bedspreads & Comforters Blankets
• Follow the... setting. • Place a clean pair of sneakers in the Dryer.
• Use the Air Fluff cycle or the Time Dry ...• Vegetable or cooking oil-soaked items.
24_ Special laundry tips Curtains & Draperies Cloth Diapers
• Use the...
User Manual (user Manual) (ver.1.0) (English) - Page 25
...• Use a 4" rigid metal exhaust duct. • Do not overload. 1 wash load = 1 dryer load. • Sort heavy items from lightweight items. • Large, bulky items like blankets or comforters ...as coins, loose buttons, nails, etc.
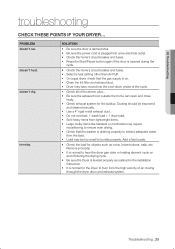
Troubleshooting _25 doesn't heat.
Remove promptly.
• It is normal to hear the dryer gas valve or heating element cycle on and off during the
cycle.
...
User Manual (user Manual) (ver.1.0) (English) - Page 26
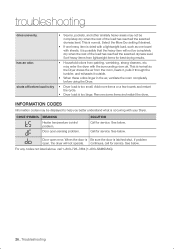
.... Call for service. When the door is Be sure the door is normal. Remove some items and restart the dryer. CODE SYMBOL MEANING
Heater temperature control problem. Door open sensing problem.
See below....This is too large. Add more items or a few towels and restart the cycle.
• Dryer load is normal as one towel with sheets, it outside.
• When these odors linger in...
User Manual (user Manual) (ver.1.0) (English) - Page 30
...supplied or authorized by SAMSUNG that occurs in shipment; product removal and reinstallation; This limited warranty does not cover problems ...States. altered product or serial numbers;
warranty
SAMSUNG DRYER LIMITED WARRANTY TO ORIGINAL PURCHASER This SAMSUNG brand product... for instructions, or fixing installation errors. All replaced parts and products become the property of purchase...
Samsung Knowledge Base Results
We have determined that the information below may contain an answer to this question. If you find an answer, please remember to return to this page and add it here using the "I KNOW THE ANSWER!" button above. It's that easy to earn points!-
General Support
... ORIENTATED IN A VERTICAL, HORIZONTAL, OR FLOOR MOUNT POSITION. Warranty and parts replacement Samsung warrants this product proves defective under warranty. Business users should contact either the ...subject to the headset can damage performance and reduce battery life. The warranty is removed, or if the product has been subject to physical abuse, improper installation modification,... -
SPH-I350 - How To Use Key Guard SAMSUNG
How To Remove The Drawer Manual Lock - Manual Lock The SPH-I350 (Intrepid) handset features two different lock features, the Manual Lock and the Automatic Lock, one which may ... -
How To Remove The Drawer SAMSUNG
STEP 4. Remove The Drawer Once you have released both the left and right side levers, pull the drawer all the way out.
Similar Questions


Step By Step Instructions On How To Replace Samsung Dryer
(Posted by tuJbi 10 years ago)


If Your Samsung Dryer Model Dv203aew/xac Not Heating Up Whats The Problem On It
how to troubleshoot
how to troubleshoot
(Posted by armielen0704 11 years ago)