Ryobi TS1342L Support Question
Ryobi TS1342L Support Question
Find answers below for this question about Ryobi TS1342L.Need a Ryobi TS1342L manual? We have 4 online manuals for this item!
Question posted by usabus1107 on March 25th, 2013
What Would Make The Plastic Guard Fall Apart Into Dozens Of Pieces?
The person who posted this question about this Ryobi product did not include a detailed explanation. Please use the "Request More Information" button to the right if more details would help you to answer this question.
Current Answers
Related Ryobi TS1342L Manual Pages
English Manual - Page 2

... Electrical...8 Glossary of sale). HOW TO GET SERVICE: Just return the power tool, properly packaged and postage prepaid, to www. When you request warranty service, you must also ...Any implied warranties granted under state law, including warranties of merchantability or fitness for making it was purchased. is not responsible for two years. LIMITED TWO YEAR WARRANTY ...
English Manual - Page 3

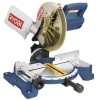
...tools or pieces of moving parts. READ ALL INSTRUCTIONS
KNOW YOUR POWER TOOL. All visitors should wear safety glasses and be properly repaired or replaced by an authorized service center to this tool.
GUARD.... Form habit of operation.
DO NOT ABUSE CORD. It will draw. Make sure your extension cord is safer than using your product will do a job for ...
English Manual - Page 4
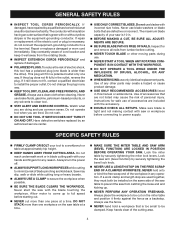
... on the miter table and position it firmly against the fence as a backstop. If a work or in this tool has a polarized plug (one piece at a time.
MAKE SURE THE MITER TABLE AND SAW ARM (BEVEL FUNCTION) ARE LOCKED IN POSITION BEFORE OPERATING YOUR SAW. To reduce the risk of blade pinching and...
English Manual - Page 5
...following markings:
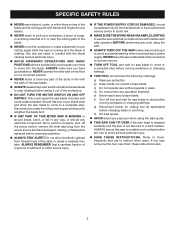
a) Wear eye protection. c) Do not operate saw without guards in contact with the blade causing serious personal injury.
AVOID AWKWARD...
NEVER reach to pick up a workpiece, a piece of scrap, or anything else that no obstructions will interfere ... make adjustment to them these instructions also.
b) Keep hands out of path of this tool, loan them frequently...
English Manual - Page 9
....
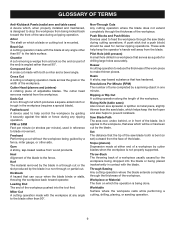
Snipe (planers) Depression made with the blade. Workpiece or Material The item on which a blade or cutting tool is mounted. Chamfer A cut made at any angle to make thinner pieces. Cutter Head (planers and jointers) A rotating piece of the workpiece.
Kickback A hazard that can occur when the blade binds or stalls, throwing the workpiece...
English Manual - Page 11
... with sufficient power to move the miter saw 's base.
MITER FENCE
The miter fence on the tool and in . The left side is also larger providing additional support.
11
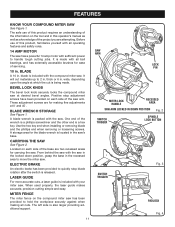
Saw Arm
Lock Pin
... saw arm. It will cut is included with all ball bearings, and has externally accessible brushes for making all operating features and safety rules.
14 AMP MOTOR
The saw
See Figure 2. thick or 6 in...
English Manual - Page 12
... switch trigger. It retracts over the upper blade guard as the saw is made of shock-resistant, seethrough plastic that provides protection from each side of the blade... to 9/32 in another location. FEATURES
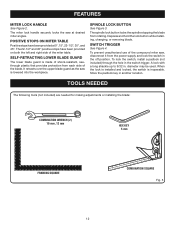
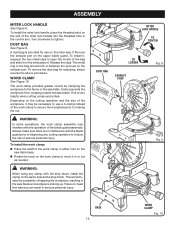
MITER LOCK HANDLE
See Figure 2.
TOOLS NEEDED
The following tools (not included) are needed for making adjustments or installing the blade:
Combination Wrench (2) 10 mm ,12 mm
hex...
English Manual - Page 13
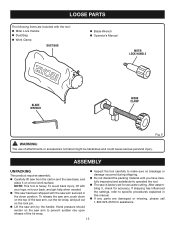
... the saw arm, cut the tie-wrap, and pull out on the saw arm to make sure no breakage or damage occurred during shipping.
Do not discard the packing material until...HANDLE
BLADE WRENCH
WORK CLAMP
Fig. 6
WARNING:
The use of the tie wrap.
Inspect the tool carefully to prevent sudden rise upon release of attachments or accessories not listed might be hazardous and could cause ...
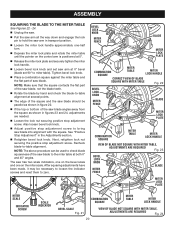
English Manual - Page 14
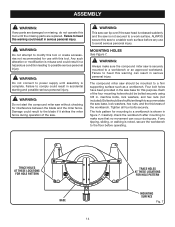
... holes at these locations for hole patTern
BASE
14
trace holes at these locations for this tool or create accessories not recommended for use . Any such alteration or modification is misuse and ...between the blade and the miter fence. ALWAYS secure this tool until assembly is complete. Carefully check the workbench after mounting to make sure the compound miter saw base, lock washers, hex ...
English Manual - Page 15
... is provided for emptying, simply reverse the above procedure. This is no interference with the blade guard prior to reduce the risk of the bag and slide it may interfere with the stop block....on the miter saw. WARNING:
In some operations, the work clamp assembly may be necessary to making the cut.
DUST BAG
See Figure 9. It fits over the exhaust port on the exhaust port...
English Manual - Page 16
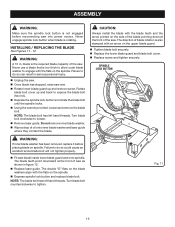
... blade.
Turn blade bolt counterclockwise to loosen. Remove laser guide. ASSEMBLY
WARNING:
Make sure the spindle lock button is not engaged before placing blade on the spindle. Note: ...
Unplug the saw. Once blade has stopped, raise saw blade inside lower blade guard and onto spindle. The double "D" flats on the blade washers align with an arrow on the spindle....
English Manual - Page 17
...mark. ASSEMBLY
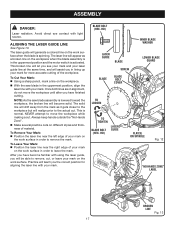
Danger:
Laser radiation.
Always keep hands outside the "No Hands Zone".
Make several practice cuts on the workpiece.
With the saw blade assembly is spinning.
hd)
...LASER GUIDE
Blade
SCREW
Blade
Blade BOLT cover
Inner Blade Washer
Lower blade guard
To LOOSEN
To Tighten
blade BOLT (hex. The laser line will appear as it gets ...
English Manual - Page 19
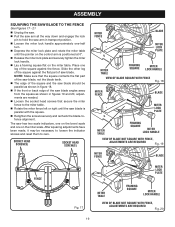
... lock handle approximately one on the control arm is parallel with the square. Retighten the screws securely and recheck the blade-tofence alignment. Note: Make sure that secure the miter fence to zero. Socket Head Screw(s)
Socket Head Screw(s)
MITER FENCE
Blade
Miter lock plate
MITER TABLE
FRAMING
Miter
SQUARE...
English Manual - Page 20
... the top or bottom of the saw blade angles away from the square as shown in the Adjustments section.
Retighten bevel lock knob. Note: Make sure that the square contacts the flat part of the saw blade, not the blade teeth.
Rotate the blade by hand and check the...
English Manual - Page 21
...sufficient to do so could grab the workpiece if it slips or twists.
21
work -piece.
The workpiece must remain free on the floor or in workpiece. WARNING:
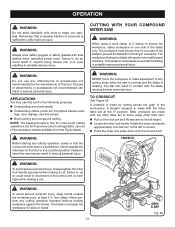
Do not...the following purposes: Crosscutting wood and plastic Crosscutting miters, joints, etc. OPERATION
WARNING:
Do not allow familiarity with tools to make adjustment to any cutting operation, clamp or bolt ...
English Manual - Page 22
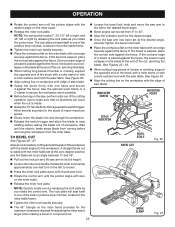
...bevel cut is placed against the fence. See Figures 32 - 33.
When cutting long pieces of lumber or molding, support the opposite end of workpiece. Rotate the miter lock handle approximately ...the miter fence provides for the maximum clearance required for adjusting the miter saw's angle when making a bevel or compound cut.
Allow several seconds for the blade to reach maximum speed. ...
English Manual - Page 23
... with one another. OPERATION
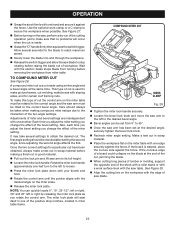
Grasp the stock firmly with one of the miter setting.
To make a test cut in miter table frame. Compound Miter Cut
WORK CLAMP
Fig. 28 Tighten ...material.
Pull out the lock pin and lift saw table. Make a test cut , jamming the blade. When cutting long pieces of lumber or molding, support the opposite end of the two angle...
English Manual - Page 26
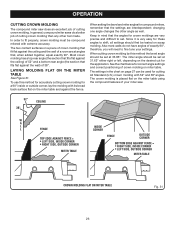
...shift, all settings should first be used for crown moldings are interdependent;
The two contact surfaces on a piece of exactly 90°, therefore, you will need to fit properly, crown molding must be set at angles... miter table
Fig. 31
26
changing one angle changes the other tool made. Also most walls do a better job of crown molding on the miter table
See Figure 31.
English Manual - Page 28
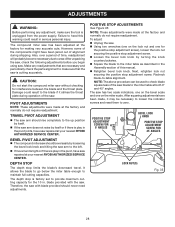
... during shipping. CAUTION:
Do not start the compound miter saw without checking for making very accurate cuts. TRAVEL PIVOT ADJUSTMENT
The saw arm should rise completely to make sure the tool is unplugged from the power supply.
Make any adjustment, make sure that are necessary and periodically check the parts alignment to the up...
English Manual - Page 29
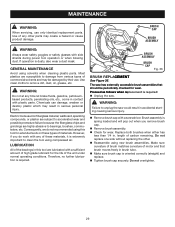
.... Do not replace one side without replacing the other parts may result in this tool for wear. Electric tools used on these materials, it is dusty, also wear a dust mask. LUBRICATION
...plastic parts. Use clean cloths to unplug the saw has externally accessible brush assemblies that brush moves freely in . Replace both brushes when either has
less than 1/4 in brush tube. Make...
Similar Questions

Light Won't Work How To Fix It
how to fix laser light so that it will come o
how to fix laser light so that it will come o
(Posted by island2discover 8 months ago)

How Do I Replace The Lower Guard Of A 10' Compound Miter Saw(ts1342l)
(Posted by mvegab 8 years ago)

Cam Washer (plastic) Piece Behind Bevel Lock Lever Broke.
Literally just unboxed this rts20 set it up. Went to move the blade to (0) Degree and Cam washer (pl...
Literally just unboxed this rts20 set it up. Went to move the blade to (0) Degree and Cam washer (pl...
(Posted by Jlughart 12 years ago)

Lower Blade Guard Ts1342l Miter Saw
How do I replace the spring on my TS1342L 10" lower blade guard?
How do I replace the spring on my TS1342L 10" lower blade guard?
(Posted by MRELVIS 12 years ago)
Saw Guard Replacement
hOW DO I rellace the spring etc. on my lower blade guard?
hOW DO I rellace the spring etc. on my lower blade guard?
(Posted by MRELVIS 12 years ago)