Ryobi TS1141S Support Question
Ryobi TS1141S Support Question
Find answers below for this question about Ryobi TS1141S.Need a Ryobi TS1141S manual? We have 1 online manual for this item!
Question posted by finirdh on May 12th, 2011
How Do Unlock And Lift The Saw Head Up?
The person who posted this question about this Ryobi product did not include a detailed explanation. Please use the "Request More Information" button to the right if more details would help you to answer this question.
Current Answers
Related Ryobi TS1141S Manual Pages
Operation Manual - Page 1

... purchase.
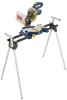
SAVE THIS MANUAL FOR FUTURE REFERENCE When properly cared for, it will give you for dependability, ease of rugged, trouble-free performance. Compound Miter Saw
TS1141 -
WARNING: To reduce the risk of injury, the user must read and understand the operator's manual before using
Thank you years of operation, and operator...
Operation Manual - Page 4

.... Always SUPPORT LONG WORKPIECES while cutting to clean tool. STAY ALERT AND EXERCISE CONTROL. Never start the saw from lumber before cutting. Never touch blade or ...switches replaced by securely tightening the bevel lock knob. Use this tool has a polarized plug (one way.
Saw may create a hazard or cause product damage. DOUBLE CHECK ...
Operation Manual - Page 5

...to perform properly, shut off rapidly. b) Keep hands out of path of saw arm, moving workpiece or changing settings. f) Turn off tool and wait for any reason. NEVER reach to pick up a ... This saw can tip over if the saw head is released suddenly and the saw on and off the power switch, remove the miter saw blade to loosen and could cause your saw from the power ...
Operation Manual - Page 8

...to feed the workpiece over , under, behind, or in a workpiece that has hardened. Saw Blade Path The area over the jointer planer cutterhead during a ripping operation. Worktable Surface ...or fence during cutting operations. Through Sawing Any cutting operation where the blade extends completely through or partial cut which a blade or cutting tool is being placed inadvertently in a ...
Operation Manual - Page 10

...176;, 22-1/2°, 31.62°, and 45° positive stops have been provided on the tool and in the saw at the rear of the blade. It is released. BLADE
A 7-1/4 in . thick or 4-1/4...are attempting. Spindle Lock Button Fig. 3
MITER FENCE
The miter fence on each side of the saw arm.
SELF-RETRACTING LOWER BLADE GUARD
The lower blade guard is lowered into the workpiece. REAR ...
Operation Manual - Page 12

... Bracket/Carrying Handle Work Clamp Bevel Knob Blade Bevel Indicator and Screw Operator's Manual
miter saw base
DUST BAG
WORK CLAMP
AAA Batteries
blade wrench miter saw head
bevel knob rear bracket/ carrying handle bevel scale and screw
blade Fig. 6
WARNING:
The use of attachments or accessories not...
Operation Manual - Page 13
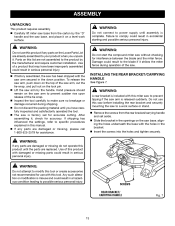
...tool carefully to make sure no breakage or damage occurred during operation of the saw. Damage could result in serious personal injury. WARNING:
A rear bracket is released suddenly. warning:
Do not attempt to the product by the handle.
ASSEMBLY
UNPACKING
This product requires assembly. Carefully lift miter saw...lock pin. Lift the saw to your product when ...
Operation Manual - Page 15

... the bolt, spring washer, and flat washer aside. Place the miter saw head on the saw base oriented vertically as a workbench. Remove the paper seal from the miter saw head. Remove the tape securing the bolt from the back of the saw head. finger tighten. Using the blade wrench provided or a standard 5 mm...
Operation Manual - Page 17

... the mark for aligning the laser line with light source. Remove the padlock then plug the saw .
After you have become familiar with the blade at the same time, and will be able...leave the mark. Draw a line on different styles and thickness of the workpiece.
Unplug the saw into the power source. Repeat the steps above as necessary. WARNING:
Use of controls or adjustments...
Operation Manual - Page 19

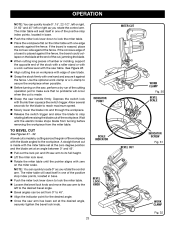
... guards securely in place and in the illustrations. Never operate the saw arm. Lift the miter lock lever. Rotate the miter table until the square and throat plate are needed. Using the blade wrench provided, loosen the socket head screws securing the fence.
pointer
throat plate
VIEW OF MITER TABLE...
Operation Manual - Page 20

... or back edge of the saw blade angles away from the square as shown in transport position. Lift the miter lock lever. Rotate the miter table until the saw blade is parallel with zero .... Using the blade wrench, loosen the socket head screws that secure the miter fence to the miter table. Slide the other leg of saw blade. See figure 21. Rotate the miter ...
Operation Manual - Page 21
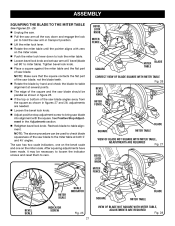
...above procedure can be used to check blade squareness of the saw blade angles away from the square as shown in transport position. Lift the miter lock lever. Rotate the miter table until...Blade NOT SQUARE WITH Miter Table, ADJUSTMENTS ARE REQUIRED Fig. 28 blade square MITER TABLE
The saw has two scale indicators, one on the bevel scale and one on the miter scale. ...
Operation Manual - Page 22
...or make you careless.
WARNING:
Always wear eye protection with side shields marked to comply with tools to make adjustment to secure your eyes, resulting in serious personal injury.
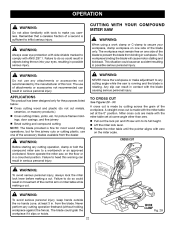
The use of ...than zero. Pull out the lock pin and lift saw on one of the workpiece.
Failure to heed this tool. CROSS CUT
WARNING:
Before starting any attachments or accessories not...
Operation Manual - Page 23
... is placed against the fence. Depress the switch lock with zero on the saw arm to its full height. Lift the miter lock lever. Rotate the miter table until the electric ...°. Pull out the lock pin and lift saw , perform a dry run of saw table. Allow several seconds for the desired angle. Once the saw arm has been set at the desired angle, securely...
Operation Manual - Page 24

... the switch lock with thumb then squeeze the switch trigger. Work CLAMP Fig. 33 Pull out the lock pin and lift saw arm to 45°. Once the saw blade to secure the workpiece when possible. The miter table will occur when the cut in one another. A compound miter cut is...
Operation Manual - Page 27

...molding. The miter angle should be set at 33.85°. changing one angle changes the other tool made. The settings in mind that , when added together, equal exactly 90°. Laying molding ...flat on the miter table using the compound features of the miter saw does an excellent job of a room are at 31.62° either right or left, depending...
Operation Manual - Page 29

...Note: The above procedure can be used to check blade squareness of the saw blade to the blade if it may be necessary to loosen the indicator screws...saw . Loosen the bevel lock knob by turning the knob counterclockwise. Square the blade to zero. PIVOT ADJUSTMENTS
Note: These adjustments were made at your nearest authorized service center. Failure to make sure the tool...
Operation Manual - Page 30

... screw
WARNING:
Use of controls or adjustments or performance of the miter lock lever is required. unlock miter lock lever Fig. 40
Once aligned, tighten the screw then remove the blade ... to re-engage Recheck the miter table to ensure proper tightness. Prior to squaring the saw blade to move the miter table. NOTE: When properly aligned, the laser should feel tight and ...
Operation Manual - Page 31

... lubricant for the life of commercial solvents and may be periodically checked for wear. Do not overtighten. Electric tools used on these types of these materials, it is required: Unplug the saw has externally accessible brush assemblies that brush moves freely in contact with plastic parts. Brush REPLACEMENT
See Figure 42...
Operation Manual - Page 32

...Saw
TS1141 - Please call or visit.
To reduce your exposure to these chemicals: work in the space provided below.
• HOW TO ORDER REPAIR PARTS
• MODEL NUMBER • SERIAL NUMBER TS1141... to filter out microscopic particles.
• SERVICE
Now that you have purchased your tool, should a need ever exist for a complete list of these exposures varies, depending on...
Similar Questions

Rts23t Table Saw. Looking For Part Numbers For The Elevating Shaft And Block
Looking for part numbers for the elevating shaft and block for RTS23T table saw
Looking for part numbers for the elevating shaft and block for RTS23T table saw
(Posted by nbmills45 2 years ago)
Ryobi 10" Table Saw Dado Throat Plate
where can I find a dado throat plate for the Ryobi 10" table saw?
where can I find a dado throat plate for the Ryobi 10" table saw?
(Posted by Rick52757 2 years ago)

Wiring Diagram For Ryobi Rts21 Table Saw Switch
I need to view the wiring diagram for the switch on the Ryobi RTS21 table saw. I had to disconnect t...
I need to view the wiring diagram for the switch on the Ryobi RTS21 table saw. I had to disconnect t...
(Posted by wolfsonjames 9 years ago)

Dado Blade Insert For A Ryobi Rts10 Table Saw
Where can I purchase a dado blade insert for my Ryobi RTS10 10" table saw? I am having difficulty fi...
Where can I purchase a dado blade insert for my Ryobi RTS10 10" table saw? I am having difficulty fi...
(Posted by bstilton 9 years ago)
