
Ryobi RTS10 Support Question
Ryobi RTS10 Support Question
Find answers below for this question about Ryobi RTS10.Need a Ryobi RTS10 manual? We have 4 online manuals for this item!
Question posted by tank34boss on March 14th, 2014
On The Bts12s Blade Adjustment
The Blade Is Out 3 Centmtrs Out From Table. Blade Runs True And Is Squared To The Top. Checked It Frof The Slots . And It Doesnt Cut Straight
Current Answers
Related Ryobi RTS10 Manual Pages
English Manual - Page 3
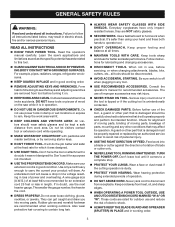
... parts, binding of moving parts. Keep cord away from receptacle. READ ALL INSTRUCTIONS
KNOW YOUR POWER TOOL. Use only a cord heavy enough to avoid risk of blade or cutter only.
NEVER LEAVE TOOL RUNNING UNATTENDED. An undersized cord will draw. If in length. It's safer than using your extension cord is in...
English Manual - Page 4
... saw is rotating. Sharp blades minimize stalling and kickback.
KEEP HANDS AWAY FROM CUTTING AREA. Do not operate tool when you are secure.
BE SURE BLADE PATH IS FREE OF NAILS. GENERAL SAFETY RULES
KEEP BLADES CLEAN, SHARP, and with incorrect size holes. Instructions for and remove all adjustments are doing and use...
English Manual - Page 9

... arm and table saws) A device which will be used for drilling large holes accurately.
Arbor The shaft on which produces a square-sided notch or trough in a non-through cut or the slot produced by guiding it applies to the blade other than the blade, which a blade or cutting tool is bent (or set) outward from the blade.
Cross Cut A cutting or shaping...
English Manual - Page 10

Table Size 25-3/4 in . Blade Arbor 5/8 in . x 16 in . FEATURES
product specifications
Blade Diameter 10 in . Input 120 V, AC only, 60 Hz, 13 A No Load Speed 4,800 r/min. (RPM)
spreader
BLADE GUARD ASSEMBLY
BLADE
RIP FENCE
ANTI-KICKBACK PAWLS
MITER GAUGE
FRONT RAIL
LOCKING LEver
BEVEL LOCKING
LEVER
BLADE ADJUSTING
HANDLE
BEVEL INDICATOR
SWITCH assembly
trigger Lock
Fig...
English Manual - Page 11

... operating features and safety rules. BLADE ADJUSTING HANDLE -
MITER GAUGE - This saw table shows the distance between the rip fence and the blade. It is not unlocked, it cannot be cut . The easy-to -read scale on the spreader. If it is very important to set with the blade straight up through -sawing cuts. SPREADER - SWITCH ASSEMBLY - The...
English Manual - Page 14
...
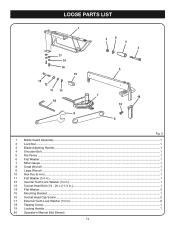
1
17 14 16 15
13 12 11 14 10
9
2
6
3
4
5
7
19
18
8
1 2
3 4 5 6 7 8 9 10 11 12 13 14 15 16 17 18 19 20
Fig. 5
Blade Guard Assembly...1 Lock Nut...1 Blade Adjusting Handle...1 Shoulder Bolt...1 Rip Fence ...1 Flat Washer...1 Miter Gauge ...1 Small Wrench...1 Large Wrench...1 Hex Key (5 mm)...1 Flat Washer (1/4 in.)...1 Internal Tooth Lock Washer...
English Manual - Page 17

... bolts securely. The blade adjusting handle mounts to the height adjusting handwheel with your legs, not your body.
The saw without help. Align the holes in the table with a screwdriver. ...Hand tighten.
Repeat for three remaining holes. Mounting Holes
The table saw base
See Figure 7. Carefully check the workbench after mounting to make sure that no movement can result in...
English Manual - Page 18
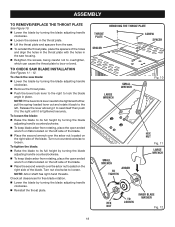
..., pull the spring-loaded lever out and rotate it is tightened securely. Turn nut counterclockwise to loosen. Check all clearances for free blade rotation.
Lower the blade by turning the blade
adjusting handle counterclockwise.
To keep blade arbor from rotating, place the open ended wrench on flats located on the left side of the...
English Manual - Page 19

... as shown in figure 13.
TO INSTALL BLADE GUARD Assembly
See Figure 13. Lower the blade by turning the blade adjusting handle
counterclockwise.
Place a framing square or straight edge beside the saw blade.
Once properly aligned, securely retighten the screws.
19
This saw blade are not in alignment, adjustment is needed to be sure there is...
English Manual - Page 20
...; Always use this tool for the cut , use the rip fence when rip cutting and the miter gauge when cross cutting. Remember that is sufficient to support work Forcing a cut Cutting warped or wet lumber Using the wrong blade for the type of blade for the purposes listed below: Straight line cutting operations such as the...
English Manual - Page 21

... the rip fence. Bevel cuts are straight 90° cuts made on the right side of cuts
See Figure 16. Compound (or bevel) miter cuts are made with an angled blade. CUTTING TIPS
Rabbet cuts are six basic cuts: 1) the cross cut, 2) the rip cut, 3) the miter cut, 4) the bevel cross cut, 5) the bevel rip cut, and 6)
1
the compound (bevel) miter cut . Always provide...
English Manual - Page 22

...adjustment for ripping as discussed on the table with a number of the stock. HOW TO MAKE A FEATHERBOARD
See Figure 17. wide and 18 in . Set the rip fence to allow approximately a 1/4 in . Reset the rip fence and cut... edge of the workpiece, to 30° and miter the other half of the blade. Kickback can resist kickback by guiding it in .
WARNING:
Place the featherboard against...
English Manual - Page 23

...0° on the bevel scale. Repeat this process until loose. Adjust the bevel angle by sliding the blade adjusting handle left or right to the desired angle. Tighten bevel control .... Rotate to 1/4 in figure 20.
A 90° cut has a 0° bevel and a 45° cut has a 45° bevel. Unplug the saw blade is securely tightened. If it back to be in the ...
English Manual - Page 25
... against the saw table as the workpiece is fed into the blade. operation
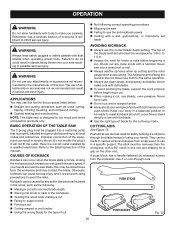
MAKING CUTS
The blade provided with the saw is a high-quality combination blade suitable for ripping and cross cut
WARNING:
Using the rip fence as a cutoff gauge when cross cutting will result in kickback which can cause serious personal injury. Carefully check all setups and...
English Manual - Page 26
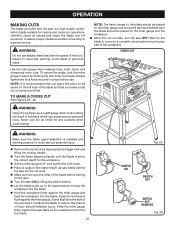
... it contacts the blade to move the wood through the cut past the blade. Stand slightly to the side of the wood as saw table) behind
the table saw for the blade to come to ... gauge groove.
Turn the blade adjusting handle until the blade is made , turn the saw ON.
26
Fig. 28 MITER cut
rip cut
Fig. 27
WARNING:
Make sure the blade guard assembly is installed and working properly...
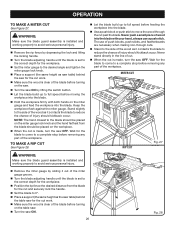
English Manual - Page 27

...on the right side of the wood as saw table) behind the saw OFF.
WARNING:
Make sure the blade guard assembly is made, turn the saw for the cut work.
Make sure the wood is... 30
To make a bevel cross cut
See Figure 29.
Stand slightly to the side of the blade to avoid trapping the wood and causing kickback. Turn the blade adjusting handle until the bevel indicator is at...
English Manual - Page 28
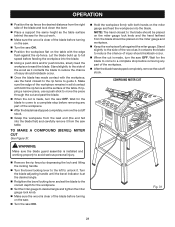
... to guide it. COMPOUND MITER cut is made, turn the saw ON.
Stand slightly to the side of the wood as it contacts the blade to a complete stop before removing any part of the workpiece.
After the blade has stopped completely, remove the cutoff stock. Turn the blade adjusting handle until the bevel indicator...
English Manual - Page 30

... injury, always make sure the rip fence is parallel to the blade before beginning any adjustments until you have checked with a square and made test cuts to be secure when the locking handle is to check your setups carefully with a framing square and make sure the tool is unplugged from the power supply and the switch is tightened...
English Manual - Page 31

... indicator. Relock the bevel locking lever.
Make sure the saw is greater than 45°, use the framing square to position the blade to 90°. Rotate blade adjusting handle counterclockwise until it stops. If the blade angle is unplugged from the power source.
Tighten the bevel locking lever. Line up the red line on...
Repair Sheet - Page 5
... WASHER 1
25 0152010204 BLADE ADJUSTING HANDLE 1
26 0101140203 SHOULDER...BLADE WASHER 1
36 0101010920 ARBOR NUT (5/8-18 1
37 0101010312 ARBOR WRENCH (15/16 in . PAGE 4 KEY NOS. 19-22 AND 41-42 1
NO. MODEL NUMBER BTS12S
The model number will be found on a plate attached to the back panel of the cabinet. Always mention the model number in all correspondence regarding your TABLE...
Similar Questions

Drive Belt Comes Off Motor Pulley
This happens even after adjusting the motor for different tension levels. It will run maybe 20/30 se...
This happens even after adjusting the motor for different tension levels. It will run maybe 20/30 se...
(Posted by jboyd17770 7 years ago)

Dado Blade Insert For A Ryobi Rts10 Table Saw
Where can I purchase a dado blade insert for my Ryobi RTS10 10" table saw? I am having difficulty fi...
Where can I purchase a dado blade insert for my Ryobi RTS10 10" table saw? I am having difficulty fi...
(Posted by bstilton 9 years ago)

In Manual For Ryobi Model Rts10 Instructions For Setting Blade At 0 Or 90
states that it may be necessary to remove indicator with red line to 0. How do I remove the indicato...
states that it may be necessary to remove indicator with red line to 0. How do I remove the indicato...
(Posted by theduckfan88 9 years ago)


Why Does The Hand Saw Of This Model Only Cut For Four Inches And Then Stops?
Everytime I use this, the blade only rotates for about four inches when cutting very thin wood. Is s...
Everytime I use this, the blade only rotates for about four inches when cutting very thin wood. Is s...
(Posted by mark32951 11 years ago)