Ryobi DP121L Support Question
Ryobi DP121L Support Question
Find answers below for this question about Ryobi DP121L.Need a Ryobi DP121L manual? We have 5 online manuals for this item!
Question posted by dntxprt on February 16th, 2013
Depth-set Operation
It does not working properly. It is either overtighten or not tight enough.
Current Answers
Related Ryobi DP121L Manual Pages
English Manual - Page 1
... FUTURE REFERENCE Thank you years of injury, the user must read and understand the operator's manual before using
this product.
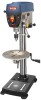
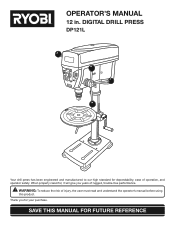
OPERATOR'S MANUAL
12 in. WARNING: To reduce the risk of rugged, trouble-free performance. DIGITAL DRILL PRESS
DP121l
Your drill press has been engineered and manufactured to our high standard for your purchase...
English Manual - Page 2
...; Operation...18-20 Adjustments...21 Maintenance...22 Troubleshooting...23 Parts Ordering / Service...Back Page
INTRODUCTION
This tool has many features for direct, indirect, or incidental damages, so the above limitations and exclusions may not apply to you. ryobitools.com. We will complete the work properly due to...
English Manual - Page 3
... wear protective hair covering to carry the current your product will operate properly and perform its operation. Keep tools sharp and clean for recommended accessories. Consult the operator's manual for better and safer performance. Make sure your hand and frees both hands to disconnect from work into moving parts, breakage of improper accessories may result in...
English Manual - Page 4
...; INSPECT EXTENSION CORDS PERIODICALLY and replace if damaged.
GROUND ALL TOOLS. If damaged, have repaired by an authorized service center.
ALWAYS TURN SWITCH...-grounding conductor to clean tool.
NEVER START A TOOL WHEN ANY ROTATING COMPONENT IS IN CONTACT WITH THE WORKPIECE.
DO NOT OPERATE A TOOL WHILE UNDER THE INFLUENCE OF...
English Manual - Page 5
...DEPTH STOP TO AVOID DRILLING INTO THE TABLE. Never use to instruct other cutting tool if the workpiece should unexpectedly shift.
NEVER PERFORM ANY OPERATION...IS DOWN AND THE CHUCK IS INSTALLED PROPERLY.
LOCK THE MOTOR SWITCH OFF..., work on the table while the cutting tool is clamped tight to...operator injury.
KEEP HANDS AWAY FROM WORK AREA. If you do this tool...
English Manual - Page 6

Precautions that involve your hands away from the blade will allow you to operate the tool better and safer.
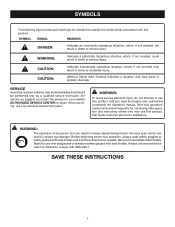
Proper interpretation of these symbols will result in damp locations. SYMBOL
NAME
DESIGNATION/EXPLANATION
V
Volts
Voltage
A
Amperes
Current
Hz
Hertz
Frequency (cycles per minute
Wet Conditions ...
English Manual - Page 7
...into your nearest AUTHORIZED SERVICE CENTER for repair. Before beginning power tool operation, always wear safety goggles or safety glasses with side shields. We...Vision Safety Mask for assistance.
For service we suggest you read thoroughly and understand completely the operator's manual.
SAVE THESE INSTRUCTIONS
7
CAUTION: CAUTION:
Indicates a potentially hazardous situation, which ...
English Manual - Page 8

...the grounding instructions are working with insulation having an equipment-grounding conductor and a grounding plug. If damaged replace immediately. Electrical Connection
This tool is properly grounded. A line ...cause electrical shock resulting in figure 1.
If the tool does not operate when plugged into a matching outlet that accept the tool's plug. Use the chart provided below to ...
English Manual - Page 9

... blade extends completely through the thickness of the saw during any ripping operation. Freehand Performing a cut .
Set The distance that area which a blade or cutting tool is bent (or set) outward from a block so the end (or part of the end) is not properly supported.
Pilot Hole (drill presses) A small hole drilled in the workpiece...
English Manual - Page 11
...which prevents accidentally starting the drill press with all operating features and safety rules.
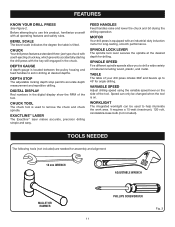
DIGITAL DISPLAY
Red numbers in...depths. Depth Stop
The adjustable locking depth stop permits accurate depth measurement and repetitive drilling.
TOOLS NEEDED
The following tools (not included) are needed for long-lasting, smooth performance.
Before attempting to help illuminate the work...
English Manual - Page 12
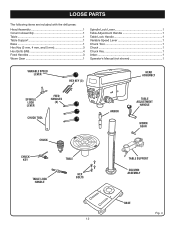
... 3 Worm Gear 1
Spindle Lock Lever 1 Table Adjustment Handle 1 Table Lock Handle 1 Variable Speed Lever 1 Chuck Tool 1 Chuck 1 Chuck Key 1 Arbor 1 Operator's Manual (not shown 1
Variable Speed Lever
hex key (3)
head assembly
SPINDLE LOCK Lever
feed handles
(3)
CHUCK TOOL
chuck
arbor
table adjustment
handle
worm gear
chuck KEY
table lock handle
table
hex bolts...
English Manual - Page 13

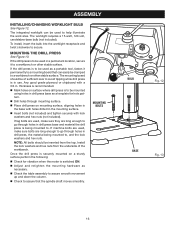
... all loose parts, and satisfactorily operated the tool.
If any parts are replaced. base Fig. 5
13
column assembly
WARNING:
Do not attempt to base
See Figure 5.
Place the base on a level work surface. attaching column assembly to modify this tool until assembly is heavy. WARNING:
If any accessories from the
box...
English Manual - Page 16
... in drill press base and material the drill press is in drill press, the material being mounted to help illuminate the work area. Mounting the Drill press
See Figure 13.
The mounting board should be inserted from the underside of sufficient size to...Mark holes on surface where drill press is to be mounted using holes in drill press base as a portable tool, fasten it to secure.
English Manual - Page 20
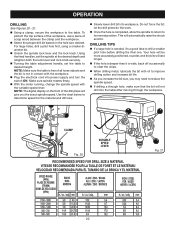
...; Select the proper drill bit based on the front of the drill press will not drill into workpiece. Using the feed handles, set the spindle at the desired depth and retighten both the lock lever and lock knob securely.
Turning the table adjustment handle, set the table to its normal position.
Operation
drilling
See...
English Manual - Page 21
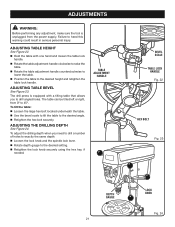
...a number of holes to exactly the same depth: Loosen the lock knob and the spindle lock lever. Rotate depth gauge to the desired setting. Retighten the lock knob securely ... right, from the power supply. adjusting the drilling depth
See Figure 24.
adjustments
WARNING:
Before performing any adjustment, make sure the tool is equipped with one hand and loosen the table...
English Manual - Page 22
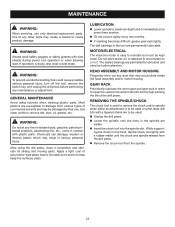
... the chuck in it completely and lubricate all sliding and moving parts.
Use clean cloths to maximum depth and oil moderately once every three months.
Oil the column lightly every two months. ...or destroy plastic which may be used or when large drill bits with side shields during power tool operation or when blowing dust. Apply a light coat of automotive-type paste wax to the...
English Manual - Page 23
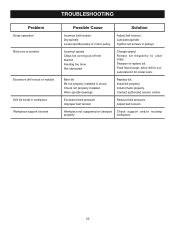
... for metal work. Contact authorized service center.
Sharpen or replace bit.
Install chuck properly. Workpiece not supported or clamped Check support and/or reclamp
properly
workpiece.
23...spindle. Install bit properly. troubleshooting
Problem
Noisy operation Bit burns or smokes
Excessive drill runout or wobble
Drill bit binds in pulleys.
Tighten set screws in workpiece ...
English Manual - Page 24
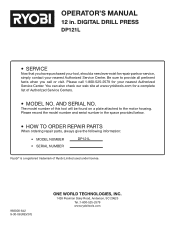
... pertinent facts when you have purchased your tool, should a need ever exist for your nearest Authorized Service Center. AND SERIAL NO. DIGITAL DRILL PRESS
DP121l
• SERVICE
Now that you call 1-800-525-2579 for repair parts or service, simply contact your nearest Authorized Service Center. OPERATOR'S MANUAL
12 in the space provided...
Repair Sheet - Page 3
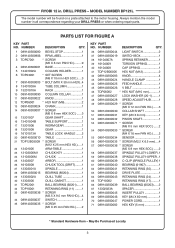
...HD.).........9
4 089140300001 BASE 1
5 13401002A COLUMN HOLDER 1
6 TDP03001
* SET SCREW
(M8 X 10 mm HEX SOC.).....3
7 089140300003 * BOLT (...24 13103006M CHUCK 1
25 13403007 ARBOR 1
26 16103008 CHUCK TOOL (DRIFT)........1
27 13303001A SPINDLE 1
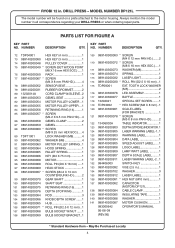
28 089140300015 BEARING (80204...FOR FIGURE A
KEY PART NO. MODEL NUMBER DP121L
The model number will be found on a plate...
Repair Sheet - Page 4
... 3 135 089140200912 LASER LABEL 1 136 089140300081 * HEX NUT (M10 mm 1 137 089140300082 CAPACITOR (MOTOR) DP121L 1 138 089140300084 CABLE CLAMP 1 139 089140300085 INSULATING TAPE 1 140 089140300086 WASHER 1 141 089140300087 MOTOR CUSHION 1 983000642 OPERATOR'S MANUAL 06-06-08 (REV:06)
* Standard Hardware Item - TOOTH LOCK WASHER (M5 2 116 089140300076...
Similar Questions

Can I Get A Battery Replacement For My Hp108l 8v Drill?
I have a small Riobi drill with an 8V lithium battery HP108L. I need to get a replacement battery.Wh...
I have a small Riobi drill with an 8V lithium battery HP108L. I need to get a replacement battery.Wh...
(Posted by bonniejansenusa 1 year ago)

I Am Looking For A Part For The Ryobi 12 In. Drill Press W/ Laser Model Dp121l
My name is Carlos Alvarez, from Mexico, and I'm looking for part 27. 13303001A SPINDLE. Can you help...
My name is Carlos Alvarez, from Mexico, and I'm looking for part 27. 13303001A SPINDLE. Can you help...
(Posted by alvarezmc 2 years ago)

How Do You Adjust The Lazer On The Ryobi Dp121l Drill Press?
(Posted by rtrobaugh 9 years ago)

Charger Has Green Light But Will Not Operate Any Of My Tools
riboyi lithium 18v P103 battery has a green light from charger but will not run andy of my tools
riboyi lithium 18v P103 battery has a green light from charger but will not run andy of my tools
(Posted by jmschaefer 12 years ago)