
2003 Pontiac Aztek Support Question
2003 Pontiac Aztek Support Question
Find answers below for this question about 2003 Pontiac Aztek.Need a 2003 Pontiac Aztek manual? We have 1 online manual for this item!
Question posted by d4rksh on June 14th, 2014
How To Put On A Account Control Knob In A 2003 Pontiac Aztek
The person who posted this question about this Pontiac automobile did not include a detailed explanation. Please use the "Request More Information" button to the right if more details would help you to answer this question.
Current Answers
Related Manual Pages
Owner's Manual - Page 2

...Nnrrnal Maintenance R e p l s p m ~ n P3t-t~ ..." The 2003 PontiacAztekOwnerManual
SeatsandRestraintSystems ...1-1 Front Seats ...1-2 Rear Seats ...1-7 Safety Belts ...1-13 Child ...Sunroof ...2-52 Vehicle Personalization ...2-53 insirumeni panei ...3-< Instrument Panel Overview ...3-4 Climate Controls ...3-22 Warning Lights, Gages and Indicators ...3-29 Message Center ...3-41 Driver Information...
Owner's Manual - Page 3

...Helm, Incorporated P.O. If you do this, it when you learn about the features and controls for Pontiac Division whenever it appears in it so the new owner can obtain a French copy of... MI 48207
GENERAL MOTORS, GM, the GM Emblem, PONTIAC, the PONTIAC Emblem and the name AZTEK are registered trademarks of control or an accident. I'y-im
PONTIAC
Canadian Owners
You can use it was printed. If ...
Owner's Manual - Page 5

... in different colors or in the Index:
"Engine Compartment Overview" "Instrument Panel Overview" "Climate Controls" "Audio Systems''
Also see warning labels on your vehicle. Symbols, used on page 3-29....
Many times, this book you will tell you what to do to a specific component, control, message, gage or indicator. You'll also see Warning Lights, Gages and lndicators on ...
Owner's Manual - Page 9

... push down on the outboard sides of the cushion up or down.
Move the front of the control up or down to adjust the front portion of the seat, to unlock and move the whole seat forward ...or rearward, slide the control forward or rearward.
1-2 Move the rear of the control up or down to move the entire seat up or down . To make sure the...
Owner's Manual - Page 10

... driver's and front passenger's seat.
Press the top of the vehicle to turn the heater off .
1-3 Turn the knob toward the rear of the switch to increase lumbar support. Manual Lumbar
The knob that controls this feature is located on . Press the bottom of the driver's and front passenger's seats.
If it does...
Owner's Manual - Page 25
... systems your vehicle has. If a child will be an excellent driver, but if you from
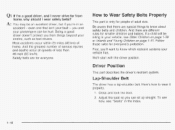
home, why should I never drive far from things beyond your control, such as bad drivers. even one that there are special things to Wear Safety Belts Properly
This part is only for smaller children and babies...
Owner's Manual - Page 113

... toward you can see more from you. Outside Power Mirrors
The power outside rearview mirror knob is convex. If you have adjusted them. If you cut too sharply into the right...they really are not adjusting either mirror, leave the control in the direction you could hit a vehicle on the driver's door. I
I
Turn the knob counterclockwise to adjust the passenger's side mirror.
After ...
Owner's Manual - Page 151

... parking lamps will turn off.
The lamps will turn on automatically.
DOOR: To turn the interior lamps on. The knob for 30 seconds if: The ignition is turned to OFF, the exterior lamp control is removed from the ignition. If you return to low beam, the fog lamps will extend. Interior Lamps...
Owner's Manual - Page 156

... or DN buttons until the HUD image is on the optional steering wheel controls.
3. To turn the image off, turn the dimmer knob to dim.
2.
Start your HUD. The brightness of the instrument panel ...may begin to the desired HUD image brightness. The HUD controls are entering a dark area and may have the HUD dimmer knob set. If you change your vehicle is determined by ...
Owner's Manual - Page 157
...image may need to see . If the ignition is covering the HUD unit. The HUD dimmer knob is adjusted to have your vehicle is facing) is blown.
When not using it .
A... When using the dimmer knob.
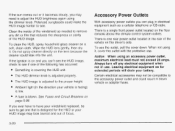
Polarized sunglasses could leak into the unit. To clean the HUD, spray household glass cleaner on the floor console above the climate control system outlets. Accessory Power...
Owner's Manual - Page 159
... air to the rear of the following:
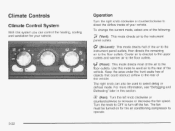
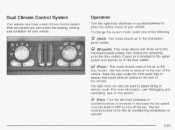
(Vent): This mode directs air to the floor outlets.
Operation
Turn the right knob clockwise or counterclockwise to operate.
8@
3-22 The right knob can control the heating, cooling and ventilation for the air conditioning compressor to direct the airflow inside of the vehicle. Keep the area...
Owner's Manual - Page 160
... quick cool down . Select the highest fan speed. 4. When A/C is activated. This is pressed, an indicator light will circulate throughout your vehicle. Temperature Control: Turn the center knob clockwise or counterclockwise to become too dry. When the button is normal. Select the coolest temperature. 3. Using these settings together for your vehicle while...
Owner's Manual - Page 162
...
The fan must be used to select defog or defrost mode. With this section.
@ (Fan):
Turn the left knob clockwise or counterclockwise to direct the airflow inside of the following:
The right knob can control the heating, cooling and ventilation for the air conditioning compressor to turn off the fan. Operation
Turn the...
Owner's Manual - Page 188

DIC Controls and Displays
ZONE # PRESS & HOLD SET TO CHANGE: This display mode will be displayed when you know ...PRESS SET TO CALIBRATE COMPASS: After selecting your zone, press the MODE button and this will be displayed for three seconds after PONTIAC appears in place of the country that you calibrate the compass:
0
DRIVE VEHICLE IN CIRCLE CALIBRATING COMPASS
When calibration is turned to...
Owner's Manual - Page 203
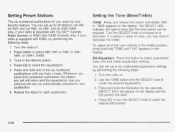
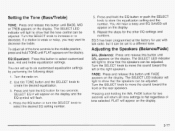
...the desired station. 4. Press and hold one of the tone controls to the middle position, press and hold the EQ button for two seconds.
Turn the SELECT knob to increase or to select AM, FMI or FM2, or XMI... that pushbutton.
6. Use the TONE button and the SELECT knob to show that the tone control can be automatically selected for each pushbutton. Turn the radio on . 2.
Owner's Manual - Page 214
... up to move the sound toward the left or the right speakers. Press and hold the EQ button or push the SELECT knob to flat regardless of the tone controls to show that the speakers can be adjusted. SELECT EQ # will light to show that the speakers can be adjusted.
Press the...
Owner's Manual - Page 220
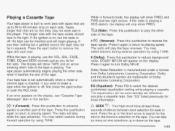
... piayiny speed. Press it again to turn Dolby NR off , first press the eject button or push the RCL knob. See "EQ" listed previously for the radio.
seconds of the tape. If you want to insert a tape while... playing.
While the tape is playing, use the VOL, BAL, FADE, TONE, EQ and SEEK controls just as nine selections up or the down arrow to remove the tape and start over. Your tape...
Owner's Manual - Page 227

... between the front and rear speakers, push and hold the AUDIO knob when no tone or speaker control is displayed.
The radio will be automatically selected for each pushbutton. To adjust all... beep and CENTERED will return and the equalization that pushbutton. Press and hold the AUDIO knob. Turn the knob to move the sound toward the front or the rear speakers.
6. To adjust the ...
Owner's Manual - Page 228
... Press the P-TYPE button. Press the P-TYPE button. Select a category by turning the P-TYPE knob.
3. Once the desired category is displayed, press either SCAN arrow, and the radio will begin ...your chosen category.
3.
selected PTY will search for stations with . To adjust all tone and speaker controls to the middle position. P-TYPE and the last
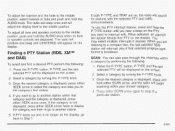
Finding a PTY Station (RDS, XMTM and DAB...
Owner's Manual - Page 431

... Plug the wired headphones into the jacks on page 3-102 for the 2003 Pontiac Aztek andpage 3-103 for the 2003 Buick Rendezvous.
Litho in Part No. 03AZRENDOl
General Motors Corporation 2002 All... device through the st s time.
'CopyrightU.S.A.
Supplement to the 2003 Pontiac Aztek and 2003 Buick Rendezvous Owner's Manual
This information replaces the Audio Speakers text for the "Entertainment ...
Similar Questions

Where Is The Ignition Control Module Located On A 2003 Aztek
(Posted by needronmc 10 years ago)

How Do You Change The Rear Differential Fluid On A 2003 Aztek
(Posted by sharpbilel 10 years ago)

How To Replace Light Bulbs In Heater Control On A Aztek
(Posted by buyuaphil02 10 years ago)

Where Are The Crank Sensors Located On 2003 Aztek
(Posted by Anonymous-113815 10 years ago)
I Have A 2003 Aztek It Is Overheating I Have Put On Wzter Pump Thermastate What
(Posted by Anonymous-113815 10 years ago)