Get support for Pfaff hobbylock 783

Pfaff hobbylock 783 Support Question

Pfaff hobbylock 783 Support Question

Find answers below for this question about Pfaff hobbylock 783.
Need a Pfaff hobbylock 783 manual? We have 1 online manual for this item!
Question posted by annefajarda on May 30th, 2023

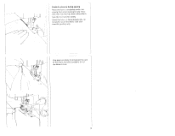
Why Is The Needle Holder Keeps On Dropping

the needle holder keeps on dropping down

Current Answers

Answer #1: Posted by SonuKumar on May 30th, 2023 10:22 AM
This answer was accepted by the poster of the original question.
SonuKumar

Member since:
May 9th, 2021

Points: 16,638,180
1,100
points
If the needle holder on your Pfaff Hobbylock 783 serger keeps dropping, there could be a few possible reasons for this issue. Here are some common causes and solutions:

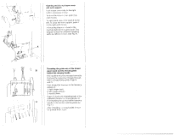
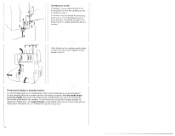
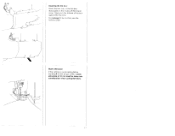
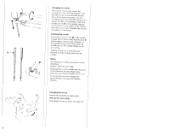
Loose needle holder screw: The screw that holds the needle holder in place may have become loose over time. Check if the screw is tightened properly and secure it if necessary.

Worn-out needle holder: The needle holder itself may be worn out or damaged, causing it to drop. Inspect the needle holder for any signs of wear or damage. If it is worn out, you may need to replace it.

Incorrect installation: It's possible that the needle holder was not installed correctly during the last needle change. Ensure that you have inserted the needle holder securely into its proper position and that it is aligned properly.

Needle clamp tension: The tension on the needle clamp may be too loose, causing the needle holder to drop. Check the needle clamp tension and adjust it according to the manufacturer's instructions.

Mechanical issues: There could be mechanical issues within the serger that are affecting the needle holder's stability. In such cases, it's advisable to consult a professional technician or contact the manufacturer for assistance.

If you're unable to resolve the issue on your own or if the problem persists, it's recommended to reach out to a qualified sewing machine technician or contact Pfaff customer support for further guidance specific to your model.


Please respond to my effort to provide you with the best possible solution by using the "Acceptable Solution" and/or the "Helpful" buttons when the answer has proven to be helpful.

Regards,
Sonu
Your search handyman for all e-support needs!!

Related Pfaff hobbylock 783 Manual Pages

Owner's Manual - Page 2

... up and down movement of the light bulb is 15 watts. 0) The drive belt must never be disconnected from the power source. B) When leaving the machine, changing parts or accessories, the machine must take sufficient care to avoid injury and observe the sewing area continuously while...
Owner's Manual - Page 3

... Setting the stitch length V Disengaging the upper knife Adjusting the seam width Changing the sewing foot Rolled hems Changing the needle Changing the knives Changing the upper knife Changing the lower knife Changing the light bulb . . . . . Notes on threaded machine . Contents Parts of the sewing machine Electrical connection Master switch and sewing light Foot control . .
Owner's Manual - Page 5

... box 9 Handwheel 10 Looper cover with recess 11 Upper knife 12 Work support (swiveLtype) 13 Needle plate 14 Sewing foot 15 Needle bar 16 Sewing foot lifting lever 17 Thread spool holder 18 Thread guides 19 Thread guide bar 20 Machine socket 21 Master switch 22 Rear thread guide (4 x) 23 Feet 24 Accessory box 25 Stitch...
Owner's Manual - Page 6

... not place any objects on the foot control Switching the machine ON and OFF Power and sewing light are switched on and off simultaneously with master switch 12 Switching On: 0 Press switch. Machine and sewing tight are switched on a special sewing table. Switching off . 4 Machine and sewing tight are switched off : Press switch again. Electrical connection Use...
Owner's Manual - Page 7

... continuously while sewing. Foot control The speed of the needle and the upper knife, the user must be pre-selected in two steps by anyone but an authuiized Pfaff agent. 5 Electronic toot control Maximum speed can be disconnected from the power source. B) When leaving the machine, changing parts or accessories, the machine must take...
Owner's Manual - Page 8

... guide bar and align it so that thread guides 18 are exactly above the spool holders. 6 Pull up to the screw head. Insert thread spool stand 1 from the top. Tighten clamp screw A securely Insert four thread spool holders 17 with centering pieces 36 fully in the holes of the thread spool stand...
Owner's Manual - Page 9

...the guides behind carrying handle 2. needle (blue) Figure H shows the threading path of the thread B spool stand and the thread guides behind the carrying handle The machine must ) be pushed dowii ... hold it and swing it down Fo close the work support, push it to the machine behind the looper cover This diagram shows the different threading paths by different colors (see Fig...
Owner's Manual - Page 12

... off and pull the threads through the looper eye Tie the threads still in the machine and the new threads together Pull the needle thread out of the needle. Place new thread spools on spool holders 17. Threading the needle Threading of guide wires 18 and of the thread guide behind the thread retainer After...
Owner's Manual - Page 13

Inserting the lint box: Insert the two tubs of the lint box downwards in the recess of the looper _\ cover Then push the bottom of the box against the machine For removal of the lint box, use the reverse order / / Seam allowance If the cutting is guided along below marking N on the looper cover, a seam allowance of 16 mm must be taken into consideration when cutting the fabric. 11
Owner's Manual - Page 14

... left hand while turning hand wheel with your right hand in the illustration 5thN Insert test fabric up to the upper knife and lower the sewing foot. Sewing test After threading a sewing test test should he made Raise sewing foot lever 16, as shown in the direction indicated by the arrow on the wheel.
Owner's Manual - Page 15

Points to observe during sewing Place the fabric completely under the sewing foot when starting to sew (Also after the machine has been rethreaded) Sew the first stitches slowly Since the fdbric is fed automatically, do not pull or push the fabric Use your hand for guiding only Sew approxirriately 5 cm beyond the end of the seam and use a scissors to cut the thread chain. 13
Owner's Manual - Page 16

...needle can be ued to pull the thread chain into the eani Or: Sew about 5 cm (2 beyoi d the end of scam Then turn the work piece around and sew...Sewing very thick fabrics and workpieces with different thicknesses: On this machine, all kinds of fabric from extremely thin to extremely thick can be processed Plheni sewing...: When sewing thin or medium fabrics, the screw of the upper knife holder must be...
Owner's Manual - Page 17

... opposite the front edge of thread tension cover 7 (see Hustration below> Make the correct adjustment after examination of the interlocking of the individual thread tensions Needle t/ i Top side i•' Wj\ Setting the standard thread tension N Heverse side The thread tension to be set depends on the left shows a correct seam) Page...
Owner's Manual - Page 18

... k)J side Correcting the thread tensions When the thread tension is turned in (+) direction the tension is increased When turned iii ( > direction it is decreased The needle thread A is too loose (blue thread tcniori) The right looper thread C is too loose (red thread tension) or the left looper thread D too tight (yellow...
Owner's Manual - Page 23

... threads, one polyester thread The bulk threads must Uteri be threaded ri the left looper, yellow putt 3 needle thread, blue pat 1 polyester thread polyester t tire ad polyester thread For ttireading of the sewing machine: I Jcedk insert needle Sewing foot. red tension polyester thread 120 140 for blue red and yellow threud tensions Threading path: I right...
Owner's Manual - Page 24

... needle will go Tighten needle set screw securely. plug Lower the sewing toot [urn the hand wheel in such of the needle shank hole M of the needle a way that flat side K faces surface L of the arrow until the needle bar is at its highest position Use the needle change tool from the needle Notes: ihe following machines. Then push needle holder...
Owner's Manual - Page 26

... mains plug! Reset the upper knife to cutting position 24 Align the cutting edge of the lower knife holder and push it is flush with the pressure plate. Replace the screw with the needle plate surface Before tightening the retaining screw, align the pressure plate. Disengage the upper knife (see page 18...
Owner's Manual - Page 29

..., 16) Thread tension too tight Incorrect setting of thread tensto rs. and e made peratiori Sewing problems of ftc tind described below . iese machines have been veliped for light materials) (pages 15, 161 Re-adjust differential feed. Prohlerri Needle breakage Thread breakage Skipped stitches Incorrect stitch formation Puckered seams SO (01 it) fl F teedle...
Owner's Manual - Page 30

B 28 zz 77 2 3 8 H 60 Accessories I Screwcii vol (big) 2 Screwdriver (small) 3 nt bru h 4 Tweezer, 5 Upper kniif 6 Thread uereehng disc 7 Needles 8 Sewing rTldchine oil 9 Rolled hem sewing foot 10 Thread spool net 11 Needle change tool 11 )Y'i' (115i] Thread spool net Very useful for smaller thread spools. A) Thread unreeling disc Fhe thread unreeling disc shown as shown...
Owner's Manual - Page 31

approx 80 kg 29 no. 90) 4 315 x 280 x 330 mm . Weight Contents of threads Dimensions . Specifications; Maximum 'ewing speed Seam width Stitch length Sewing foot I uhricatuori . Sewing foot height Needle system Number of cardboard box 1 umiachune with motor 1 foot control 1 instruction manual/gu000ltee certificate 1 lint box 1 thread spool stand 4 thread spool stand bars 1 thread...

Similar Questions

Do You Know Where Ican Buy The Feed Dog For The 783
The feed dog on my 783 has broken and it seemsot be differentfrom other hobbylocks.Is there somewher...
(Posted by herloom 6 years ago)
Pfaff 262-261 Sewing Machine With Cabinet
I have Pfaff 262-261 with cabinet. I use motor but needle shaft is not working. Is it possible to re...
(Posted by sushishah 8 years ago)
Pfaff 259 Sewing Machine Won't Run With Foot Petal
I have a pfaff 259. When I push on the foot petal the motor runs but the machine itself doesn't run....
(Posted by Aemazing 8 years ago)
Ask a New Question
Use the box below to post a new question about this Pfaff product .
Points & Prizes
  • You can earn points for nearly everything you do on HelpOwl.com
  • You can trade in those points for gift cards at leading retailers such as Amazon.com and Walmart
  • It's that simple!
See How it Works
Create a Free Account

Pfaff Manuals

Find free Pfaff hobbylock 783 manuals and user guides available at ManualOwl.com. Try out our unique manual viewer allowing you to interact with manuals from directly within your browser!

Pfaff Reviews

View thousands of Pfaff user reviews and customer ratings available at ReviewOwl.com.

Contact Information

Complete Pfaff customer service contact information including steps to reach representatives, hours of operation, customer support links and more from ContactHelp.com.

Scoreboard Ratings

See detailed Pfaff customer service rankings, employee comments and much more from our sister site.