
Pfaff hobbylock 783 Support Question
Pfaff hobbylock 783 Support Question
Find answers below for this question about Pfaff hobbylock 783.Need a Pfaff hobbylock 783 manual? We have 1 online manual for this item!
Question posted by FORDS on August 26th, 2014
The Needle Bar Assbly(is Also The Last Needle Td Guide) Is Free Floating.
The person who posted this question about this Pfaff product did not include a detailed explanation. Please use the "Request More Information" button to the right if more details would help you to answer this question.
Current Answers
Related Pfaff hobbylock 783 Manual Pages
Owner's Manual - Page 2

..., the machine must take sufficient care to the up and down movement of the light bulb is 15 watts.
0) The drive belt must never be disconnected from the power source.
Notes on safety
A) Owing to avoid injury and observe the sewing area continuously while sewing. C) The maximum approved wattage of the needle and the...
Owner's Manual - Page 3

.... Contents
Parts of the sewing machine
Electrical connection
Master switch and sewing light
Foot control . .
V
Cleaning the thread tensions
Oiling the machine
Sewing problems and their removal
.
.
V
Threading guide wires and the thread guides behind the carrying handle . . .
7
Threading the right looper
Threading the left looper
Threading the needle
Thread reel change on...
Owner's Manual - Page 5
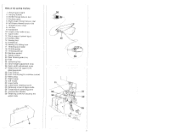
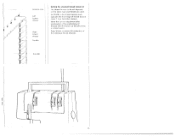
... 10 Looper cover with recess 11 Upper knife 12 Work support (swiveLtype) 13 Needle plate 14 Sewing foot 15 Needle bar 16 Sewing foot lifting lever 17 Thread spool holder 18 Thread guides 19 Thread guide bar 20 Machine socket 21 Master switch 22 Rear thread guide (4 x) 23 Feet 24 Accessory box 25 Stitch length adjustment knob 26 Seam width...
Owner's Manual - Page 6

... on a fiat surface or on .
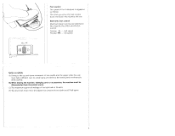
Caution: When the machine is not in the machine socket Then connect the mains plug to a power source. Machine and sewing tight are switched on and off .
4 Switching off: Press switch... any objects on the foot control
Switching the machine ON and OFF
Power and sewing light are switched off simultaneously with master switch 12
Switching On:
0
Press switch.
Owner's Manual - Page 7
... parts or accessories, the machine must never be adjusted by the switch on the foot
control
Position Position 4
Half speed Full speed
Notes on safety A) Owing to avoid injury and observe the sewing area continuously while sewing.
Electronic toot control
Maximum speed can be disconnected from the power source. C) The maximum approved wattage...
Owner's Manual - Page 8
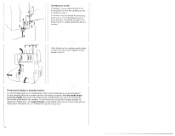
Tighten clamp screw A securely
Insert four thread spool holders 17 with centering pieces 36 fully in the holes of the thread spool stand. Push thread guiding part 18 into guide bar 19.
Pull up to the screw head. Insert thread spool stand 1 from the top. Installing the thread spool stand Loosen clamp screw A a little...
Owner's Manual - Page 9
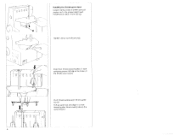
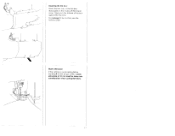
... handle 2 must be pulled up until it locks. right looper (red) 2. needle (blue)
Figure H shows the threading path of the thread
B
spool stand and the thread guides
behind the carrying handle
The machine must be pushed dowii igdin
7 push it to the machine behind carrying handle 2.
A threading diagram is fixed to the left looper...
Owner's Manual - Page 12
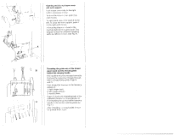
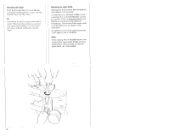
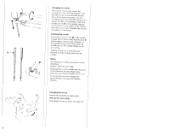
... about 10 cm of thread through the respective needle eyes. Tie the threads still in the machine and the new threads together Pull the needle thread out of the needle. Threading the needle Threading of guide wires 18 and of the thread guide behind the thread retainer
After threading the machine, push handle 2 down, and close work support...
Owner's Manual - Page 13
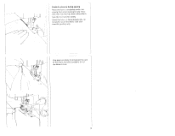
Inserting the lint box:
Insert the two tubs of the lint box
downwards in the recess of the looper
_\
cover Then push the bottom of the box
against the machine
For removal of the lint box, use the reverse order
/
/
Seam allowance
If the cutting is guided along below marking N on the looper cover, a seam allowance of 16 mm must be taken into consideration when cutting the fabric.
11
Owner's Manual - Page 15
Points to observe during sewing Place the fabric completely under the sewing foot when starting to sew (Also after the machine has been rethreaded) Sew the first stitches slowly Since the fdbric is fed automatically, do not pull or push the fabric Use your hand for guiding only
Sew approxirriately 5 cm beyond the end of the seam and use a scissors to cut the thread chain.
13
Owner's Manual - Page 16
... fabrics, a crochet needle can be ued to pull the thread chain into the eani
Or:
Sew about 5 cm (2 beyoi d the end of scam Then turn the work piece around and sew a few stitches ovei... the upper knife
Sewing very thick fabrics and workpieces with different thicknesses:
On this machine, all kinds of fabric from extremely thin to extremely thick can be processed Plheni sewing extremely thick fabrics ...
Owner's Manual - Page 17
... side
The thread tension to be set depends on the left shows a correct seam)
Page 16 lists examples for correction of the individual thread tensions
Needle
t/
i
Top side
i•'
Wj\ i/
.1 // ;;1
Right
looper
thread
Set the N on the thread tension dials opposite the front edge of thread tension cover 7 (see Hustration below...
Owner's Manual - Page 18

... k)J side
Correcting the thread tensions When the thread tension is turned in (+) direction the tension is increased When turned iii ( > direction it is decreased
The needle thread A is too loose (blue thread tcniori)
The right looper thread C is too loose (red thread tension) or the left looper thread D too tight (yellow...
Owner's Manual - Page 20

..., securely tighten screw 38 for axial upper knife hi ock ng
Push rotary lenr 27 of the axial upper knife guide full,' to the rrght, hold it, and turn it may be necessary to 5. L
\ N,
1
kf[J)... 12 arid looper cover 10 If necessary, loosen screw '38 for blocking the upper knife, see page 14
Sew a test sewn
Note, Atler adjusting the seam width, it forwards until pin A engages in the hole nf...
Owner's Manual - Page 23
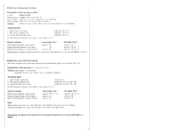
..., one polyester thread The bulk threads must Uteri be set higher or lower.
Rolled hem with polyester thread
Preparation of the sewing machine:
I right looper, red patti 2 left looper Blue thread tension, needle thread
round edge, Fig. 1
appnox "N" to 3 appiox. -t 5 upirox. engage rulkit tern tout ''0
Seam width, from 30 to 4 Ii mm (depending...
Owner's Manual - Page 24
..., see p needle
31.
Changing the needle
Pull out the ii ii. plug Lower the
sewing toot [urn the hand wheel in such of the needle shank
hole M of the needle a way that flat side K faces surface L of the arrow until the needle
bar is at its highest position Use the
needle change tool from the needle
Notes:
ihe following machines.
Owner's Manual - Page 26

... the mains plug!
Replace the screw with the needle plate surface Before tightening the retaining screw, align the pressure plate. Disengage the upper knife (see page 18) Remove retaining screw 34 of the lower k n fe
Place the new lower knife against the left guide of the lower knife so that it up...
Owner's Manual - Page 29
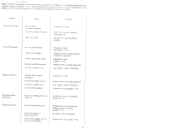
... H Thread cnr r ectly (pageS 7-10). Regulate tension, (pages 15, 16)
Insert needle correctly (page 22>
use needle system 130/705 H
Needle bent or pond damn aged
Needle not fully inset led Incorrect needle used
Thread correctly (see page 22) Do riot pull n aterial during sew i rig
Ii icnr redly threaded 1 tread has caught 1 fired tension too...
Owner's Manual - Page 30

... reel pin. B
28 zz
77
2
3
8
H
60
Accessories
I Screwcii vol (big) 2 Screwdriver (small) 3 nt bru h 4 Tweezer, 5 Upper kniif 6 Thread uereehng disc 7 Needles 8 Sewing rTldchine oil 9 Rolled hem sewing foot 10 Thread spool net 11 Needle change tool
11 )Y'i' (115i]
Thread spool net
Very useful for smaller thread spools. A)
Thread unreeling disc
Fhe thread unreeling disc...
Owner's Manual - Page 31

approx 80 kg
29 Specifications; Sewing foot height Needle system Number of cardboard box
1 umiachune with motor 1 foot control 1 instruction manual/gu000ltee certificate 1 lint box 1 thread spool stand 4 thread spool stand bars 1 thread guide 1 machine cover
1300 1 ches'inin
3 5 mn
1 5 inn
Hinged
Manual
5 mm
130/705 1 (rio 75 -
no. 90) 4
315 x 280 x 330 mm
. Weight
Contents...
Similar Questions

Why Is The Needle Holder Keeps On Dropping
the needle holder keeps on dropping down
the needle holder keeps on dropping down
(Posted by annefajarda 11 months ago)

Edge Guide - Pfaff Select 1540 Sewing Machine
How does the Edge Guide work for the Pfaff Select 1540 sewing machine?
How does the Edge Guide work for the Pfaff Select 1540 sewing machine?
(Posted by jesjames 2 years ago)

My Pfaff Hobby 1122 Sewing Machine Needle Does Not Pick Up Bobbin Thread And Thu
thus does not sew - what is the quick fix. Thanks a million for your quick reswponse.
thus does not sew - what is the quick fix. Thanks a million for your quick reswponse.
(Posted by faridanizar 8 years ago)

What Needles Can I Use For This Machine?
What needles can I use for my Pfaff Hobby 721?
What needles can I use for my Pfaff Hobby 721?
(Posted by Irishwoman32 10 years ago)

The 6091 Needle Hitting Boben, How To Time Machine
(Posted by regmom04 10 years ago)