Get support for Pfaff hobbylock 756

Pfaff hobbylock 756 Support Question

Pfaff hobbylock 756 Support Question

Find answers below for this question about Pfaff hobbylock 756.
Need a Pfaff hobbylock 756 manual? We have 1 online manual for this item!
Question posted by CASHmere84 on August 13th, 2023

Tips To Thread Needle Number 4 On The Pfaff Hobbylock 756

I am having a lot of trouble threading needle #4 on the Pfaff Hobbylock 756. Are there any tips you can share with me please

Current Answers

Answer #1: Posted by SonuKumar on August 13th, 2023 7:46 PM
This answer was accepted by the poster of the original question.
SonuKumar

Member since:
May 9th, 2021

Points: 16,621,300
1,100
points
Here are some tips to thread needle number 4 on the Pfaff Hobbylock 756:

Make sure that you are using the correct needle for your fabric. Needle number 4 is a universal needle that can be used for most fabrics. However, if you are sewing a very heavy or delicate fabric, you may need to use a different needle size.

Thread the needle from the back of the machine to the front. The needle threader on the Pfaff Hobbylock 756 can be helpful for this step.

Make sure that the needle is threaded all the way through. You should be able to see the thread coming out of the eye of the needle on both the top and bottom.

Adjust the tension on the needle thread. The tension should be set to a medium setting for most fabrics. If the stitches are too loose, increase the tension. If the stitches are too tight, decrease the tension.

Test the stitch by sewing a few stitches on a scrap piece of fabric. The stitches should be even and uniform. If the stitches are not even, adjust the tension or needle position until they are correct.

Here are some additional tips for threading needle number 4 on the Pfaff Hobbylock 756:

Use a needle threader to help you thread the needle. This can be especially helpful if you have trouble threading needles by hand.

Make sure that the needle is inserted into the needle bar correctly. The needle should be inserted all the way up to the stop.

If the needle is not inserted correctly, it can cause the machine to skip stitches or break the needle.

If you are still having trouble threading the needle, you can watch a video tutorial online. There are many tutorials available that can show you how to thread a needle on a Pfaff Hobbylock 756.

I hope these tips help you thread needle number 4 on your Pfaff Hobbylock 756! Let me know if you have any other questions.


Please respond to my effort to provide you with the best possible solution by using the "Acceptable Solution" and/or the "Helpful" buttons when the answer has proven to be helpful.

Regards,
Sonu
Your search handyman for all e-support needs!!

Answer #2: Posted by khanjee on August 13th, 2023 12:45 PM
khanjee

Member since:
July 23rd, 2016

Points: 205,300
100
points


Please Accept my answer by providing you with the best possible solution. Would be more glade.
THANK YOU
Answer #3: Posted by Hanna0809 on August 14th, 2023 12:05 PM
Hanna0809

Member since:
July 22nd, 2023

Points: 21,130
100
points
Sure, here are some tips to help you thread needle number 4 on the Pfaff Hobbylock 756:

1. **Raise the Presser Foot**: Before threading the machine, make sure the presser foot is raised. This helps release the tension and allows for smoother threading.

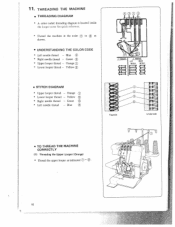
2. **Follow the Color Code**: The Pfaff Hobbylock 756 usually has a color-coded threading guide. Thread color 4 according to the guide.

3. **Thread Path**: Start by following the threading path indicated in the manual. Generally, you'll need to pass the thread through various guides, tension discs, and loops before reaching needle number 4.

4. **Tension Discs**: Ensure that the thread passes through the tension discs correctly. This is crucial for proper stitch formation.

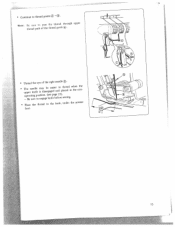
5. **Thread from Front to Back**: Insert the thread from the front of the needle bar towards the back. Make sure the thread is seated securely in the needle clamp.

6. **Needle Orientation**: Check that the flat side of the needle faces the back of the machine. Insert the needle fully into the needle clamp and tighten it.

7. **Test Stitch**: Once you've threaded the needle, conduct a test stitch on a scrap fabric to ensure proper threading and tension. This will help you identify any issues before you start sewing your actual project.

Remember, it's always a good idea to consult your machine's manual for specific instructions tailored to your Pfaff Hobbylock 756 model. If you're unsure or facing difficulties, don't hesitate to seek assistance from the manufacturer's customer support or a local sewing machine expert.

Related Pfaff hobbylock 756 Manual Pages

Owner's Manual - Page 2

...sewing Congratulations! Defective mains leads must be of the terminals in your plug, proceed as approved by ASTA according to be marked 3 A or with the lettter N or coloured black. You have any help or advice. Your new hobbylock 756...safety notes on page 2. : If you many enjoyable hours creating your PFAFF dealer. He is coloured brown must be connected to the safety-lead ...
Owner's Manual - Page 3

... repair, electrical or mechanical adjustment 4. Only use the proper needle plate. Keep fingers away from the accumulation of the sewing machine and foot control free from all moving parts. Do not use bent or blunt needles, Only use needles recommended by the manufacturer as threading needle, changing needle, threading bobbin, or changing presser foot, etc. 16. Replace bulb...
Owner's Manual - Page 4

...on safety for domestic sewing machi nes according to use only original PFAFF parts. When leaving the machine, during maintenance work or when changing This sewing machine is wet, e.g. ...the machine 4. The machine should only must exercise adequate caution with condensation. 8. To remove any objects in side the machine which is free of the needle and keep the sewing Environment...
Owner's Manual - Page 5

... and attachments 44 28. Needle information 4 3. Principal parts 5 4. How to change threads/tie on method .22 . . . 16. Machine maintenance 40 • Cleaning the machine 40 • Oiling the machine 40 • How to replace the stationary knife .41 . . . • How to open looper cover 6 5. Seam guide lines 24 19. Free arm sewing 38 24. How to...
Owner's Manual - Page 6

... that overlock uses a eliminates the flat shank possibility industrial needle of inserting the needle backwards. * Do not attempt to use sewing machine needle of a standard any size or household type in this overlock. #2054 Overlock needle * ms(te2yaw0pce5ihns4ign-a0nere6.ewe)adoRvlveaeaerginel#ua2lbaal0freva5abi4pinrlioacssbisiinlzzeteesanfn11oe4d0er,dislsb1ee2faswu,llri(1nn#4igps2...
Owner's Manual - Page 7

... and holder © Handle Pressure regulating screw Left needle thread tension dial (blue) ® Right needle thread tension dial (green) © Upper looper thread tension dial (orange) © Lower looper thread tension dial (yellow) ® Throat plate ® Cylinder cover Cloth plate © Looper cover © Power & light switch © Stitch length dial © Hand wheel...
Owner's Manual - Page 12

11. Yellow © • STITCH DIAGRAM * Upper looper thread - Green * Upper looper thread Orange ® * Lower looper thread - Green * Left needle thread Blue - THREADING THE MACHINE r • THREADING DIAGRAM * A color coded threading diagram is located inside the loopei cover for quick refcrcnce. * Thread the machine in the order ® to as indicated © 10 ...
Owner's Manual - Page 16

(3) Threading the Right Needle (Green) I A 14 I I * Thread the right needle as indicated (iJ--®. . 1- • - \ L_-4 -- - * Pass thread from back to the front through the thread guide D * Pass thread through hole ® from front to back, then to the front through right slot as shown. * While holding thread with finger, pass it between the tension discs and pull thread down...
Owner's Manual - Page 17

* Continue to the back, under the presser foot. 15 L upper * Thread the eye of the the thread through thread guide(). Note: Be sure to thread path pass of the right needle ®. * TuophpepeBerearntsieuknerngdeilfpeetoosimesintaigdoyainsg.eebn(egskeaneegifaepesdaiegbraeenf2odto3re)p.ltsahecrweeidandgi.nwthheen the non - * Place the thread to thread points® -®.
Owner's Manual - Page 18

J 16 (. (4) Threading the Left Needle (Blue) I * Thread the left needle as indicated * Pass thread from back to the front through the thread guide * Pass thread through hole from front to back, then to the front through right slot as shown. °Tfl * While holding thread with finger, pass it between the tension discs and pull thread down to make certain...
Owner's Manual - Page 19

Be sure to engage knife before sewing. * Place the thread to the back, under the presser foot. • IMPORTANT THREADiNG INFORMATION * Always thread the needle(s) last to thread points ®-®. * Continue to prevent mis I threading the lower looper. * If the lower looper should come unthreaded. 1) Unthread the needle(s) 2) Thread the lower looper 3) Thread the needle(s) Correct view...
Owner's Manual - Page 20

... presser foot and sew a test sample. CHAINING OFF AND TEST SEWING * When the machine is 5 7.5 cm (2 3 inches) in length. * Clip the thread chain. Note: Anytime you 2 or 3 complete turns to start the thread chain. * Lower presser foot. * Continue holding the chain and press on the fabric while sewing as this may deflect the needle, causing it to...
Owner's Manual - Page 21

... a one- BASIC STITCH TYPES • 4 THREAD OVERLOCK MOCK SAFETY STITCH * This machine is a four-thread overlock that Adjustments be in no greater than half a number at a time. 2) Sew a test sample after each adjustment. .4 S Current Setting is sewn. Adjustment would be increased by adjust ing the knife (page 25). The left needle is removed a narrow 3.5mm (9/64...
Owner's Manual - Page 22

Turn the left needle thread tension is too loose Turn the right needle thread tension dial - (green) toward a higher number. Turn lower looper thread tension dial (yellow) toward a higher number Or turn lower looper thread tension dial (yel - Upper looper thread \ Right thread nenee edled Jl ''\ thread L ierXooper hread Underside * When the right needle thread tension is too loose - ...
Owner's Manual - Page 23

... tension dial tension dial - (orange) to a lower number. * When needle the needle thread tension dial (blue is too loose, or green) to a lower number. Or, turn to a the higher lower number. Needle Topside Needle thread b00 Topside Lower looper thread L9Werloper Underside - Topside Underside 21 looper thread tension dial - • SUGGESTED TENSION SETTINGS FOR...
Owner's Manual - Page 25

... setting dial for tangles or looping under thread stand. J 17. HOW TO DISENGAGE MOVABLE UPPER KNIFE 9 TNOONPLWAOCREKMINOGVPAOBSLIETIKONNIFE IN * Be sure the machine is in the up position * Turn the hand wheel toward you until the knife clears the top of the the needle, needle. * Pull the threads through the needle. * Return tension dials to previous settings...
Owner's Manual - Page 27

... accesso ries. (1) * Move the stationary knife holder increase the stitch width, or to the to the left sew the four-thread stitch needle position stitch at a width of 5.7mm (7/32 inch). * The machine is set to three-thread left to right to decrease the stitch width. * Be sure to knife level align with the the...
Owner's Manual - Page 29

... be sewn. * This machine can sew two types of rolled hems. • SUGGESTED TENSION SETTINGS FOR STANDARD ROLLED HEM * Always sew a test sample and adjust tension balance if neccessary. * Adjust tension balance the same as instructed below. For a beautiful rolled hem thread the upper looper with wooly nylon and the needle and I lower loopet with...
Owner's Manual - Page 33

... fold. * Stitch on the fabric before cutting out the garment * Remove the left needle and adjust machine for a narrow three-thread overlock stitch. Note The rolled hem stitch can also be used . * Set the ... side with the desired number of pin g tucks using a water soluble fabric marker I Sew decorative pin tucks on the extended hem edge, allowing the machine needle to barely catch the edge...
Owner's Manual - Page 47

...Needle bar stroke Presser foot rise Needle Number of the machine and catches the fabric scraps as they are trimmed. (7) Fabric Separator * Most suited for gathering when sewing...28. The machine will trim the excess fabric, finish off the edge and sew a hem in one operation. (See page 31) (6) Clean Pocket * Fits under the base of threads Machine dimensions Weight hobbylock 756 Specification 1,...

Similar Questions

High Pitched Screech. Pfaff Hobbylocker 756
The overlocker works well but has developed a high pitched screech scraping sound when it starts up ...
(Posted by jesmond99 2 years ago)
My Passport 2.0 Machine Has Been Away To The Supplier Gur Sewing Machines In Bir
My machine has just come back from the suppliers, GUR sewing machines in Birmingha, after being chec...
(Posted by normaaitken13 6 years ago)
Pfaff 259 Sewing Machine Won't Run With Foot Petal
I have a pfaff 259. When I push on the foot petal the motor runs but the machine itself doesn't run....
(Posted by Aemazing 8 years ago)
Ask a New Question
Use the box below to post a new question about this Pfaff product .
Points & Prizes
  • You can earn points for nearly everything you do on HelpOwl.com
  • You can trade in those points for gift cards at leading retailers such as Amazon.com and Walmart
  • It's that simple!
See How it Works
Create a Free Account

Pfaff Manuals

Find free Pfaff hobbylock 756 manuals and user guides available at ManualOwl.com. Try out our unique manual viewer allowing you to interact with manuals from directly within your browser!

Pfaff Reviews

View thousands of Pfaff user reviews and customer ratings available at ReviewOwl.com.

Contact Information

Complete Pfaff customer service contact information including steps to reach representatives, hours of operation, customer support links and more from ContactHelp.com.

Scoreboard Ratings

See detailed Pfaff customer service rankings, employee comments and much more from our sister site.