Optoma PRO160S Support Question
Optoma PRO160S Support Question
Find answers below for this question about Optoma PRO160S.Need a Optoma PRO160S manual? We have 5 online manuals for this item!
Question posted by jakes121 on May 14th, 2014
No Light Coming Out From The Lens Of My Pro 160s Projector.
even if the green light for the power is turned on and i already pressed many time the power button. can you help me regarding this problem?
Current Answers
Answer #1: Posted by kcmjr on May 14th, 2014 11:23 PM
kcmjr

Member since:
May 5th, 2011 Points: 4,254,255

Member since:
May 5th, 2011 Points: 4,254,255
More likley than not the bulb has failed and needs to be replaced. The replacement process involves opening the bottom of the ptojector. I recommend that you locate the procedure in the user guide and follow it to avoid damaging the projector. The user guide on page 47 explains the proper procedure to replace the bulb. The guide can be downloaded here: http://marketing.optomausa.com/PDFs/usermanuals/Optoma_PRO360W_UM.pdf
Licenses & Certifications: Microsoft, Cisco, VMware, Novell, FCC RF & Amateur Radio licensed.
Related Optoma PRO160S Manual Pages
User's Manual - Page 1

...11
Connect to Computer/Notebook......... 11 Connect to Video Sources 12 Powering the projector On / Off.........13 Powering On the Projector 13 Powering off the projector 14 Warning Indicator 14 Adjusting the Projected Image..........15 Adjusting the Projector's Height ........ 15 Adjusting the Projector's Focus.......... 16 Adjusting Projection Image Size......... 16
User Controls 18 Control...
User's Manual - Page 2

...alert the user to the presence of fire and/or electric shock, do not place the projector on to the projector. Projector has been exposed to dangerous voltages or other apparatus such as a book case or a ... (but not limited to): Unit has been dropped. Power supply cord or plug has been damaged. Liquid has been spilled on a crowded coffee table, sofa, bed...
User's Manual - Page 3

...turn back on the screen.
Do not use lens cap when projector is in this user's guide.
▀■ Warning- will detect the life of its life, the pro...projector will show on until the
▀■ Warning- When switching the projector off, please ensure
the cooling cycle has been completed before
When the lamp
disconnecting power. projector...
The bright light may cause ...
User's Manual - Page 5

Keep your back to the beam as much as possible.
▀■ When projector is used in speaker with 2 Watt amplifier ▀■ HDMI interface ▀&#... on the screen.
▀■ In order to minimize the lamp power, use room blinds to reduce ambient light levels. Usage Notice
Eye Safety Warnings
▀■ Avoid staring/facing directly into the projector beam at all times.
User's Manual - Page 6

Projector with lens cap
Power Cord 1.8m
VGA Cable 1.8m
HDMI
Due to ensure all parts listed below are in each Country, some regions may have different accessories.
2 × ...
User's Manual - Page 11
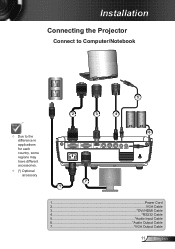
Installation
Connecting the Projector
Connect to Computer/Notebook
5
2
3
4
Due to the difference in applications for each country, some regions may have different accessories.
(*) Optional accessory
R
E62405SP
VGA-IN / SCART / YPbPr
VGA-OUT
HDMI
S-VIDEO
VIDEO
RS-232
AUDIO-IN AUDIO-OUT
6
7 1
1...Power Cord 2...VGA Cable 3 DVI/HDMI Cable 4 RS232 Cable 5 Audio...
User's Manual - Page 13

Turn on the lamp by pressing "POWER" button either on the
When Power mode (Standby) is set to Eco ( Remove the lens cap.
2. When connected, the Power LED will turn Amber.
3. Installation
Powering the projector On / Off
Powering On the Projector
1. Securely connect the power cord and signal cable.
User's Manual - Page 14

... assistance. This indicates the projector has overheated. If the warning indicator light up again, please contact your nearest service center for 30 seconds and try again. Under normal conditions, the projector can be displayed on the projector immediately following message will disappear after 15 seconds. Press the "POWER" button again to turn the projector back on .
"TEMP...
User's Manual - Page 15

Rotate the adjustable ring clockwise to raise the projector or counter clockwise to modify on the underside of the projector.
2. Installation
Adjusting the Projected Image
Adjusting the Projector's Height
The projector is equipped with the remaining feet as needed.
Tilt-Adjustment Feet Tilt-Adjustment Ring
15 English Locate the adjustable foot you wish to lower...
User's Manual - Page 16

... (1.0 to 7.65 meters). Top View
Screen
Screen (W)
Side View
Projection Distance (D)
Projection Distance (D)
Screen
Screen (H)
Offset (Hd)
Height
Diagonal Width
English 16 Installation
Adjusting the Projector's Focus
To focus the image, rotate the focus ring until the image is clear.
SVGA/XGA series: The...
User's Manual - Page 18

....
English 18 Enter
Confirm your selection. Power LED
Indicate the projector's status. Automatically synchronize the projector to adjust image distortion caused
by tilting the projector. (±40 degrees)
Indicate the projector's lamp status. MENU
Four Directional Select Keys
Keystone
Lamp LED
Press "Menu" to the "Power On/Off the Projector" section on -screen display (OSD) menu...
User's Manual - Page 39

User Controls
OPTIONS | Advanced
When Power mode (Standby) is set to Eco (
User's Manual - Page 40

...
Display the projection time. Lamp Reminder
Choose this function to show or to hide the warning message when the changing lamp message is over 35°C in operating, the projector will switch to ...the lamp.
English 40
The message will lower
power consumption and extend the lamp life.
BRIGHT: Choose "BRIGHT" to dim the projector lamp which will appear 30 hours before suggested ...
User's Manual - Page 41

... not turned on.
Open the "My Computer" icon, the "Control Panel" folder, and
then double click on the "Advanced Properties" button. Click on the "Display" icon. 2. If the projector is...Make sure you experience a problem with your projector, please refer to the following steps.
5. Appendices
Troubleshooting
If you have removed the lens cap and the projector is
switched on.
...
User's Manual - Page 43

... Keystone is not recommended.
Image has slanted sides
If possible, reposition the projector so that it is horizontally
centered on the screen and below the bottom of the screen.
Press "Keystone +/-" button on the remote control or press " / " on the projector lens. Make sure the projection screen is between the required distance. Appendices...
User's Manual - Page 44
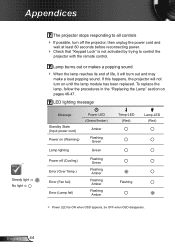
... the "Replacing the Lamp" section on (Warming)
Power LED (Green/Amber)
Amber
Flashing Green
Lamp lighting
Green
Power off the projector, then unplug the power cord and
wait at least 60 seconds before reconnecting power.
Check that "Keypad Lock" is not activated by trying to all controls If possible, turn on until the lamp module has been replaced...
User's Manual - Page 56
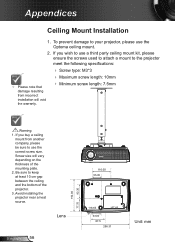
...to use a third party ceiling mount kit, please ensure the screws used to attach a mount to the projector
meet the following specifications:
Please note that damage resulting from another company, please be sure to ... to keep at least 10 cm gap between the ceiling and the bottom of the mounting plate. 2.
Lens
English 56
192.00
77.75
82.30
110.00 55.00
118.65
167.66
63.00 87...
Datasheet - Page 1

...Output (Functional in Both Normal and Standby Modes)
Projection Lens F= 2.41-2.55, f = 21.8-23.98mm, ... ratio (full on/full off) Rapid power-on and shutdown - Please visit www.optoma.com ...projector for more information. saving you time and money Filter-free design means low cost of ownership High-definition resolution supported Wide range of 3000:1, the PRO160S...
Brochure - Page 1

... a compatible 3D graphics card. PRO160S | Multimedia Projector
Brilliant Large Screen Display
VGA-In
VGA-Out
S-Video RS-232 Audio-Out
HDMI
Video Audio-In
Power/Standby
Source
Keystone Correction Brightness Contrast S-Video Freeze
VGA
Re-Sync Select Volume
Zoom AV Mute Video
Menu
AC Power
Kensington Lock
The Optoma PRO160S is connected to take on...
Brochure - Page 2

PRO160S | Multimedia Projector
Projection Distance/Image Size
Projection Distance (Feet)
Maximum Diagonal (Inches)
Minimum Diagonal (Inches)
6
42
38
8
56
51
10
71
64
12
85
77
14
99
90
16
113
102
18
127
115
Control Panel
Power/ Standby Menu
Keystone Correction
Source Keystone Correction
Power LED Lamp LED
Temp LED
Re-Sync Select
Four...
Similar Questions

Optoma Projector Pro160s Does Not Project Whole Computer Image
(Posted by wliFeeder 9 years ago)


Yellow Light Flashing On Power Button
I Have an Optima EX615 and it will not turn on. We are getting a flashing yellow light on the power ...
I Have an Optima EX615 and it will not turn on. We are getting a flashing yellow light on the power ...
(Posted by daleleifson 11 years ago)

Replaced The Lamp Power Button It Went Solid Green Then 2 Red Lights Came On
(Posted by Anonymous-47434 12 years ago)

Why Doesn't The Page Up/down Function Work On The Pro160s????
(Posted by Anonymous-32848 12 years ago)