
NordicTrack Gx 5.0 Pro Bike Support Question
NordicTrack Gx 5.0 Pro Bike Support Question
Find answers below for this question about NordicTrack Gx 5.0 Pro Bike.Need a NordicTrack Gx 5.0 Pro Bike manual? We have 2 online manuals for this item!
Question posted by 2dellis on April 7th, 2013
Ntex04911.1 Locate Plug-in Receptacle
Recently I caught the electric cord, the POWER ADAPTER cord in the pedals. The cord ripped itself out, leaving something in the receptacle and ruining the POWER ADAPTER plug. QUESTION: what is the part number and title of the RECEPTACLE? I want to attempt replacement but I need to order the parts first. I know the POWER ADAPTER is #51 on the manual parts list but I can't be sure of the part already on the bike. THANKS!!
Current Answers
Related NordicTrack Gx 5.0 Pro Bike Manual Pages
English Manual - Page 1
Serial Number Decal
QUESTIONS? If you have questions, or if parts are damaged or missing, DO NOT CONTACT THE STORE; please contact Customer Care. Keep this equipment. www.nordictrack.com
Model No. CALL TOLL-FREE:
1-800-TO-BE-FIT
(1-800-862-3348) Mon.–-Fri. 6 a.m.–-6 p.m. MT Sat. 8 a.m.–-4 p.m.
USER’'S MANUAL NTEX04911.1 Serial No...
English Manual - Page 2
... CHEST HEART RATE MONITOR 13 HOW TO USE THE EXERCISE BIKE 14 MAINTENANCE AND TROUBLESHOOTING 21 FCC INFORMATION 22 EXERCISE GUIDELINES 23 PART LIST 24 EXPLODED DRAWING 26 ORDERING REPLACEMENT PARTS Back Cover LIMITED WARRANTY Back Cover
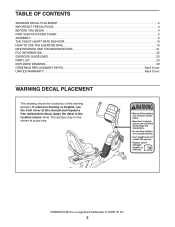
WARNING DECAL PLACEMENT
This drawing shows the location(s) of ICON IP, Inc.
2 If a decal is a registered trademark...
English Manual - Page 3

... is the responsibility of the owner to ensure that could become caught on your exercise bike before using the exercise bike; Always wear athletic shoes for personal injury or property damage sustained by persons weighing more than 350 lbs. (159 kg).
4. Do not put the exercise bike in this manual.
8. If you feel faint or if you...
English Manual - Page 4
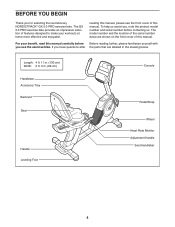
... drawing below. BEFORE YOU BEGIN
Thank you use the exercise bike. To help us assist you, note the product model number and serial number before Before reading further, please familiarize yourself with you for selecting the revolutionary NORDICTRACK® GX 5.0 PRO exercise bike. The model number and the location of this manual carefully before contacting us. For...
English Manual - Page 8
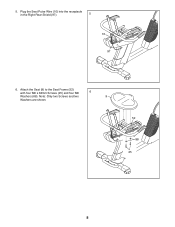
5. Attach the Seat (9) to the Seat Frame (52)
with four M6 x 38mm Screws (25) and four M6
6
Washers (88). Note: Only two Screws and two
9
Washers are shown.
52
88 25
8 Plug the Seat Pulse Wire (10) into the receptacle
in the Right Rear Shield (97).
5
10 97
6.
English Manual - Page 10

... the top of one wire tie to the Main Wire (43) and to the end of the other two Screws. Tip: Avoid pinching the wires.
Locate the wire ties in the front of the Upright, and then tighten the other wire tie to the Frame Pulse Wire (42). Slide the Top...
English Manual - Page 12
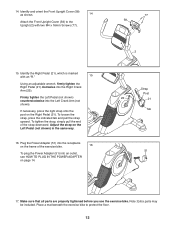
... (77).
15. Firmly tighten the Left Pedal (not shown) counterclockwise into an outlet, see HOW TO PLUG IN THE POWER ADAPTER on the frame of the strap downward. Plug the Power Adapter (51) into the receptacle
on page 14.
77 58
2
Strap
Post
23
21
Tab
51
17. Place a mat beneath the exercise bike to the Upright (2) with an “...
English Manual - Page 13
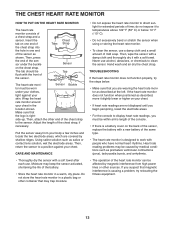
...sensor to a position against your body a few inches and locate the two electrode areas, which are covered by shallow ridges. ...heart rate monitor does not function properly, try relocating the fitness equipment.
13 Insert the tab on one end of the...battery cover on the chest strap. Pull the sensor away from high power lines or other sources. Wrap the heart
rate monitor around
your chest...
English Manual - Page 14
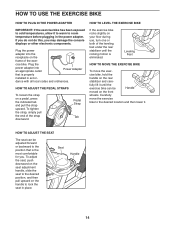
... THE EXERCISE BIKE
IMPORTANT: If the exercise bike has been exposed to cold temperatures, allow it to warm to room temperature before plugging in place. Plug the power
adapter into an appropriate outlet
Power Adapter
that is eliminated.
To tighten the strap, simply pull the end of the exer- If you do not do this, you . Plug the
power adapter into the
receptacle on...
English Manual - Page 15
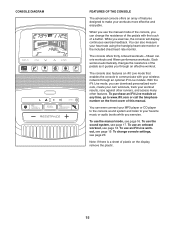
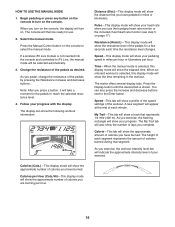
...button. To use an iFit Live workout, see page 18. To change the resistance of the pedals with your wireless network through an effective workout. You can change console settings, see page 17....manual mode, see page 16. While you exercise. To use an onboard workout, see page 19. Each workout automatically changes the resistance of the pedals as it guides you can also measure your...
English Manual - Page 16
... tabs. Speed—-This tab will show a profile of the speed settings of laps you exercise, the flashing rectangle will show your progress. A new segment will also show the number of...This display mode will show the resistance level of the pedals for a few seconds each segment represents the amount of calories you exercise, the workout intensity level bar will show your progress with...
English Manual - Page 17
...button. If necessary, press the Home button again. Measure your workout, simply resume pedaling.
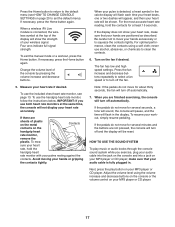
If there are finished exercising, the console will turn off the fan. never use the included chest heart rate ...heart symbol in the display. Four arcs indicate full signal strength. IMPORTANT: If you exercise, plug your audio cable into the jack on the console and into a jack on your palms...
English Manual - Page 18
...exercise, you will then change.
18 Select an onboard workout.
Note: The same resistance level and/or target speed may be ready for use. The height of the pedals will be programmed for the current segment. IMPORTANT: The target speed is intended only to start the workout. Make sure to keep your pedaling... or too low, you are finished exercising, the console will flash in the matrix...
English Manual - Page 20
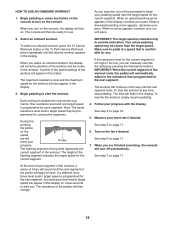
...Live status display. Set the default menu if desired. Press the decrease button to turn on the exercise bike.
3. Press the Enter button repeatedly to adjust the contrast level.
5. The display will appear in...iFit Live module if desired. Determine if an iFit Live module is the menu that has been pedaled on the console. Check for the voice of the personal trainer ON or OFF.
1. Press ...
English Manual - Page 21
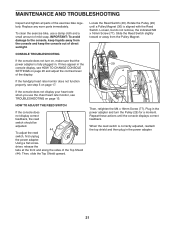
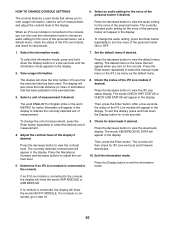
... function properly, see HOW TO CHANGE CONSOLE SETTINGS on , make sure that the power adapter is aligned with the Reed Switch.
Plug in the power adapter.
21 Using a flat screwdriver, release the tabs at the front and along the sides of the exercise bike regularly. Rotate the Pulley (29) until the console displays correct feedback. When the...
English Manual - Page 22
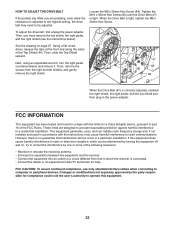
... the party responsible for a Class B digital device, pursuant to provide reasonable protection against harmful interference in the power adapter.
However, there is correctly adjusted, reattach the right shield, the right pedal, and the top shield and then plug in a residential installation. Using a flat screwdriver, release the tabs at the front and along the sides...
English Manual - Page 23
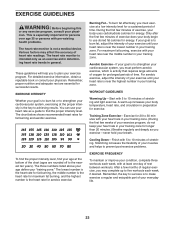
... than 20 minutes.) Breathe regularly and deeply as a guide to prevent post-exercise problems.
EXERCISE FREQUENCY
To maintain or improve your training zone. Various factors may complete up ...increases your physician. During the first few weeks of stretching. Training Zone Exercise—-Exercise for energy. Remember, the key to 30 minutes with pre-existing health problems...
English Manual - Page 24
...91 12
92
2
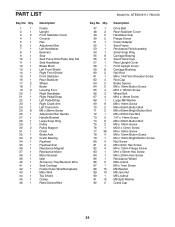
Description
Drive Belt Rear Stabilizer Cover Handlebar Grip Flange Screw Power Adapter Seat Frame Resistance Rod Assembly Small Snap Ring Carriage Bearing Seat Frame Cap ... Wheel Brake Leveling Foot Right Handlebar Right Pedal/Strap Left Pedal/Strap Right Crank Arm Left Crank Arm ...Receptacle Main Wire Top Shield Clamp Reed Switch/Wire
Model No. NTEX04911.1 R0412A
Key No.
English Manual - Page 26
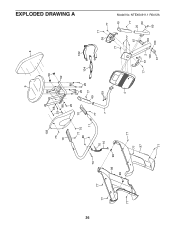
NTEX04911.1 R0412A EXPLODED DRAWING A
9 8
26
77 77
103 75 10
69
56
88
25
88
52
25
88
88
77
10
75
86
25 25
11
77
70 77
70
49 77
10
69 7
98
99
99 4
77
77
97
77
102 104
77 58
77
77 49
77
57 2
100
67
77 67
100 100
77 20
69
69
Model No.
English Manual - Page 27
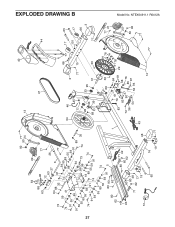
NTEX04911.1 R0412A EXPLODED DRAWING B
40
92 77
50 24
13
27
64
22
88
96
63
77
12
63 27
26
74
64 88 32
91
6
...
Similar Questions

Ramp Angle Not Working
ramp is stuck at the top. When you push an angle button, ramp motor makes a bzzzz sound for a second...
ramp is stuck at the top. When you push an angle button, ramp motor makes a bzzzz sound for a second...
(Posted by maboomba 4 years ago)

What Part Powers The Generator?
No power to light panel. What part powers the generator
No power to light panel. What part powers the generator
(Posted by vernaleejohnston 4 years ago)

Elliptical Power/screen Not Going On.
The TV monitor works but the Ellipital power is not going on so can't change resistance, check milea...
The TV monitor works but the Ellipital power is not going on so can't change resistance, check milea...
(Posted by cahasselt 5 years ago)

How To Adjust Reed Switch On Nordictrak Gx 5.0 Pro So Console Displays Correctly
(Posted by bkmk 10 years ago)