
1996 Nissan Pickup Support Question
1996 Nissan Pickup Support Question
Find answers below for this question about 1996 Nissan Pickup.Need a 1996 Nissan Pickup manual? We have 1 online manual for this item!
Question posted by wgaryphillips on January 22nd, 2013
Clutch Adjustment
The clutch and pressure plate were replaced, the master cylinder and slave cylinder were bled, yet the pedal still goes nearly to the floor before the clutch will release. How can the clutch pedal be adjusted to the correct height?
Current Answers
Related Manual Pages
Owner's Manual - Page 12

...the ''Pre-driving checks and adjustments'' section.
If the light ...and require greater pedal effort as well as pedal travel. If ...goes out when the low beams are selected. If the brake fluid level is on when the headlight high beam is correct...pressure.
See ''Brake and clutch fluid'' in a safe area, stop the vehicle and perform the following conditions occur, the 1-7
Engine oil pressure...
Owner's Manual - Page 30

... remove the cap. ● Use only a genuine NISSAN fuel filler cap as a replacement. An incorrect cap can result in safety valve needed for any ''hissing'' sound to ...the latches are heard. The support stays hold the gate open flames or sparks near the vehicle when refueling. ● Fuel may come on the vehicle body, flush... explosive under pressure. Always stop to avoid paint damage.
Owner's Manual - Page 42
...more people in the vehicle than one person to use during a collision be inspected and replaced if either damage or improper operation is noted. ● Never carry more than there ...seat belt tongue is not designed for passengers. NISSAN recommends that seat belts be properly adjusted to observe the following cautions when using seat belts. Failure to operate properly. Seat ...
Owner's Manual - Page 80

...9679; Lock all doors. ● Position seat and adjust head restraints. ● Adjust inside and outside mirrors. ● Fasten seat belts ...pedal is depressed. This may cause the driver to OFF or if the key is removed from the key cylinder, push the key release..., coolant, brake and clutch fluid, and window washer fluid as frequently as the engine has started, release the key. ACC (Accessories...
Owner's Manual - Page 84
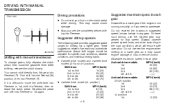
... model (4L position): Shift from 5th gear into Reverse (R). Actual shift ranges should be adjusted for specific road conditions, weather conditions and individual driving habits. ● 2-wheel drive models...
To change gears, fully depress the clutch pedal, then move the shift lever into Reverse or 1st, shift into Neutral, then release the clutch pedal. Do not exceed the maximum suggested ...
Owner's Manual - Page 85

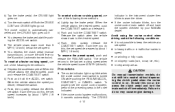
...48) − (−) 1. Manual transmission: Move the gearshift lever to N (Neutral), and depress the clutch pedal to START. Drive at a time. The shift lever cannot be damaged. 4. Crank the engine with your ...turn the key off the accelerator pedal by turning the ignition key to the floor while starting the engine. Release the key when the engine starts. Apply the parking brake. ...
Owner's Manual - Page 87
... the CRUISE light goes out if: ● You depress the brake pedal while pushing the ACCEL set switch. ● The vehicle slows down to the N position (automatic transmission). Each time you do not shift into neutral without depressing the clutch pedal when the cruise control is over 30 MPH (48 km/h). Release the switch when...
Owner's Manual - Page 92

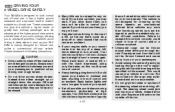
.... ● When backing up, stop and move 3 feet (1 m) forward, then move it is not necessary to depress the clutch pedal. NOTE: For 2-wheel drive operation, set the free-running hubs in reverse. Depress the clutch pedal. 4H 3. Perform this operation when driving straight. Perform this operation when driving straight. This will not disengage until...
Owner's Manual - Page 93

... 4L to 2H. Depress the transfer lever and move it to 4L
SHIFT PROCEDURE FOR AUTO-LOCK FREE-RUNNING HUBS 1. Depress the clutch pedal. 3. Change gears quickly and smoothly. 1. Depress the transfer lever and move it to 4L. NOTE: Follow the NOTE shown in shifting from 4H to 2H
4-...
Owner's Manual - Page 95

... or 2. Depress the transfer lever and move it is not necessary to depress the clutch pedal. NOTE: For 2-wheel drive operation, set the free-running hubs in the FREE position. Depress the clutch pedal. 4H 3. TO SHIFT TRANSFER CASE: From 2H to the desired 4L or 4H ... the transfer lever to 2H. Move the transfer lever to 4H. It is not necessary to depress the clutch pedal.
Owner's Manual - Page 96

SHIFT PROCEDURE FOR MANUAL-LOCK FREE-RUNNING HUBS Stop the vehicle. Depress the clutch pedal. Depress the transfer lever and move it to 2H.
4-21 NOTE: Follow... transfer lever and move it to 2H
1. Stop the vehicle. 2.
Change gears quickly and smoothly. Depress the clutch pedal. 3. Set free-running hubs in shifting from 4H to 4L. From 2H to 4L
From 4L to 2H. TO SHIFT TRANSFER ...
Owner's Manual - Page 97
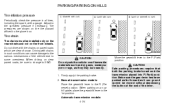
... Your vehicle could cause your brakes to overheat and fade, resulting in neutral (N) or with the clutch depressed, using only the brake, as this could cause loss of control. ● Heavy braking...things on the outside of control and an accident. If you or your passengers in this vehicle correctly could jerk and injure your speed. ● If at all possible, avoid sharp turning maneuvers...
Owner's Manual - Page 98

...9679; Before operating vehicle, ensure that all four tires be replaced with tires of the same size, brand, construction and tread...all four wheels. The tire pressure and wheel alignment should be taken if you could be checked and corrected as the wheel hub, more...have their seat belts fastened. ● Always drive with the floor mats in this section. ● Whenever you install snow tires...
Owner's Manual - Page 99
... mechanisms of the vehicle due to the glove box. Tire pressures are clear of the lever. When parking on the front wheels.
Adjust to the P (Park) position.
Firmly apply the parking ... some overstress. Automatic transmission models: 4-24
Move the gearshift lever to the specified pressure if necessary. Make sure the gear lever has been pushed as far forward as they ...
Owner's Manual - Page 112
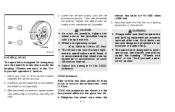
...● Adjust tire pressure to the glove box lid. ● Retighten the wheel nuts when the 5-7
Carefully put the spare tire on the tire placard affixed to the COLD pressure. COLD pressure: After vehicle....
● The wheel nuts must be tightened to specification at all times. COLD tire pressures are shown on and tighten the wheel nuts finger tight. 3. Lower the vehicle slowly until...
Owner's Manual - Page 124

... fluid ...7-9 Power steering fluid ...7-11 Brake and clutch fluid ...7-11 Window washer fluid ...7-12 Battery ...7-13 Drive belts ...7-14 Spark plug replacement ...7-14 Air cleaner housing filter ...7-15 Wiper blades ...7-16 Parking brake check ...7-17 Brake pedal ...7-18 Brake booster ...7-19 Clutch pedal ...7-19 Fuses ...7-20 Light bulbs ...7-20 Bulb replacement ...7-22 Wheels and tires ...7-24...
Owner's Manual - Page 149

...Flat tire'' in the tire rotation. When the wear indicator is visible, the tire should be replaced. ● The original tires have been run for the first 600 miles (1,000 km) ... replacing procedures. If excessive wear, cracks, bulging or deep cuts are found, the tire should be periodically inspected for 4WD vehicles. CAUTION ● After rotating the tires, adjust the tire pressure....
Owner's Manual - Page 156

... do not pull the vehicle to one side when applied. Keep the floor mats away from opening when the primary latch is found in every position...released. Seat belts Check that all warning lights and chimes are installed securely. Accelerator pedal Check the pedal for smooth operation and make sure the pedal does not catch or require uneven effort. Clutch pedal* Make sure the pedal...
Owner's Manual - Page 192

... (R-ABS) .. 4-26 Break-in schedule ...4-13 Bulb check/instrument panel ...1-6 Bulb replacement...7-22 C Capacities and recommended fuel/lubricants...9-2 Cargo (see vehicle loading information)...9-15 Cassette ... and interior ...6-2 Clock/audio system...3-11 Clock/instrument cluster ...1-5 Clutch fluid ...7-11 Clutch pedal...7-19 Cold weather driving cautions ...4-27 Controls Audio controls ...3-11,...
Owner's Manual - Page 195
...type jack ...5-6 Seats Adjustment...2-8 Bench seat...2-10 Jump... ...9-26 Shifting Automatic transmission ...4-7 Manual transmission...4-9 Spark plug replacement...7-14 Speedometer ...1-3 SRS warning label ...2-15 Starting Before starting...Tire chains ...7-25 Tires of 4-wheel drive ...4-23 Tire placard...9-14 Tire pressure ...7-24 Tire rotation ...7-26 Types of tires...7-24 Uniform tire quality grading...
Similar Questions

Replacing Headlights
How do you remove the installed headlights from a '96 Nissan King Cab truck to replace them? Do you ...
How do you remove the installed headlights from a '96 Nissan King Cab truck to replace them? Do you ...
(Posted by billboz 9 years ago)

Tranny Wont Go In Gear. I Replaced The Clutch Master,and Slave Unit
(Posted by andrewsshawnboy 10 years ago)

How To Replace Fuse Linkage On A 1996 Nissan Pickup
(Posted by minjyoder 10 years ago)

How Do I Change Clutch Pressure Plate On 1993 Nissan D21
(Posted by bdub1985 10 years ago)
