Memorex Mi1111 Support Question
Memorex Mi1111 Support Question
Find answers below for this question about Memorex Mi1111 - Micro System.Need a Memorex Mi1111 manual? We have 2 online manuals for this item!
Question posted by sheilarose7 on November 6th, 2011
Mi2001?
I need a manual for Mi2001. Memorex iPod Docking with Alarm Clock and Radio and Remote
Current Answers
Related Memorex Mi1111 Manual Pages
Info Sheet - Page 1

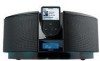
Mi1111
home stereo system for other MP3 players via
line-in jack (patch cord not included) t 954 660 7000 f 954 660 7085
www.memorexelectronics.com
CD players, and other digital audio devices
iPod with video
4th Generation
iPoidPonadnno ano
with Click WihPeoedl
iPo2dnpdhogteoneration iPod mini 4th generation (color display)
iPod with presets • Illuminated blue accent lights...
Info Sheet - Page 2
... nano (2nd generation) - Please confirm package/shipping information with your sales representative. and other countries. Mi1111
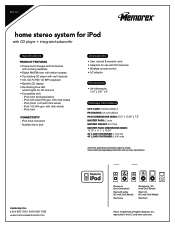
home stereo system for iPod
with CD player + integrated subwoofer
Specifications
PRODUCT FEATURES
• Powers and charges all iPod devices with docking capability
• Digital AM/FM tuner with station presets • Top loading CD player with mp3 decoder...
User's Manual - Page 2

...64257;cations are expressly approved in the instruction manual. The user could lose the authority to operate this equipment may generate or use radio frequency energy. NO USER-SERVICEABLE PARTS INSIDE.... to the presence of important operating and maintenance (servicing) instructions in the U.S. iPod is intended to alert the user to the presence of uninsulated dangerous voltage within an equilateral...
User's Manual - Page 3

... antenna. • Increase the separation between the equipment and receiver. • Connect the equipment into an outlet on , the user is encouraged to try to radio communications. SAFETY PRECAUTIONS
INFORMATION: This equipment complies with Class B digital device regulations. Only qualified service personnel should attempt to use a surge protector for help. Cet...
User's Manual - Page 4

...attention to your appliance dealer or local power company. If you are unable to your home, consult your unit. LIGHTNING To protect your obsolete outlet. RETAIN INSTRUCTIONS The safety and...an outdoor antenna. 1. If the plug should be blocked or covered. POWER LINES An outside antenna system should never be sure to protect it from a lightning storm, or when it is a safety ...
User's Manual - Page 5

... product, size of grounding conductors, location of antenna discharge product, connection to the grounding system of the building, as contact with them might be mounted to a wall or ceiling ... dangerous voltage or other products (including amplifiers) that could result in performance-this indicates a need for service. 23. If the product has been exposed to qualified service personnel.
19. ...
User's Manual - Page 6

... traffic Light traffic, normal conversation, quiet office Air conditioner at 20 feet, sewing machine Vacuum cleaner, hair dryer, noisy restaurant Average city traffic, garbage disposals, alarm clock at a safe level BEFORE your musical enjoyment.
User's Manual - Page 7
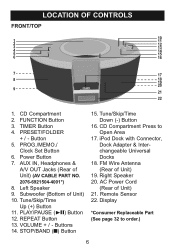
...Clock Set Button 6. Power Button 7. VOLUME + / - CD Compartment Press to order.)
6 AC Power Cord
(Rear of Unit)
19. Left Speaker 9. REPEAT Button 13. FM Wire Antenna (Rear of Unit) 21. Remote... OUT Jacks (Rear of Unit) 10. FUNCTION Button 3. iPod Dock with Connector, Dock Adapter & Interchangeable Universal Docks
18. Display
*Consumer Replaceable Part (See page 32 to Open...
User's Manual - Page 8
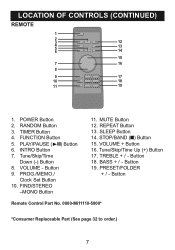
FUNCTION Button 5. Button 9. PROG./MEMO./
Clock Set Button 10. MUTE Button 12. STOP/BAND (I) Button
15. REPEAT Button 13. TREBLE + / - PRESET/FOLDER
+ / - VOLUME - Tune/Skip/Time Up (+) Button 17. Button 19. LOCATION OF CONTROLS (CONTINUED)
REMOTE
1
2
3
12
4
13
5
6
14
15
7
16
8
9
17
10
18
11
19
1. TIMER Button 4. PLAY/PAUSE (®p) Button 6. SLEEP...
User's Manual - Page 9
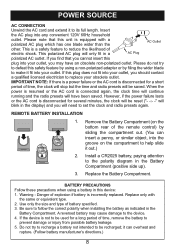
...that this unit is disconnected for a short
period of the remote control) by filing the wider blade
to make it to...or the AC cord is connected again, the clock time will continue
running and the radio presets will be saved. BATTERY PRECAUTIONS Follow these ...in this plug does not fit into your outlet, you will need to replace your outlet. Install a CR2025 battery, paying attention to...
User's Manual - Page 10

...• Make sure to view the photos (in Slideshow mode)/videos, and hear the audio, from the iPod on your external TV. The external audio unit's output sound will then be able to go into the ...switch to the VIDEO setting. • When connecting this unit, refer to the owner's manual of the TV, as well as
this manual. • When connecting this unit to the TV, make sure the power is off and...
User's Manual - Page 11

...to
U2p the
(+) 241
2 button to set the hour correctly.) Press the PROG./ MEMO./Clock Set button 3
again;
Press the PROG./ MEMO./Clock Set button „ and the time will blink.
3
4
3
21
3
21
Press ...will appear in the display when the unit is turned off , press and hold the PROG./MEMO./Clock Set button until "12" or "24" Hour blinks in the display.
Press the Tune/Skip/...
User's Manual - Page 12

... mode that it is connected, this unit. INSERTING AN iPod
1
Tabs facing front (A)
2
(A)
(B)
Locate the correct iPod Universal Dock to iPod mode automatically. Insert the dock (A) into the dock adapter (B) (as shown), making sure the dock's two tabs are facing front, and slip the tabs into the dock, whether this unit is on or
off the unit, press...
User's Manual - Page 13

.... • See the next page for how to start playback on the iPod: Press and hold the Tune/Skip/Time Down (-) 1 or Up (+) 2 button to select iPod mode.
You can operate the iPod using its own controls, as per its owner's manual, and the sound will be heard through this unit's speakers.
3
1
4
2
21
To...
User's Manual - Page 14
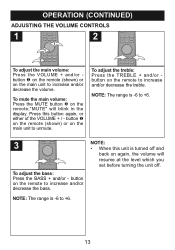
... on the main unit to increase and/or decrease the treble. To adjust the treble: Press the TREBLE + and/or button on the remote to unmute.
button on the remote to +6.
3
To adjust the bass: Press the BASS + and/or - Press this unit is -6 to increase and/or decrease the volume. NOTE...
User's Manual - Page 15
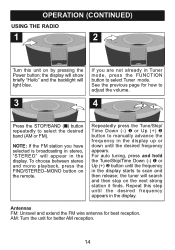
...Time Down (-) 1 or Up (+) 2 button until the frequency
in the display starts to manually advance the
frequency in the display up or
down until the desired frequency
appears in the display...will show briefly "Hello" and the backlight will search
and then stop on the remote.
OPERATION (CONTINUED)
USING THE RADIO
1
2
Turn this step
until the desired frequency 2 appears. See the previous ...
User's Manual - Page 16

... seconds, press the PRESET/FOLDER + or - button repeatedly to select 2a de1sired Preset. Press the PROG./MEMO./Clock Set button 2 again to program additional Presets in the display.
Press the PROG./MEMO./Clock Set button; RETRIEVING RADIO PRESETS (30 for FM, 10 for AM)
1
Follow Steps 1-3 on the previous page to turn this...
User's Manual - Page 20
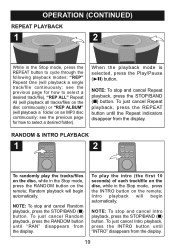
...Repeat
disc continuously) or "REP ALBUM" playback, press the REPEAT
(will playback a folder on the remote; see the previous page for how to select a desired track/file), "REP ALL" Repeat
2NOTE:... Play/Pause
following playback modes: "REP" Repeat One (will playback all tracks/files on the remote; track/file continuously; NOTE: To stop and cancel Random playback, press the STOP/BAND (I ...
User's Manual - Page 26

..., the non-MP3 files will
be "Twain15.mp3". • "Skipped" denotes a directory which contains non-audio files only, i.e. MULTI SESSION The computer user does not need to help you understand the MP3 disc unit display and the playback sequence of seven MP3 directories. • Based on this layout, the first file...
User's Manual - Page 33
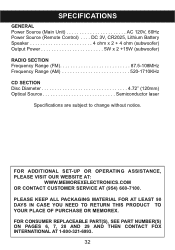
..., Lithium Battery Speaker 4 ohm x 2 + 4 ohm (subwoofer) Output Power 5W x 2 +15W (subwoofer)
RADIO SECTION Frequency Range (FM 87.5-108MHz Frequency Range (AM 520-1710KHz
CD SECTION Disc Diameter 4.72" (120mm) Optical Source... AT LEAST 90 DAYS IN CASE YOU NEED TO RETURN THIS PRODUCT TO YOUR PLACE OF PURCHASE OR MEMOREX. SPECIFICATIONS
GENERAL Power Source (Main Unit AC 120V, 60Hz Power...
Similar Questions

User Manual
I need a user manual for a Memorex clock radio CD MC7223. Any ideas??
I need a user manual for a Memorex clock radio CD MC7223. Any ideas??
(Posted by russliv 7 years ago)

My Mi1111 Wont Charge My Ipod But Still Plays Music Whats Wrong
It plugs in and plays music just wont charge
It plugs in and plays music just wont charge
(Posted by tylerleclaire 10 years ago)

Looking For Ir Remote Control Codes For A Memorex Mi1111 Home Audio System.
Got an IR Blaster on my (Android) phone & a MI1111 Sound System w/ no control so looking for the...
Got an IR Blaster on my (Android) phone & a MI1111 Sound System w/ no control so looking for the...
(Posted by scart69 10 years ago)
Any Android Ir App Work With The Memorex Mi1111 Ipod Dock Sound System?
Any Android IR App work with the Memorex MI1111 IPod Dock Sound System?
Any Android IR App work with the Memorex MI1111 IPod Dock Sound System?
(Posted by scart69 10 years ago)

I Want To Down Load An Instruction Manual For My Memorex Mi1111 Cd Micro System
(Posted by sredding 13 years ago)