
Maytag MEDE251YL Support Question
Maytag MEDE251YL Support Question
Find answers below for this question about Maytag MEDE251YL.Need a Maytag MEDE251YL manual? We have 3 online manuals for this item!
Question posted by berbs on March 4th, 2013
How To Instal A Side Vent? Can't Close The Door To Laundry Room Due To Hose.
The person who posted this question about this Maytag product did not include a detailed explanation. Please use the "Request More Information" button to the right if more details would help you to answer this question.
Current Answers
Related Maytag MEDE251YL Manual Pages
Warranty Information - Page 1
... WARRANTY SHALL BE PRODUCT REPAIR AS PROVIDED HEREIN.
In Canada, call
. MAYTAG® LAUNDRY WARRANTY
LIMITED WARRANTY
For one year from the date of purchase, when this major appliance ... additional help you obtain assistance or service if you on major appliances with Maytag published installation instructions.
10. If you also may not apply to correct defects in accordance with ...
Use & Care Guide - Page 5

See "Installation Instructions". Service calls caused by improper venting are sensed in the dryer too long.
Use Sensor Cycles for better fabric care and energy savings
Use the Sensor Cycles to efficiently dry laundry.
It may require additional touching up after the Steam Cycle.
Good
Better
Good air flow
Along with heat, dryers require good air...
Use & Care Guide - Page 10
... and may increase wrinkling and tangling.
10
Not all models.
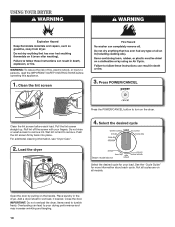
Close the door. Overloading can lead to tumble freely. For additional cleaning information, see "Dryer Care".
2. Select the desired cycle
Steam model shown Select the...Roll lint off the screen with your load. Open the door by pulling on the handle. Place laundry in the dryer. IMPORTANT: Do not overload the...
Use & Care Guide - Page 12
... rack remains stationary. Close the door. 5. When the cycle is finished.
12
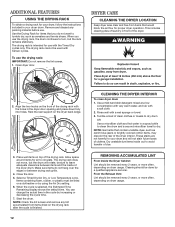
CLEANING THE DRYER INTERIOR
To clean dryer drum 1. NOTE: ...the air flow for proper dryer operation. This includes clearing piles of laundry in front of the dryer interior. Place wet items...with a soft cloth. 2. From the Exhaust Vent Lint should be sure to your dryer drum.
Select a Timed Dry/Air Dry,...
Use & Care Guide - Page 13
... the dryer.
13 Reinstalling the Dryer Follow the "Installation Instructions" to secure dryer door. To...dryer. For direct-wired dryers: 1. Wet lint is in gas supply line. 3. As needed cleaning Laundry detergent and fabric softener residue can build up . Transport hose separately. 7. Transport hose separately. 5. Make sure leveling legs are secure in dryer. Gas models only: Close...
Use & Care Guide - Page 14
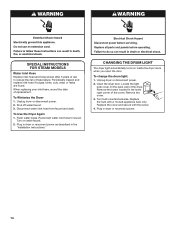
... the cover and secure with a 10-watt appliance bulb only. To Use the Dryer Again 1. Plug in dryer or reconnect power as described in dryer or reconnect power.
14 Turn bulb counterclockwise. Plug in the
"Installation Instructions." When replacing your inlet hose, record the date of the cover.
To change the drum light: 1. Replace the...
Use & Care Guide - Page 15
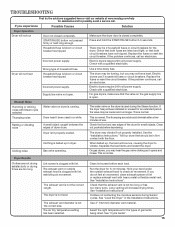
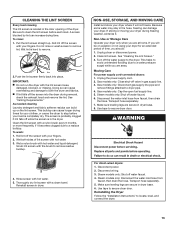
...." This is not level. Clean lint screen before laundering.
See "Cycle Guide".
15 Make sure the dryer door is closed completely.
See "Installation Instructions". Long venting will not heat
Wrong type of the drum for 5-10 minutes. See "Installation Instructions". See "Level the Dryer" in dryer. Use a time-delay fuse. The drum may be in a while. If the...
Use & Care Guide - Page 16
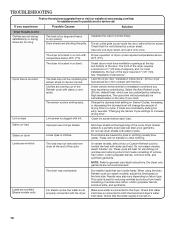
...dryer sheets. The load may not be customized by dyes in a room with damp or wet spots. Closet doors must have ventilation openings at the beginning of the dryer requires 5" (127 mm). See "Installation ...High temperature. The dryer is ending early. Level the dryer. On steam models, select Auto or Custom Refresh cycle to dry quickly. Dry smaller loads that water inlet hose is too large ...
Use & Care Guide - Page 17
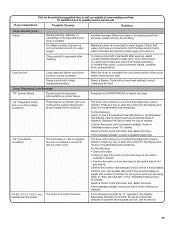
... wearing, select Custom Refresh (steam models only). On Steam models, the dryer is properly installed.
"AF" (low airflow condition)
The lint screen or vent is crushed or kinked or has too many turns. the vent is clogged;
If the message persists, have your dryer is present. To reduce odors left in garments after wearing. Using...
Use & Care Guide - Page 18

...
1. Damage resulting from accident, alteration, misuse, abuse, re, ood, acts of God, improper installation, installation not in a remote area where service by an authorized Maytag servicer is not available.
9. If ...ARE LIMITED TO ONE YEAR OR THE SHORTEST PERIOD ALLOWED BY LAW.
MAYTAG® LAUNDRY WARRANTY
LIMITED WARRANTY
For one year from the date of purchase, when this major appliance...
Installation Guide - Page 1

... 8
Power Supply Cord Connection 9 Direct Wire Connection 11 VENTING 14 Venting Requirements 14 Plan Vent System 15 Venting Kits 15 Install Vent System 16 CONNECT INLET HOSE 17 CONNECT VENT 18 LEVEL DRYER 19 COMPLETE INSTALLATION CHECKLIST 19 DOOR REVERSAL KIT (OPTIONAL 20 STACKING WASHER AND DRYER (OPTIONAL 20 TROUBLESHOOTING 20
Para una version de estas instrucciones en espa...
Installation Guide - Page 3
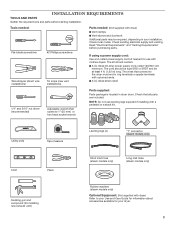
...
Leveling legs (4)
"Y" connector (steam models only)
Level
Pliers
Caulking gun and compound (for installing new exhaust vent)
Short inlet hose (steam models only)
Long inlet hose (steam models only)
Rubber washers (steam models only) Optional Equipment: (Not supplied with clothes dryers. The wires that all parts are included. Tools needed:
Flat-blade screwdriver
#2 Phillips screwdriver...
Installation Guide - Page 4
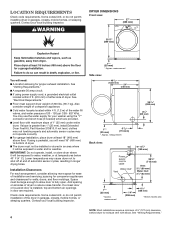
... not operate correctly.
■■For garage installation, place dryer at temperatures below 40° F (4° C).
Installation Clearances
For each arrangement, consider allowing more space for exhaust vent with maximum slope of 1" (25 mm) under entire dryer. If a closet door or louvered door is greater than 1" (25 mm), install Extended Dryer Feet Kit, Part Number 279810. measurement...
Installation Guide - Page 5

...;■Additional clearances might be required for wall, door, floor moldings, dryer venting, and gas line.
■■Additional spacing should be considered on all sides of the dryer to reduce noise transfer.
■■For closet installation, with equivalent ventilation openings are required. Mobile home installations require:
■■Metal exhaust system hardware, available...
Installation Guide - Page 7
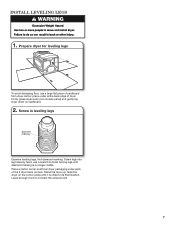
.... Place a carton corner post from dryer carton; INSTALL LEVELING LEGS
1. Prepare dryer for leveling legs
To avoid damaging floor, use a wrench to finish turning legs until it is no longer visible. Firmly grasp dryer body (not console panel) and gently lay dryer down on the corner posts until diamond marking is close to connect the exhaust vent.
7
Installation Guide - Page 15

.... Rigid metal or flexible metal vent
G. Wall D. Clamps
B
H
F. If you prefer, dryer may be securely fastened to exhaust out right side, left side, or through bottom.
Dryer B Elbow C. Exhaust outlet
Optional exhaust installations:
Over-the-top installation (also available with one offset elbow)
Periscope installation
Special provisions for close clearance):
C D E
A. Exhaust hood...
Installation Guide - Page 16
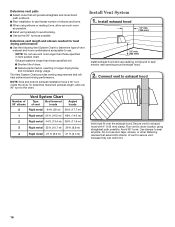
...;■Shorten life of dryer.
■■Reduce performance, resulting in Vent system chart. NOTE: Side and bottom exhaust installation have a 90° turn to the chart.
Connect vent to exhaust hood with 4" (102 mm) clamp. Secure vent to exhaust hood
Number of 90° elbows
Vent System Chart
Type of vent
Box/louvered hoods
Angled hoods...
Installation Guide - Page 17
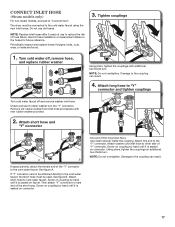
... short hose to "Connect Vent".
Check and see if rubber washer is seated on the hoses for future reference. Tighten couplings
1. Using pliers, tighten the couplings an additional two-thirds turn . Do not use to the "Y" connector. CONNECT INLET HOSE
(Steam models only)
For non-steam models, proceed to cold water faucet. The dryer must...
Installation Guide - Page 18
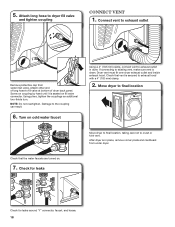
... leaks
Check for leaks around "Y" connector, faucet, and hoses. 18 5. Attach long hose to fill valve at bottom of dryer back panel. Attach other end of long hose to dryer fill valve
and tighten coupling
CONNECT VENT
1. Damage to crush or kink vent. Move dryer to final location
Move dryer to final location, taking care not to the coupling...
Installation Guide - Page 19
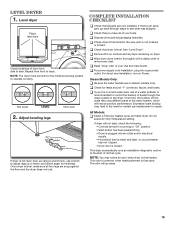
LEVEL DRYER
1.
Be sure vent is first used. q Wipe dryer drum interior thoroughly with a damp cloth to see what was skipped. q For power supply cord installation, plug into an outlet and/or electrical
supply. • Household fuse is intact and tight, or circuit breaker
has not tripped. • Dryer door is not level, prop up using a wood...
Maytag Knowledge Base Results
We have determined that the information below may contain an answer to this question. If you find an answer, please remember to return to this page and add it here using the "I KNOW THE ANSWER!" button above. It's that easy to earn points!-
Door opens in the wrong direction - Top freezer
...door aligns evenly with the top of freezer door as shown in Graphic 5 below. Move to opposite side of refrigerator door as shown in Graphic 5 below. Set aside the door until bottom hinge is installed on your doors...parts for the center hinge as shown. Remove cabinet hinge-hole plugs from both doors closed until you are working . Assemble handles on the opposite side as shown in... -
Washer fills slowly - Front-load Neptune® washer
... this washer should seem low. If you the proper care for details about connecting inlet hoses. Because this is a low-water-usage washer, the water level on the water. Enter Model Number How do not have your Installation Instructions, enter your standard-water-usage washer. washer My front-load Neptune ® Are... -
Dishwasher is not filling with water
...corner of the preferred cycle. The timer knob should click into place. Detergent remains in the drain hose at least 20" (50.8 cm) above the subfloor or floor. Dishwasher is not filling with water?&... up and down to see if it is connected to operate. Use or install an air gap if the drain hose is trying to the sink drain or disposer. Your dishwasher could be in place ...
Similar Questions

Broken Safety Switch
I have this dryer and the repair man came out and said it was a broken safety switch. I ask her if h...
I have this dryer and the repair man came out and said it was a broken safety switch. I ask her if h...
(Posted by markasosebee 10 years ago)

How Do You Reverse The Door Swing For A Maytag Dryer Model #medc400vw
(Posted by Rucinc 10 years ago)

How To Reverse The Door On A Maytag Electric Dryer Medc300xw
(Posted by racunpti 10 years ago)

How To Reverse Door On Maytag Centennial Gas Dryer
(Posted by gmenROB84 10 years ago)
How To Remove Door Panel On Maytag Centennial Dryer
(Posted by franksteve3 10 years ago)