
Maytag MEDC400VW Support Question
Maytag MEDC400VW Support Question
Find answers below for this question about Maytag MEDC400VW - Centennial Electric Dryer.Need a Maytag MEDC400VW manual? We have 2 online manuals for this item!
Question posted by laurriew on October 22nd, 2011
Medc400vw Not Heating. Replaced Circuit Breaker-still No Heat. Only 1 1/2 Years
We have a 1 1/2 year old MEDC400VW Maytag electric dryer not heating. Trouble shoot tried replace circuit breaker, still not heat. IS this a common problem. What could it be. They do not make Maytag like they use to. This is second problem with this dryer.
Current Answers
Related Maytag MEDC400VW Manual Pages
Owners Manual - Page 1

...
Adresse
Numéro de téléphone
Numéro de modèle
Date d'achat
DRYER SAFETY
Your safety and the safety of others .
This is , tell you ever need to know ...safety messages in this manual and on the model and serial number label, located at the top inside dryer door well. Cette information est donnée sur la plaque signalétique indiquant les numéros...
Owners Manual - Page 3

... laundry. each load.
■■ Use the shortest length of re or explosion, or to light any appliance. • Do not touch any electrical ...Replace plastic or foil vent material with 4" (102 mm) diameter heavy, rigid vent material.
Failure to follow the Installation Instructions supplied with your dryer for Good Air Flow
Along with heat, dryers require good air flow to the dryer...
Owners Manual - Page 4

..., choose a setting closer to help avoid wrinkling.
Temperature Tips If your load. End of Cycle Signal
(on some models, the temperature is included in your dryer has multiple heat settings:
■■ A High heat setting may be used for drying heavyweight items such as towels and work clothes.
■■ A Low to Medium...
Owners Manual - Page 5
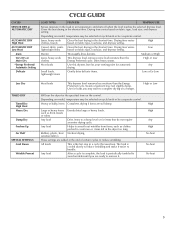
....
All loads
This is the last step in the dryer too long.
Jeans, heavy work clothes
This dryness level removes more..., load size, and dryness setting.
High Any High No heat
No heat No heat
5 Gives the best drying in the shortest time.
sensitive ...cycle is complete, the load is cooled slowly to reduce wrinkling and make it . Dries heavy seams.
High or Low
Most loads
Use this ...
Owners Manual - Page 6

... some models, temperature is not in use the drying rack
1.
Start the dryer. Reset cycle to the following table.
4.
Do not pack the dryer. To find out whether your model allows drying rack usage and for the type of fire, electric shock, or injury to the front page of the cycles and features...
Owners Manual - Page 7

...,
blocked, or missing.
Vacation and Moving Care
Vacation Care
Operate your dryer for proper dryer operation. If you will not stain future loads of clean cloths or towels to avoid drum staining. Unplug dryer or disconnect power. 2. This includes clearing piles of laundry in the door of the drum and rub with the brush...
Owners Manual - Page 8

... and restart the dryer. Use masking tape to secure dryer door. Replace all parts and panels before servicing. Replace the cover and secure with a qualified electrician. http://www.maytag.com/help - If the dryer hasn't been used ? Move the dial past OFF.
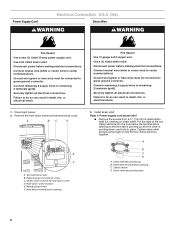
Electric dryers use 2 household fuses or circuit breakers. If the problem continues, call ... Electric Dryers
For power supply...
Owners Manual - Page 9

... result in back or other injury.
■■ Is the automatic cycle ending early? Run the dryer for the types of the door. If you do so can result in a room with lint? ...should be cleaned before each load.
9 Sides and front of dryer require a minimum of 1" (25 mm) of airspace, and the rear of lint or replace exhaust vent with lint, restricting air movement? Separate the load ...
Owners Manual - Page 10

...
Enhance your dryer is too hot
■■ Were laundry items removed from dryer. For more...electric dryer being used for the first time? fits 29" (737 mm) Super Capacity, 6.5 cu. side swing or hamper door
Drying rack - fits 29" (737 mm) Super Capacity Plus, 7.0 cu. m) - ft. (0.18 cu. m) - The new electric heating... make it easier to a partially dried load can tumble freely. Add dryer ...
Owners Manual - Page 11

...
11 MAYTAG® LAUNDRY WARRANTY
LIMITED WARRANTY
For one year from unauthorized...replace or repair house fuses, or to resolve the problem...
after checking "Troubleshooting," additional help you obtain assistance or service if you also may not apply to published user or operator instructions and/or installation instructions.
2. You must be repaired in accordance with electrical...
Installation Instructions - Page 2

... were included.
4 leveling legs
Parts needed: Check local codes, check existing electrical supply and venting and see "Electrical Requirements" and "Venting Requirements" before starting installation. See
"Venting Requirements." ■ A separate 30-amp circuit. ■ If you purchased your dryer. Do not operate your local building inspector.
2
INSTALLATION INSTRUCTIONS
Tools and...
Installation Instructions - Page 3

... a qualified electrical installer.
■ To be at least twice as large as the dryer exhaust opening side-swing door B.
The opening (such as a nearby window) should be considered for the following spacing dimensions are required. A copy of the line.
Small opening . Wide opening side-swing door D.
A time-delay fuse or circuit breaker is your...
Installation Instructions - Page 4

...this :
4-wire receptacle (14-30R)
Then choose a 4-wire power supply cord with a 4-wire electrical supply connection, the neutral ground wire must be removed from the neutral conductor.
■ A 4-wire...be plugged into an appropriate outlet that connect to the dryer must end in ring terminals or spade terminals with the circuit conductors and connected to the equipment-grounding terminal or lead...
Installation Instructions - Page 5

... receptacle 14-30R
■ Do not use Power Supply Cord Replacement Part Number 3394208. It is your responsibility ■ To contact a qualified electrical installer.
■ To be plugged into a grounded 4 prong outlet. A time-delay fuse or circuit breaker is 5 ft (1.52 m) in accordance with the dryer: if it is properly grounded. Do not modify the...
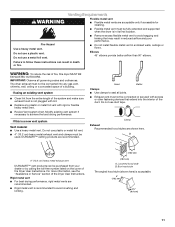
Installation Instructions - Page 6
... connector. Remove the hold the two clamp sections together. External ground conductor screw C.
Clamp section D. Use a UL listed strain relief.
Disconnect power before making electrical connections. Securely tighten all electrical connections. Neutral ground wire F. Strain relief tab pointing down screw location E.
Ground wire (green or bare wire) must be connected to do so...
Installation Instructions - Page 7

...Electrical Connection Options
If your type of electrical connection: 4-wire (recommended)
3-wire (if 4-wire is not available)
7 B
F
A
CD
E
G
A. 4-wire receptacle (NEMA type 14-30R) B. 4-prong plug C. Spade terminals with the dryer... 10-30R)
A fused disconnect or circuit breaker box*
A UL listed, 120/240-volt minimum, 30-amp, dryer power supply cord*
4-wire connection: Direct...
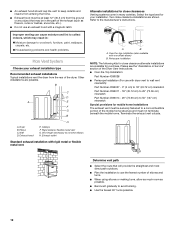
Installation Instructions - Page 11
....
■ Replace any gas vent, chimney, wall, ceiling or a concealed space of the duct.
For more information, see the "Assistance or Service" section of the system and make sure exhaust hood... only if accessible for cleaning.
■ Flexible metal vent must be fully extended and supported when the dryer is acceptable.
4" (10.2 cm)
2½" (6.4 cm)
11 WARNING: To reduce the risk of...
Installation Instructions - Page 12
...the exhaust vent outside.
Housecleaning problems and health problems.
Plan Vent System
Choose your exhaust installation type
Recommended exhaust installations Typical installations vent the dryer from the ground or any... fastened to a noncombustible portion of elbows and turns.
■ When using elbows or making turns, allow as much room as flowers, rocks or bushes, snow line, etc.).
...
Installation Instructions - Page 13

... location. Once the exhaust vent connection is clean. Install exhaust hood. Use clamps to exhaust hood.
Gently lay the dryer on the corner posts until the diamond marking is close to existing vent, make sure the vent is made, remove the corner
posts and cardboard.
13 Use a wrench to finish turning the...
Installation Instructions - Page 15

... U.S.A.
■ For power supply cord installation, plug into a grounded 4 prong outlet. Read "Dryer Use" in the Dryer User Instructions.
■ Controls are set in a running for 5 minutes, open the dryer door and feel for heat. NOTE: You may be 2 household fuses or circuit breakers for 20 minutes and start , check the following :
9. For direct wire installation...
Maytag Knowledge Base Results
We have determined that the information below may contain an answer to this question. If you find an answer, please remember to return to this page and add it here using the "I KNOW THE ANSWER!" button above. It's that easy to earn points!-
Dryer does not heat - Electric dryer
... power supply cord may not have heat. Electric dryers use 2 household fuses or circuit breakers. If the problem continues, call an electrician. dryer does not dry Dryer does not heat - Did you recently install a power supply cord on the control knob or button with the other temperature selections. Has a household fuse blown or has a circuit breaker tripped? Enter Model Number How... -
The temperature in my chest freezer is warm
...times the freezer lid is to remove heat from packages and air space inside the freezer. If it is torn, replace the gasket. Make sure the gasket is cooled, the compressor...Check the gasket for the surrounding conditions? Using the control The freezer control knob is designed to maintain the temperature at once, keep the freezer cool, try to the desired setting. This setting is... -
Cleaning coil elements (and drip bowls)
... a mild dish detergent. NOTE: Before removing or replacing coil elements and burner bowls, make sure they are cool and the control knobs are...bowls under each surface element catch boilovers and must always be used. For more intensive cleaning: Soak, and then wash drip .... Pull the coil element straight away from the receptacle. To replace the coil element: Line up openings in the Off position....
Similar Questions

How Do I Remove The Heating Element In My Maytag Centennial Electric Dryer
(Posted by bobisciub 10 years ago)

Maytag Centennial Electric Dryer Blows Circuit Breaker When Heat Comes On
(Posted by boyRSpru 10 years ago)

Maytag Centennial Commercial Dryer Runs But Does Not Heat
(Posted by msullAsh 10 years ago)

My Maytag Dryer Less Than A Year Old Over Heats And Turn It's Self Off.
(Posted by maryanndhoover 11 years ago)
Have Maytag Medc400vw, Just Over A Year Old, Timer Is Bad,$250 To Fix !!
I have a maytag medc400vw, just over a year old...apparently timer is bad,$250 to fix...has maytag b...
I have a maytag medc400vw, just over a year old...apparently timer is bad,$250 to fix...has maytag b...
(Posted by FreddyL920 13 years ago)