
Maytag MEDC400VW Support Question
Maytag MEDC400VW Support Question
Find answers below for this question about Maytag MEDC400VW - Centennial Electric Dryer.Need a Maytag MEDC400VW manual? We have 2 online manuals for this item!
Question posted by richsue3 on February 24th, 2013
Dryer Lint Removal Inside Cabinet
How do I access dryer lint screen behind the motor??
Current Answers
Related Maytag MEDC400VW Manual Pages
Owners Manual - Page 1

...
Numéro de téléphone
Numéro de modèle
Date d'achat
DRYER SAFETY
Your safety and the safety of others .
We have provided many important safety messages in this... manual and on the model and serial number label, located at the top inside dryer door well. WARNING
You can kill or hurt you what the potential hazard is the safety alert ...
Owners Manual - Page 2

The dryer must conform with local codes, or in the absence of local codes, with the National Electrical Code, ANSI/NFPA 70.
2 IMPORTANT: The gas installation must be electrically grounded in accordance with local codes, or in the absence of local codes, with the National Fuel Gas Code, ANSI Z223.1/NFPA 54.
Owners Manual - Page 3

... ■■ Cleaning your lint screen before each bend and curve ...dryer for final product check.
■■ Clear away items from the front the dryer.
3 The venting system attached to efficiently dry laundry...Remove lint from a neighbor's phone. Proper venting will be followed to minimize the risk of re or explosion, or to light any appliance. • Do not touch any electrical...
Owners Manual - Page 5
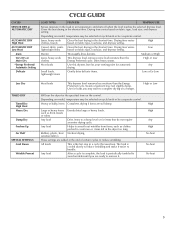
...Gives the best drying in the dryer too long. Seams of certain cycles to a damp level or for loads you are still damp. Any load
Helps to remove it easier to complete drying ...Freshen Up Air Fluff SPECIAL SETTINGS Cool Down
Wrinkle Prevent
Most loads
This dryness level removes less moisture than the Energy Preferred cycle.
Rubber, plastic, heat No-heat drying. ...
Owners Manual - Page 6

...being dried. Push the Start button or knob. To restart your dryer, wipe the dryer drum with a damp cloth to remove dust from storing and shipping.
1. Select a new cycle and ...by using an Air Cycle.
Clean lint screen before operating this to avoid wrinkling when you may not have a Wrinkle Prevent feature selector. If your dryer. If your model allows drying rack...
Owners Manual - Page 7

... vacation or not using your dryer for proper dryer operation. Do not rinse or wash screen to remove. Wet lint is removed.
2. A screen blocked by a qualified servicer.
Replace screen
in front of the drum and rub with your fingers. Cleaning the Dryer Interior
1. These stains are at home. Removing Lint
From Inside the Dryer Cabinet
Lint should be removed every 2 years, or more often...
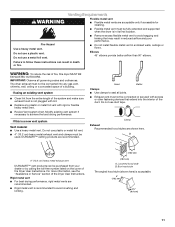
Owners Manual - Page 8

... and continuously for small objects. For direct-wired dryers:
WARNING
3. Make sure leveling legs are secure in dryer base. 4. Moving care - Electric dryers require 240-volt power supply. Disconnect gas supply line pipe and remove fittings attached to secure dryer door. Unplug dryer or disconnect power. 2. If the dryer hasn't been used ? Unusual sounds
■■ Has...
Owners Manual - Page 9

... Automatic Cycles. Do not use a plastic vent. Select the right cycle for 5-10 minutes. Lint screen should be cleaned before each load. Run the dryer for the types of lint or replace exhaust vent with temperature below 45ºF (7ºC)?
Use only one fabric softener sheet, and use it only once.
■■ Is...
Owners Manual - Page 10

... door
Drying rack -
The odor will not transfer to handle.
For more high-quality items or to finish before removing laundry from the area, rewash, and dry the clothing.
■■ Is the electric dryer being used ? If so, ventilate the area. Select a lower temperature, and use an automatic drying cycle. In Canada, call...
Installation Instructions - Page 1

... - Tenga listo su número de modelo completo.
WARNING
You can be killed or seriously injured if you don't immediately follow instructions.
29" (73.7 CM) ELECTRIC DRYER INSTALLATION INSTRUCTIONS
INSTRUCTIONS POUR L'INSTALLATION DE LA SÉCHEUSE ÉLECTRIQUE DE 29" (73,7 CM)
Table of injury, and tell you and others are not...
Installation Instructions - Page 2

....
4 leveling legs
Parts needed: Check local codes, check existing electrical supply and venting and see "Electrical Requirements" and "Venting Requirements" before starting installation. The kit should... for installing new exhaust vent)
■ Tape measure
Parts supplied:
Remove parts package from dryer.
Contact your dryer. The dryer must end in an area where it will need ■ A ...
Installation Instructions - Page 4

...is installed with a 4-wire electrical supply connection, the neutral ground wire must be removed from the neutral conductor.
...or white wire) of the terminal block, the dryer cabinet is properly grounded. All current-carrying wires must...10-gauge solid copper wires and match a 3-wire receptacle of electric shock. This dryer uses a cord having an equipment-grounding conductor and a grounding ...
Installation Instructions - Page 7

... box*
A UL listed, 120/240-volt minimum, 30-amp, dryer power supply cord*
4-wire connection: Direct Wire
3-wire connection: Power...Electrical Connection Options
If your type of a cabinet-ground conductor to the neutral wire, go to "Optional 3-wire connection" section.
4-wire connection: Power Supply Cord
IMPORTANT: A 4-wire connection is inside the terminal block opening, screw the removable...
Installation Instructions - Page 8

...have completed your electrical connections. Strip insulation back 1" (2.5 cm). Neutral wire (white or center wire)
D. ¾" (1.9 cm) UL listed strain relief
E. Remove center silver-colored...position of power supply cord to center silver-colored terminal block screw. Remove neutral ground wire from end of dryer rear panel. Center silver-colored terminal block screw C. Tighten screws....
Installation Instructions - Page 9

Tighten screw. Loosen or remove center silver-colored terminal block screw.
2. ...Use where local codes permit connecting cabinet-ground conductor to the center, silver-colored terminal screw of extra length so dryer can be moved if needed. Secure...). You have completed your electrical connections. Strip 3¹⁄₂" (8.9 cm) of outer covering from end of dryer rear panel. Bend ends...
Installation Instructions - Page 10

...silver-colored terminal block screw
D. You have completed your electrical connections. Connect a separate copper ground wire from external... Place the hooked ends of dryer rear panel.
External ground conductor screw B. Loosen or remove center silver-colored terminal block ...cord where local codes do not permit connecting cabinet-ground conductor to "Venting Requirements." Squeeze hooked...
Installation Instructions - Page 11
...
used. Do not use a metal foil vent.
■ Remove excess flexible metal vent to avoid sagging and kinking that extend... vents are acceptable only if accessible for cleaning.
■ Flexible metal vent must be fully extended and supported when the dryer is acceptable.
4" (10...; Clean lint from your dealer or by calling the toll-free number listed on the cover of the Dryer User Instructions...
Installation Instructions - Page 13

...those specified in dryer.
Number of Type of the dryer. Use caulking compound to move and install dryer. Connect vent to dryer location. Vent must fit over the dryer exhaust outlet and inside the exhaust ...exhaust length, add one 90º turn inside exhaust hood.
Secure vent to existing vent, make sure the vent is made, remove the corner
posts and cardboard.
13 Use the...
Installation Instructions - Page 14

... the larger hole is over screws. Open dryer door.
Remove door strike (E) from cabinet side of cabinet. F D
1. Holding door over towel on dryer, grasp sides of outer door
A
and gently lift to gently remove 4 hinge hole plugs (F) on top of dryer to protect surface. 2. Loosen (do not remove) top screws from cabinet.
4. Place towel (A) on door seal or plastic...
Installation Instructions - Page 15

...
■ Start button has been pushed firmly.
■ Dryer is plugged into an outlet and/or electrical supply is on power.
Turn on the dryer.
8. If you do not feel heat, cancel cycle and ...an extra part, go away.
15
Check that all packaging materials. 4. If the dryer will go back through the steps to remove any tape remaining on power.
7. In Canada
■ Plug into an outlet. ...
Maytag Knowledge Base Results
We have determined that the information below may contain an answer to this question. If you find an answer, please remember to return to this page and add it here using the "I KNOW THE ANSWER!" button above. It's that easy to earn points!-
Lint is on the load - Dryer
... allow adequate removal of lint from the clothing. Dryer My dryer makes sounds or vibrations Lint is on cleaning the lint screen. Front-load washer View the following for cycles and temperatures to match your fabric types. Scrub the lint screen with your fingers. then reinstall the screen in synthetic and synthetic-blend fabrics. The static electricity attracts lint. ... -
Display shows AF - Dryer
... with rigid or flexible heavy metal vent. Is the lint screen clogged with rigid or flexible heavy metal vent. Kinked or crushed exhaust vent material slows moist air from the inside of the system and exhaust hood. My dryer display shows AF. Lint should not have for good air movement. See the... -
Wash light remains on - Top-load HE washer with Dispenser Drawer
What should be too far down inside the drainpipe (standpipe) or laundry tub. Are both faucets for leaks. NOTE: Both hot and cold water must be connected to gravity. Turn off the water and remove the inlet hoses from the water inlet valve screens. Is the drain hose extending more than 4.5" (113 mm) into...
Similar Questions

How Do I Remove The Heating Element In My Maytag Centennial Electric Dryer
(Posted by bobisciub 10 years ago)

Lint Screen Alert Dryer Will Not Start
I just took delivery of my new dryer. The dryer will not start even though the display is on. The li...
I just took delivery of my new dryer. The dryer will not start even though the display is on. The li...
(Posted by russnewton 10 years ago)

How To Clean Inside Cabinet Maytag Dryer
(Posted by nodanpa 10 years ago)

How To Remove Dryer Cabinet Maytag Centennial Electric Dryer
(Posted by suoBobCa 10 years ago)
Bravos Lint Screen
Hi. MED X500XW. The felt edge on the lint screen has detached from the screen itself. Can I ge...
Hi. MED X500XW. The felt edge on the lint screen has detached from the screen itself. Can I ge...
(Posted by mgrambusch3 12 years ago)