Maytag MDE2400AYW Support Question
Maytag MDE2400AYW Support Question
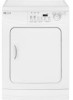
Find answers below for this question about Maytag MDE2400AYW - 3.7 cu. Ft. Electric Dryer.Need a Maytag MDE2400AYW manual? We have 2 online manuals for this item!
Question posted by handyhansen123 on November 6th, 2021
My Dryer Will Not Dry It Takes 3 Hrs
The person who posted this question about this Maytag product did not include a detailed explanation. Please use the "Request More Information" button to the right if more details would help you to answer this question.
Current Answers
Answer #1: Posted by itasklive on November 7th, 2021 7:57 AM
itasklive

Member since:
October 21st, 2021 Points: 257,510

Member since:
October 21st, 2021 Points: 257,510
The Maytag MDE2400AYW is a dryer that takes 3 hours to dry, so it is possible that the dryer is not working properly. If you have checked the vent and found no obstructions, then the problem may be with the heating coil. The heating coil could be dirty or broken, which would cause the dryer to take longer than usual to dry clothes.
Answer #2: Posted by SonuKumar on November 7th, 2021 8:34 AM
SonuKumar

Member since:
May 9th, 2021 Points: 16,621,300
Member since:
May 9th, 2021 Points: 16,621,300
Please respond to my effort to provide you with the best possible solution by using the "Acceptable Solution" and/or the "Helpful" buttons when the answer has proven to be helpful.
Regards,
Sonu
Your search handyman for all e-support needs!!
Related Maytag MDE2400AYW Manual Pages
Owners Manual - Page 1
... Lights
Using the Controls 5-7
Select Cycle Select Dryness Level Select Temperature Select Options Press Start/Pause
Use & Care Guide
Care & Cleaning 8
Control Panel Dryer Exterior Dryer Exhaust System Stainless Steel Special Laundry Tips
Dryer Exhaust Tips 9
Troubleshooting 10
Service & Warranty 11 Guide d'utilisation et
d'entretien 12 Guía de uso y cuidado 22
Form No.
Owners Manual - Page 2
....
The potential for future reference.
Keep sales receipt and/or canceled check as your dryer items that have been spotted or soaked with this appliance.
Always contact your dealer, distributor...
Serial Number
Date of our appliances, it may prevent heat from the clothes dryer hot or interrupt the drying cycle until the items have questions, call 1-800-688-2080.
Washing these ...
Owners Manual - Page 3

...with controls.
8. Note
• Because of fire, explosion, electric shock, or personal injury when using the appliance.
2. SAVE...heat setting.
To avoid the possibility of the clothes dryer. b. Clean the lint screen before selecting cabinetry, making...supervision is necessary when the appliance is saturated with gasoline, dry-cleaning solvents, other flammable or explosive substances as : ...
Owners Manual - Page 4
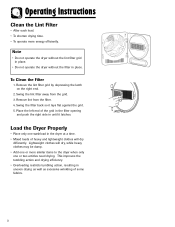
... lint filter grid by depressing the latch on the right end.
2. Note
• Do not operate the dryer without the lint filter grid in place.
• Do not operate the dryer without the filter in uneven drying as well as excessive wrinkling of some fabrics.
3
To Clean the Filter
1. Swing the lint filter...
Owners Manual - Page 5
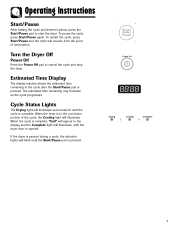
...time remaining in the cycle after the Start/Pause pad is pressed.
4 Cycle Status Lights
The Drying light will resume from the point of the cycle, the Cooling light will illuminate, until the ...pressed. When the cycle is in the display and the Complete light will illuminate.
When the dryer is complete, "End" will appear in the cool down portion of interruption. The estimated time ...
Owners Manual - Page 6
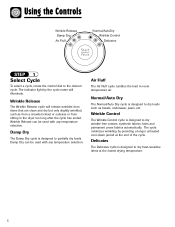
...with any temperature selection. Air Fluff
The Air Fluff cycle tumbles the load in the dryer too long after the cycle has ended.
The cycle minimizes wrinkling by the cycle name... the lowest drying temperature.
5 Damp Dry
The Damp Dry cycle is designed to dry heat-sensitive items at the end of the cycle. Normal/Auto Dry
The Normal/Auto Dry cycle is designed to dry wrinkle-free ...
Owners Manual - Page 7

... desired temperature.
Low
For heat sensitive items labeled
Tumble Dry Low or Tumble Dry
Warm.
6 Loads of the cycle. Press the pad repeatedly to completely dry the load. Use the chart below as a guide:
DRYER TEMPS
LOAD TYPE
Regular
For sturdy cottons or those labeled Tumble Dry. STEP 3
Select Temperature
To select the correct temperature...
Owners Manual - Page 8

.... To unlock the controls, press and hold the Chime and Wrinkle Prevent pads for the dryer to operate. The dryer door must be locked for 3 seconds. If the door is opened during the cycle, ...of intermittent tumbling in the Delicates, Wrinkle Release, Damp Dry or Air Fluff cycles. STEP 5
Press Start/Pause
Press this pad to start the dryer. To lock the controls, press and hold the Chime...
Owners Manual - Page 9
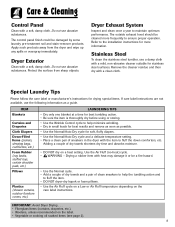
... down comforters, etc.
Do not use a damp cloth with heat may damage it or be damaged by some laundry pre-treatment soil and stain-remover products. Refer to fluff the item. • DO NOT dryer-dry kapok or foam pillows. • Use the Air Fluff cycle on a Low or Air Fluff temperature depending...
Owners Manual - Page 10

... many elbows. Tape all old ducts before installing your dryer exhaust the air easily. Be sure vent flap opens and closes freely. Don't
Allow crushed or clogged ducts and vent. Don't
Let a poor exhaust system cause slow drying. Never use and care guide. Inspect and clean the exhaust system annually. 9
Don't
Use...
Owners Manual - Page 11
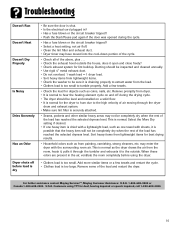
...; Be sure the door is shut. • Is the electrical cord plugged in? • Has a fuse blown or the circuit breaker tripped? • Push the Start/Pause pad again if the door was opened during the drying cycle. • The dryer should be inspected and cleaned annually. • Use rigid 4" metal exhaust duct...
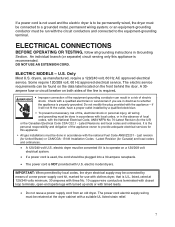
Installation Instructions - Page 2
... CORD for proper installation. 1. must be rigid metal or flexible stiff walled metal exhaust ducting. See Electric Requirements. 2.
GROUNDED ELECTRICAL OUTLET is the responsibility of the owner. Make sure you have everything necessary for electric dryers (except Canada). 3. See
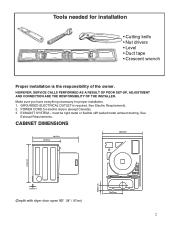
Exhaust Requirements. Tools needed for installation
Printed in U.S.A.. • Impreso en los Estados...
Installation Instructions - Page 3

... out the bottom or left side, use the accessory exhaust kit (see Accessories). The dryer must contain a minimum of 120 in2 of fire when
installed in an alcove or closet.
... must contain a minimum of 60 in2 (152.5 cm2) of combustion or ventilating air. LOCATION CONSIDERATIONS
The dryer should be louvered or otherwise ventilated and must be located to make sure the room has adequate make-up...
Installation Instructions - Page 4
... instructions (see nonexhausted
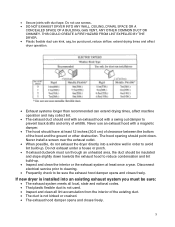
installations. A minimum of 60 in2 (152.5 cm2) of unobstructed opening is available with metal. EXHAUSTING
Exhausting the dryer to the inside (see Accessories). In the United States: • Electric dryers located in a confined area such as possible.
4 Outside the U.S. plastic or nonmetal flexible duct presents a potential fire hazard.
NEVER USE...
Installation Instructions - Page 5
...BY THE DRYER.
• Plastic flexible duct can kink, sag, be punctured, reduce airflow, extend drying times and affect
dryer operation.
• Exhaust systems longer than recommended can extend drying times, ...If exhaust ductwork must be sure the exhaust hood damper opens and closes freely. Disconnect electrical service prior to cleaning.
• Frequently check to avoid lint build-up .
•...
Installation Instructions - Page 6
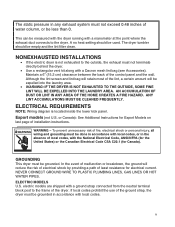
... be grounded. GROUNDING
This dryer must be less than 0. The dryer tumbler should be expelled into the laundry area.
• WARNING: IF THE DRYER IS NOT EXHAUSTED TO THE OUTSIDE, SOME FINE LINT WILL BE EXPELLED INTO THE LAUNDRY AREA. Maintain a 6" (15.2 cm) clearance between the back of least resistance for electrical current.
In the event...
Installation Instructions - Page 7
... modify the plug provided with the circuit conductors and connected to operate on the front behind the door. IMPORTANT: When permitted by local codes, the dryer electrical supply may be connected by a qualified electrician. • To prevent unnecessary risk of local codes, with tinned leads.
• Do not reuse a power supply cord...
Installation Instructions - Page 8
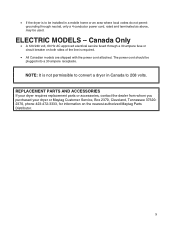
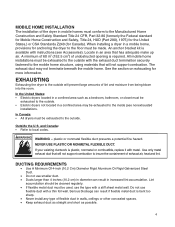
ELECTRIC MODELS - NOTE: It is not permissible to 208 volts. • If the dryer is to be installed in Canada to convert a dryer in a mobile home or an area where local codes do not permit grounding through a 30 ampere fuse or circuit breaker on the nearest authorized Maytag ...
Installation Instructions - Page 9
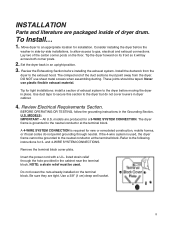
... the exhaust hood.
Insert the power cord with a U.L. Do not loosen the nuts already installed on the floor. Review the Exhausting Section before moving the dryer in the Grounding Section. Review Electrical Requirements Section. MODELS: IMPORTANT -
listed strain relief through neutral. Use a 3/8" (1 cm) deep well socket.
9
Lay two of...
Installation Instructions - Page 10
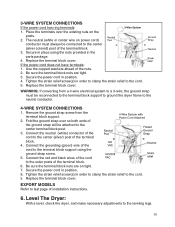
... posts of the cord to the center terminal block post.
3.
Level The Dryer:
With a level, check the dryer, and make necessary adjustments to the cord. 5. Place the terminals over so...Remove the ground strap screw from a 4-wire electrical system to a 3-wire, the ground strap must always be reconnected to the terminal block support to ground the dryer frame to the center (silver colored) post ...
Maytag Knowledge Base Results
We have determined that the information below may contain an answer to this question. If you find an answer, please remember to return to this page and add it here using the "I KNOW THE ANSWER!" button above. It's that easy to earn points!-
Dryer does not heat - Electric dryer
Electric dryer My electric dryer does not heat. Gas dryer FAQs Knowledgebase search tips My dryer will not start Damp loads or long drying times - Dryer Has a household fuse blown or has a circuit breaker tripped? The drum may be turning, but you may be found on the dryer? Dryer does not heat - Replace the fuses or reset the circuit breakers. Enter... -
Poor drying performance - Bravos® dryer
... will take a long time to the Sensor cycle settings, including the temperature level for these loads Bulky Medium Thick quilted jackets, thick comforters, pillows Normal Corduroys, work clothes, sheets Thick comforter with digital display - Gas dryer Damp loads or long drying times - Dryer Poor drying performance - dryer. ... -
Loads are wrinkled - Dryer
... used ? cycles for more information on the model. Were the laundry items removed from the dryer before removing the laundry items from the dryer. All cycles end with a Cool Down, which will take longer to dry and are more likely to come out of the cycle to wrinkling. ...
Similar Questions

What Is The Average Dry Time For Maytag Dryer Mde2400ayw
(Posted by lencjfr19 9 years ago)

How To Put On Replacement Belt On Maytag Dryer Mde2400ayw
(Posted by herh 10 years ago)

How To Test Heating Coil For Dryer Mde2400ayw
(Posted by aogradebi 10 years ago)

How To Replace Drive Belt On Maytag Dryer Mde2400ayw
(Posted by plantna 10 years ago)

Matching Stacking Kit
Matching stacking kit Maytag/MED9600SQ-epic-70-cu-ft-electric-dryer/21808 with regards, Vinesh
Matching stacking kit Maytag/MED9600SQ-epic-70-cu-ft-electric-dryer/21808 with regards, Vinesh
(Posted by vineshjosep 11 years ago)