Maytag MDE2400AYW Support Question
Maytag MDE2400AYW Support Question
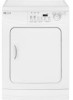
Find answers below for this question about Maytag MDE2400AYW - 3.7 cu. Ft. Electric Dryer.Need a Maytag MDE2400AYW manual? We have 2 online manuals for this item!
Question posted by sidneyroyer3 on August 8th, 2019
The Start/pause Button Popped Out And Broke. Is There A Replacement Button?
Need to find a replacement start/pause button
Current Answers
Answer #1: Posted by Odin on August 8th, 2019 6:03 PM
Odin

Member since:
April 10th, 2010 Points: 41,236,690

Member since:
April 10th, 2010 Points: 41,236,690
If you can't get the part from the company [use the contact information at https://www.contacthelp.com/maytag/customer-service], you may be able to obtain the part number. Then, even without the part number, consider the following:
- Try http://www.searspartsdirect.com/ [call if necessary] or https://encompass.com/.
- Try another online parts source like http://www.ereplacementparts.com/ or https://www.partstore.com/
- Contact local parts dealers and used appliance dealers, who might be able to supply or maybe fix the part
- Use a search engine like Google's or Yahoo's
- Try http://www.searchtempest.com/, which displays global listings from eBay, Craigslist, and other sources
- Take the part you have to an appliance technician, who might possibly be able to fix or replace the part
(For option 5, you may want to use a free tracking program like https://www.followthatpage.com/ to save you from having to repeat your search over time.)
Hope this is useful. Please don't forget to click the Accept This Answer button if you do accept it. My aim is to provide reliable helpful answers, not just a lot of them. See https://www.helpowl.com/profile/Odin.
Related Maytag MDE2400AYW Manual Pages
Owners Manual - Page 1
... Time Display Cycle Status Lights
Using the Controls 5-7
Select Cycle Select Dryness Level Select Temperature Select Options Press Start/Pause
Use & Care Guide
Care & Cleaning 8
Control Panel Dryer Exterior Dryer Exhaust System Stainless Steel Special Laundry Tips
Dryer Exhaust Tips 9
Troubleshooting 10
Service & Warranty 11 Guide d'utilisation et
d'entretien 12 Guía de uso y cuidado...
Owners Manual - Page 2
...that contain vegetable oil or cooking oil can create a fire hazard.
What You Need to Know About Safety Instructions
Warning and Important Safety Instructions appearing in this manual ... 1-800-688-9900 U.S.A. 1-800-688-2002 Canada (Mon.-Fri. 8 a.m.-8 p.m. Always contact your dryer items that have questions, call 1-800-688-2080. The potential for future reference. Washing these items ...
Owners Manual - Page 3

... reaction that could ignite or explode. See installation instructions for dryer use fabric softeners or products to carry out.
9. Do ... moving.
6. Do not repair or replace any servicing unless specifically recommended in published user-repair instructions... or beginning installation. Read all traces of fire, explosion, electric shock, or personal injury when using the appliance.
2.
Do...
Owners Manual - Page 4
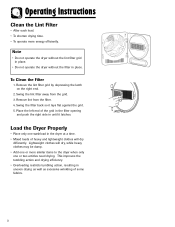
... a time. • Mixed loads of heavy and lightweight clothes will dry, while heavy clothes may be damp. • Add one or two articles need drying. Load the Dryer Properly
• Place only one washload in place. Operating Instructions
Clean the Lint Filter
• After each load. • To shorten drying time. •...
Owners Manual - Page 5
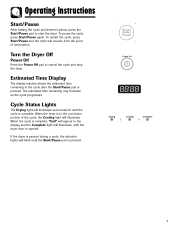
... the cycle is complete, "End" will illuminate and remain lit until the cycle is opened. Operating Instructions
Start/Pause
After setting the cycle and desired options, press the Start/Pause pad to cancel the cycle and stop the dryer.
Estimated Time Display
The display window shows the estimated time remaining in the cycle after the...
Owners Manual - Page 6
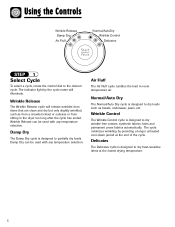
... designed to the desired cycle.
Wrinkle Release can be used with any temperature selection. Air Fluff
The Air Fluff cycle tumbles the load in the dryer too long after the cycle has ended. The indicator light by providing a longer unheated cool-down period at the lowest drying temperature.
5 Using the Controls...
Owners Manual - Page 7

... at the end of larger or bulkier size may require the More Dry Setting to completely dry the load. Use the chart below as a guide:
DRYER TEMPS
LOAD TYPE
Regular
For sturdy cottons or those labeled Tumble Dry. Medium
For permanent press, synthetics, lightweight cottons or items labeled Tumble Dry Medium...
Owners Manual - Page 8

... and hold the Chime and Wrinkle Prevent pads for 3 seconds. STEP 5
Press Start/Pause
Press this pad to start the dryer.
Child Lock
The control panel can be pushed again to resume the cycle once ...pads for 3 seconds. If the door is opened during the cycle, the Start/Pause pad must be locked for the dryer to operate.
The Child Lock indicator light will sound intermittently. When the ...
Owners Manual - Page 9
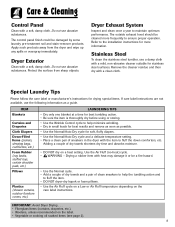
... the item to fluff the down comforters, etc. Drying a rubber item with a soft, damp cloth. Protect the surface from the dryer and wipe up any spills or overspray immediately. Special Laundry Tips
Please follow the care label or manufacturer's instructions for more frequently to maintain optimum performance. Adding a couple of dry towels...
Owners Manual - Page 10

... hazard.
Do
Read the installation instructions and the use lint-trapping screws. Do
Use 4" diameter rigid metal duct. Do
Clean all joints, including at the dryer. Be sure vent flap opens and closes freely. Inspect and clean the exhaust system annually. 9
Don't
Use plastic, thin foil, or non-metal flexible duct...
Owners Manual - Page 11
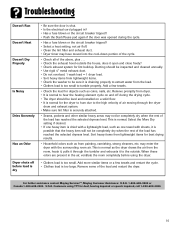
... as the dryer draws the air from the room, heats it, pulls it through the dryer
drum and exhaust system. • Make sure lint filter is shut. • Is the electrical cord plugged in... odors are present in ? • Has a fuse blown or the circuit breaker tripped? • Push the Start/Pause pad again if the door was opened during the cycle.
• Has a fuse blown or the circuit breaker ...
Owners Manual - Page 12
...OR FITNESS, SO THESE EXCLUSIONS OR LIMITATIONS MAY NOT APPLY TO YOU. b. Incorrect electric current, voltage, electrical and/or gas supply. Light bulbs, water filters and air filters.
4. Correct ... metal ducting must be repaired or replaced free of the problem you are available from Maytag Services, LLC, Customer Assistance. If You Need Service
First see the Troubleshooting section in...
Installation Instructions - Page 2
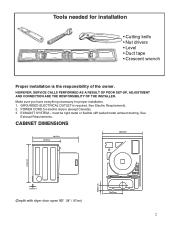
...rigid metal or flexible stiff walled metal exhaust ducting. See Electric Requirements. 2. Tools needed for installation
Printed in U.S.A.. • Impreso en los...1. EXHAUST SYSTEM - See
Exhaust Requirements.
Make sure you have everything necessary for electric dryers (except Canada). 3. GROUNDED ELECTRICAL OUTLET is the responsibility of the owner. HOWEVER, SERVICE CALLS PERFORMED AS A ...
Installation Instructions - Page 3

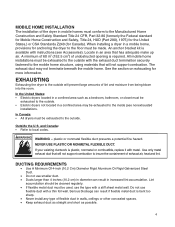
...WARNING: To reduce the risk of fire, this closet contains both a washer and a dryer, doors must be exhausted to the outside to make sure the room has adequate make-up... Before Starting To Install The Dryer. REMOVE THE DOOR FROM ALL DISCARDED APPLIANCES SUCH AS DRYERS TO AVOID THE DANGER OF A CHILD SUFFOCATING.
It is factory-ready for the exhaust system. A DRYER PRODUCES COMBUSTIBLE...
Installation Instructions - Page 4
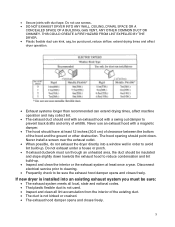
... insure the containment of exhaust air, heat and lint.
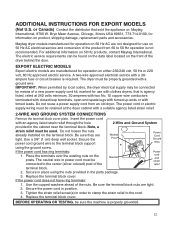
In the United States: • Electric dryers located in diameter can result if flexible metal duct is bent too sharp. • Never... with a stiff sheet metal wall.
An anchor bracket kit is plastic, nonmetal or combustible, replace it with a thin foil wall. Outside the U.S. Locate in an area that will prevent large...
Installation Instructions - Page 5
...
• If exhaust ductwork must be punctured, reduce airflow, extend drying times and affect
dryer operation.
• Exhaust systems longer than recommended can extend drying times, affect machine operation ...point down towards the exhaust hood to prevent back drafts and entry of wildlife. Disconnect electrical service prior to cleaning.
• Frequently check to avoid lint build-up .
&#...
Installation Instructions - Page 8
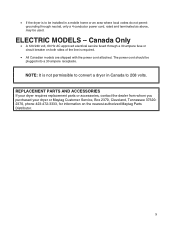
ELECTRIC MODELS - REPLACEMENT PARTS AND ACCESSORIES
If your dryer requires replacement parts or accessories, contact the dealer from whom you purchased your dryer or Maytag Customer Service, Box 2370, Cleveland, Tennessee 373202370, phone 423-472-3333, for information on both sides of the line is to be installed ...
Installation Instructions - Page 10
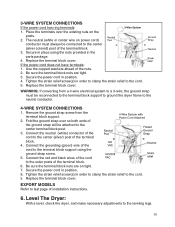
... Remove the ground strap screw from a 4-wire electrical system to a 3-wire, the ground strap must ...dryer, and make necessary adjustments to the center terminal block post.
3. If the power cord does not have terminals: 1. Fold the ground strap over the existing nuts on power cord)
conductor must be attached to the leveling legs.
10 The neutral (white or center wire on the
posts. 2. Replace...
Installation Instructions - Page 11
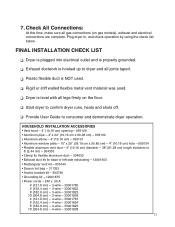
...;q Dryer is plugged into electrical outlet and is properly grounded.
❏q Exhaust ductwork is hooked up to dryer and all joints taped.
❏q Plastic flexible duct is NOT used.
❏q Rigid or stiff walled flexible metal vent material was used.
❏q Dryer is level with all gas connections (on the floor.
❏q Start dryer to confirm dryer...
Installation Instructions - Page 12
... wire. Do not loosen the nuts already installed on the posts. Use the cupped washers ahead of the product from an old dryer. Replace the terminal block cover. A two-wire approved electrical service with tinned leads. Do not reuse a power supply cord from 60 to the cord.
4. Secure the power cord ground wire...
Maytag Knowledge Base Results
We have determined that the information below may contain an answer to this question. If you find an answer, please remember to return to this page and add it here using the "I KNOW THE ANSWER!" button above. It's that easy to earn points!-
Dryer does not heat - Electric dryer
... supply cord may not have heat. Gas dryer FAQs Knowledgebase search tips My dryer will not start Damp loads or long drying times - Electric dryer My electric dryer does not heat. Did you recently install a power supply cord on the control knob or button with the other temperature selections. Replace the fuses or reset the circuit breakers. Loads... -
Loads are damp; dryer does not dry
... drying times - Dryer Poor drying performance - Electric Dryer Dryer does not heat - Your Dryness level settings can be displayed for all Automatic Dry or Sensor Dry cycles are damp; Press and hold the Dryness button for possible causes and solutions. Damp loads or long drying time - Gas Dryer Cycle is shown. Press Pause/Cancel at any... -
Dryer does not heat - Gas dryer
.... The valve is open when the handle is closed. Electric dryer The Air Fluff or Air Only temperature does not add to dry. Air Fluff or Air Only temperature can be found on the control knob or button with the other temperature selections. The drum of a gas...
Similar Questions

Maytag Centennial Electric Dryer Medc400vwo How To Replace Door Switch
(Posted by marjodanett 9 years ago)

How To Put On Replacement Belt On Maytag Dryer Mde2400ayw
(Posted by herh 10 years ago)

How To Replace Drive Belt On Maytag Dryer Mde2400ayw
(Posted by plantna 10 years ago)

Can I Replace The 3 Wire Cord With A 4 Wire Cord On My Maytag Electric Dryer
(Posted by secondtononeconcrete 10 years ago)

Hello. My Dryer Does Not Start.
My dryer has two years . I push the start button and it does not start but it make a sound as is on ...
My dryer has two years . I push the start button and it does not start but it make a sound as is on ...
(Posted by schm 10 years ago)