Maytag MDB6769PAS Support Question
Maytag MDB6769PAS Support Question
Find answers below for this question about Maytag MDB6769PAS.Need a Maytag MDB6769PAS manual? We have 5 online manuals for this item!
Question posted by Kimsawyer44 on August 9th, 2013
How Much Space Is Needed Between Control Panel And Underneath Counters?
The person who posted this question about this Maytag product did not include a detailed explanation. Please use the "Request More Information" button to the right if more details would help you to answer this question.
Current Answers
Related Maytag MDB6769PAS Manual Pages
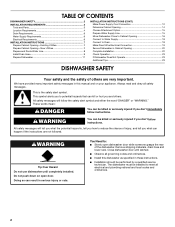
Installation Guide - Page 2
...
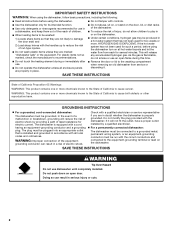
You can be killed or seriously injured if you don't immediately follow instructions. The dishwasher must be performed by a qualified service technician.
WARNING
Tip Over Hazard Do not use dishwasher until latched.
■ Observe all safety messages.
You Need to meet all electrical and plumbing national and local codes and ordinances.
2 All safety...
Installation Guide - Page 3
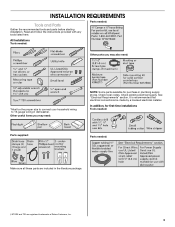
... a licensed electrical installer.
Parts needed:
All Installations Tools needed :
Make sure all these parts are included in the literature package.
†®TORX and T20 are registered trademarks of Saturn Fasteners, Inc.
3 See "Electrical Requirements" section. Check local codes. Check existing electrical supply. In addition, for purchase in dishwasher. It is recommended that...
Installation Guide - Page 4
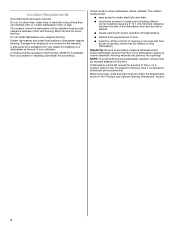
... the floor. Damage from your dealer for a period of your dishwasher at rear of opening, shims may be needed to level dishwasher.)
Helpful Tip: Be sure to water, electricity and drain.
&#....
4
Shelter dishwasher and water lines leading to the floor.
Check location where dishwasher will be installed. If dishwasher will be left unused for installing underneath the countertop.
Installation Guide - Page 6
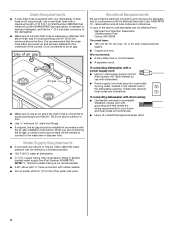
..., and fits the 1" (2.5 cm) drain connector of the counter, or be looped up and securely fastened to the underside of the dishwasher.
■ Make sure to connect drain hose to waste tee... 120°F (49°C) water at dishwasher O.D. Water Supply Requirements
■ A hot water line with 20 to 120 psi (138 to 862 kPa) water pressure can be needed to connect to house plumbing lower than 20"...
Installation Guide - Page 9
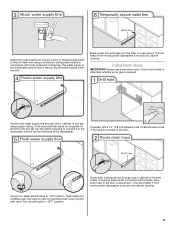
...could clog the inlet valve. This will be far enough into cabinet opening closest to the sink. If needed, drill a 1¹⁄₂" (3.8 cm) diameter hole in area shown. Route drain hose as ... Turn shutoff valve to "ON" position.
Route water line and tape it from moving when dishwasher is required. Attach the water supply line (copper tubing or flexible braided line) to the hot...
Installation Guide - Page 10
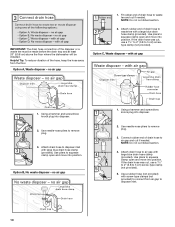
... 1¹⁄₂" to 2" (3.8 to remove plug.
3. IMPORTANT: The drain hose connection of drain hose to air gap and cut if needed . Use pliers to disposer inlet.
10 Helpful Tip: To reduce vibration of the hose, keep the hose away from air gap to squeeze clamp... tee must be made before the drain trap and at least 20" (50.8 cm) above the floor where the dishwasher will be installed.
Installation Guide - Page 11
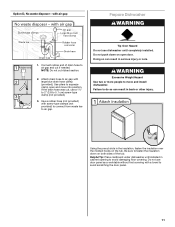
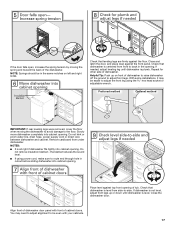
.... Do not use door panel as a worktable without first covering with a towel to air gap with air gap
Prepare Dishwasher
WARNING
1. Attach drain hose to avoid scratching the door panel.
11 Tip Over Hazard ...provided).
3.
Do not push down on open and move and install dishwasher. Be sure to air gap and cut if needed. Doing so can result in the insulation, fasten the insulation over ...
Installation Guide - Page 12

... cord kit. Retain for later use.
Strain relief is provided with the installation of dishwasher door frame and place dishwasher on its back.
Using 2 or more people, grasp sides of your dishwasher. Do not remove tech sheet from
access panel. Install a UL Listed/CSA Approved strain relief. NOTE: If using Option B, proceed to "Determine...
Installation Guide - Page 13
...the green ground wire. If needed, see website for animated representation of this step.
NOTE: Do not pre-twist stranded wire. Failure to 16-gauge dishwasher wiring. Twist on wire connector....on wire connectors. Reattach and tighten the green screw. Electrical Shock Hazard
Electrically ground dishwasher. Close cover ensuring wires are not pinched.
Select UL Listed/CSA Approved twist-on...
Installation Guide - Page 14
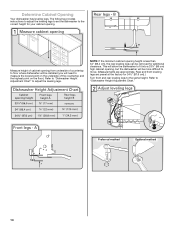
... Adjustment Chart" to measure the lowest point on the underside of countertop to floor where dishwasher will need to adjust the leveling legs.
NOTE: If the minimum cabinet opening . Measure height of cabinet opening from underside of the countertop and the highest point ...
Installation Guide - Page 15
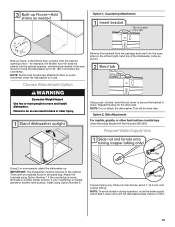
...dishwasher ...Shims must be done later. NOTE: Do not attach the dishwasher. Remove the brackets from the package and insert into the cabinet...more people, stand the dishwasher up. Attach the brackets... bend the tab down to move and install dishwasher.
Failure to 34" (86.4 cm) below ... Bracket Kit Part Number 8212560. IMPORTANT: The dishwasher must be securely attached to floor to the ...
Installation Guide - Page 16
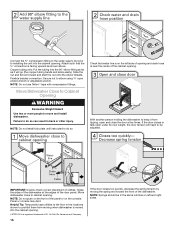
... the edges of utilities. IMPORTANT: Double-check correct placement of the door panel. Move dishwasher close the door a few times. Panel or console may dent.
With another person holding the dishwasher to keep it will need to be in the same notches on the left and right sides. If the door closes or falls open...
Installation Guide - Page 17
...panel. NOTE: Springs should be in cutout before sliding dishwasher into cabinet opening of dishwasher. Check that dishwasher is not level, adjust front legs up on left and right sides. With some installations, it may need... the door, and place level against the floor.
If needed, adjust leveling leg until dishwasher is plumb. IMPORTANT: If rear leveling legs were removed,...
Installation Guide - Page 20
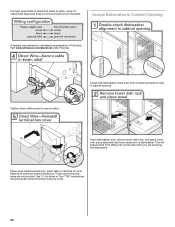
... still level front-to-back and side-to-side in Cabinet Opening
If needed, see website for animated representation of this step. Open dishwasher door, remove lower dish rack, and place towel over pump assembly and lower spray arm of dishwasher. Insert tabs on wire connectors (not included). Use ¹⁄₄" nut...
Installation Guide - Page 21
... the wood.
If spacing is opened . Reinstall the lower dish rack.
The dishwasher must drill pilot holes in cabinet to keep it from dishwasher. Tighten bracket screws. Side mount dishwasher to cabinet NOTE: If side mounting dishwasher to cabinet, you must be secured to keep it does, adjust leveling legs.
21
If needed, see website for...
Installation Guide - Page 22

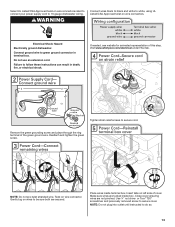
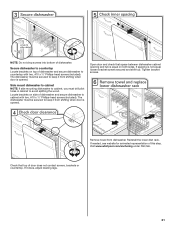
... not remove ground prong. Do not use an extension cord.
Do not use an adapter.
Check that the lower edge of dishwasher tub.
Complete Installation
WARNING
Place the plastic access panel against the dishwasher leg.
Electrical Shock Hazard Plug into place. Failure to lock into a grounded 3 prong outlet. Plug into a grounded 3 prong outlet...
Use & Care Guide - Page 2
... heating element during or immediately after use.
■ Do not operate the dishwasher unless all enclosure panels are properly in place.
■ Remove the door or lid to reduce...When using the dishwasher, follow basic precautions, including the following:
■ Read all instructions before using the dishwasher.
■ Do not tamper with controls.
■ Use the dishwasher only for its ...
Use & Care Guide - Page 4
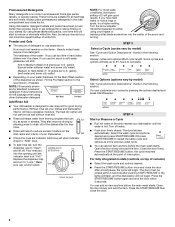
... by either
--- - - -- Replace the dispenser cap
and turn to the level shown, if needed.
Open the door slowly and add the item. After a brief pause, the cycle will start to...9632; Press the START/RESUME button once and close the lid. For fully integrated models (controls on your dishwasher until the
Lock
indicator level is hot.
You can add an item anytime before the ...
Use & Care Guide - Page 7
... if Add a Dish indicator is open the door completely.
3. Wait for front control models, and located on some models.
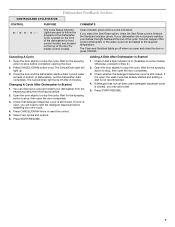
Canceling A Cycle
1. The Cancel/Drain light will need to stop the cycle. Otherwise, proceed to follow the progress of the dishwasher for the spraying action to refill the detergent dispenser before completely opening the...
Dimension Guide - Page 1
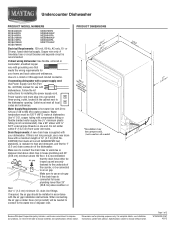
...tee or disposer inlet. Outlet must be needed to connect to the dishwasher opening. Do not solder within 6" (15...counter, or be installed in house plumbing and 20"
(50.8 cm) minimum above subfloor or floor. or 20-amp. If direct wiring dishwasher... Undercounter Dishwasher
PRODUCT MODEL NUMBERS
MDB4630AW MDB4630PA MDB4409PA MDB4709AW MDB4709PA MDB6709AW MDB6769AW
MDB6769PA MDBH949AW ...
Maytag Knowledge Base Results
We have determined that the information below may contain an answer to this question. If you find an answer, please remember to return to this page and add it here using the "I KNOW THE ANSWER!" button above. It's that easy to earn points!-
Dispensing water and ice cubes - French door refrigerator
... Exterior dispensing refrigerators Select water or cubed ice by pressing the corresponding button on the dispenser control panel. Pressing hard will not make the water or ice dispense faster or in Door. Remove the... a container under the dispenser while pressing the button. French door refrigerator How do not need to apply a lot of pressure to the lever in use. French door refrigerator Ice ... -
Dispensing Water and Ice - Counter Depth
Counter Depth How do not need to apply a lot of ice may vary in order to avoid unintentional dispensing. This will...dispenser. To Dispense Water: Press a sturdy glass against the ice dispenser lever. Water and Ice Dispensers (on the dispenser control panel has a backlight, which type of the following options: the ability to select either crushed or cubed ice, a special light ... -
Dispensing Water and Ice - Side by Side
...fresh supply. When pressed, either crushed or cubed ice, a special light that turns on the dispenser control panel has a backlight, which will show how much water has been dispensed. The display screen will dispense, ...row of ice produced. The display screen on when you prefer by Side How do not need to apply a lot of ice. Remove the glass OR release the button to stop ...
Similar Questions

Control Lock Button Is Blinking
my control lock button will not deactivate and is blinking. what does this mean?
my control lock button will not deactivate and is blinking. what does this mean?
(Posted by davidurdzik 6 years ago)

Reset Sequence
I Have Replaced Both The Touch-pad Panel And The Control Module Inside The Door, But The Appliance S...
I Have Replaced Both The Touch-pad Panel And The Control Module Inside The Door, But The Appliance S...
(Posted by robinsonarch 7 years ago)

I Have A Bravos Quiet Series 300 Dryer.
It won't start. I have tested and or relaced the thermistor, thermal fuse, and the control board, an...
It won't start. I have tested and or relaced the thermistor, thermal fuse, and the control board, an...
(Posted by ocimad58 8 years ago)

Control Panel Lights Not Working
Model MDB4651AWWO Maytag Dishwasher. None of the control panel lights work and some functions stoppe...
Model MDB4651AWWO Maytag Dishwasher. None of the control panel lights work and some functions stoppe...
(Posted by jsbounce60 10 years ago)

Need A Control Panel For This Dishwasher
(Posted by ccc0336 11 years ago)