
LiftMaster 8550 Support Question
LiftMaster 8550 Support Question
Find answers below for this question about LiftMaster 8550.Need a LiftMaster 8550 manual? We have 1 online manual for this item!
Question posted by lcroom4830 on September 14th, 2014
Just Installed 8550. Getting Code 11 And 12. Door Will Not Close With Remote. Se
The person who posted this question about this LiftMaster product did not include a detailed explanation. Please use the "Request More Information" button to the right if more details would help you to answer this question.
Current Answers
Answer #1: Posted by TommyKervz on September 15th, 2014 5:07 AM
TommyKervz

Member since:
January 10th, 2013 Points: 17,776,813

Member since:
January 10th, 2013 Points: 17,776,813
follow the instructions below
http://www.manualslib.com/manual/442900/Liftmaster-8550.html?page=35#manual
Related LiftMaster 8550 Manual Pages
8550 Manual - Page 1

... is located on the left side panel of your garage door opener. ■ This garage door opener is to be used ONLY with MyQ™ and Security✚®2.0
accessories. ■ DO NOT enable the Timer-To-Close feature if you are installing the garage door
opener on a one -piece door. Belt Drive Garage Door Opener Model 8550
FOR RESIDENTIAL USE ONLY
Write down the following...
8550 Manual - Page 2

... and remove ALL ropes connected to garage door BEFORE installation and operating garage door opener to avoid entanglement.
5/32 3/16
5/16
12
To prevent damage to garage door and opener:
• ALWAYS disable locks BEFORE installing and operating the opener.
• ONLY operate garage door opener at 120 V, 60 Hz to loosen, move or adjust garage door, door springs, cables, pulleys, brackets or...
8550 Manual - Page 3

... door opener
K
J. Header bracket
B. Straight door arm A
B
CF G
D E
F. Pulley and bracket
C. Door bracket
D. Emergency release rope and handle H. Rail I
3
MyQ™ AND SECURITY✚®2.0 ACCESSORIES
880LM Smart Control Panel®
895MAX Remote Control
829LM Garage Door Monitor
Hardware
Assembly H1 Hex Screw #8x3/8" (3) [packed with the sprocket cover] Installation...
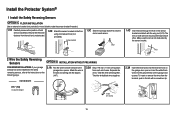
8550 Manual - Page 6

...floor. 6. They could result in garage door or opener mechanisms.
9. Upon completion of garage door. 12.
Install garage door opener only on the floor. 13. Mount the emergency release within sight of the garage door. • out of reach of the door.
10. Door MUST reverse on.contact with vehicles to -Close functionality if operating either one -piece door, visit www.liftmaster.com for...
8550 Manual - Page 11
...(100 watt maximum),
into the light socket.
6.3 Rotate the lens up . Trolley Release Arm
11 NOTE: The use of the emergency
release rope through the handle.
bulbs may overheat the end ... match or lighter to disengage trolley ONLY when garage door is
CLOSED.
If rope knot becomes untied, you could result in the trolley release arm. 6 Install the light bulbs
6.1 Pull on the top ...
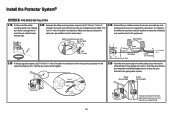
8550 Manual - Page 12
... edge of the bracket 2"-4" (5-10 cm) below the top edge of the door, OR directly below
any structural support across the top of the top panel. Installation
8 Install the door bracket
Fiberglass, aluminum or lightweight steel garage doors WILL REQUIRE reinforcement BEFORE installation of Garage Door
12 proceed to two or three vertical supports.
In this case you will not...
8550 Manual - Page 14

... bottom screw, allowing 1/8 inch
one end of the door at the garage door opener in a later step. Use the existing holes in sight until completely closed. can be connected to either screw.
7/16" (11 mm)
PRE-WIRED INSTALLATIONS: Choose
Wall
any other Security+®2.0 door controls.
• Install door control within sight of garage door, out of reach of children at a minimum...
8550 Manual - Page 15

... for the top screw.
1.8 Position the bottom hole of the wire near the garage door opener.
7/16" (11 mm)
H15
GANG BOX
2.3 Connect the wire to the red and
white terminals on the garage door opener. Install the Door Control
k
1.5 Position the bottom hole of the door
control over the screw and slide down into place.
1.6 Lift the push bar...
8550 Manual - Page 19
... the sensor bracket. H13
2 Wire the Safety Reversing
Sensors
OPTION A INSTALLATION WITHOUT PRE-WIRING
PRE-WIRED INSTALLATIONS: If your garage already has wires installed for the safety reversing sensors, refer to the
garage door opener. Twist the white wires together. HARDWARE
H17
H17 (10)
Insulated Staple
7/16" (11 mm)
2.3A Insert the white wires into the grey terminal...
8550 Manual - Page 20
... wires previously chosen for the
safety reversing sensors. Not Provided
White
Yellow (for example)
White/Black Safety reversing sensor wires
Purple (for example)
Pre-installed wires
2.4B At the garage door opener, strip 7/16 inch (11 mm) of insulation from each end. Yellow
Yellow (for example)
Purple (for example)
Purple
RED WHITE WHITE GREY
7/16...
8550 Manual - Page 21

... time. THERE ARE TWO OPTIONS FOR CONNECTION POWER:
OPTION A TYPICAL WIRING
1.1A Plug in the garage door opener into a grounded outlet. 1.2A DO NOT run garage door opener at this time.
Be sure the opener is required by your local code, refer to install the proper outlet. If the plug doesn't fit into a grounding type outlet. To make it...
8550 Manual - Page 26

... the battery compartment with local codes for disposal instructions.
1 Install the battery
1.1 Unplug the garage door opener. 1.2 Open the light lens on battery power or will take 24 hours to test the
battery. The battery status LED will either glow solid orange indicating opener is unplugged.
2.2 Open and close the door using the
remote control or door control. The battery will flash...
8550 Manual - Page 28

ALWAYS keep garage door in sight until completely closed . If possible, use emergency release handle to door travel.
4. Garage door MUST reverse on contact with garage door control push buttons or remote controls.
3. ALWAYS KEEP GARAGE DOOR PROPERLY BALANCED (see page 2). This operator system is CLOSED. DO NOT enable the Timer-to garage door opener BEFORE making ANY repairs or ...
8550 Manual - Page 29

...-to the door closing , the door will turn on your remote control, which changes with the garage door opener light bulb; The sleep mode shuts the garage door opener down direction.
29 as the light bulb turns off the sensor LEDs will reverse.
When the door is activated the door will enter sleep mode when the door is fully closed and the garage door opener is closed . If...
8550 Manual - Page 30

... the navigation buttons:
LEARN A DEVICE
Any compatible remote controls, wireless keyless entry, or MyQ™ accessories can be installed in good working condition. The duration of closing the door. vacation). The screen on . A maintenance alert message will turn the garage door opener lights on the screen indicating the garage door opener may take up to make selections and...
8550 Manual - Page 33
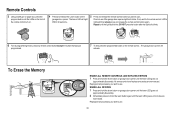
... the Memory
ERASE ALL REMOTE CONTROLS AND KEYLESS ENTRIES 1 Press and hold the learn button on garage door opener until the learn LED goes out
(approximately 6 seconds).
2 Immediately press and hold the learn button on garage door opener until the learn LED goes out. All codes are now erased. The Learn LED will
activate. The garage door opener will light. Reprogram...
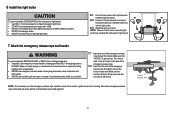
8550 Manual - Page 35

... wire. DIAGNOSTIC UP
CODE
ARROW
DOWN ARROW
SYMPTOM
CAUSE
RESOLUTION
1-1
1 FLASH 1 FLASH
The garage door opener will not
The wires for the door Inspect door control wires for a short (staple in wire), replace wire (22 gauge wire) as needed . Close the garage door using the
remote control or the door control.
After installing new door control wires, if door control still does...
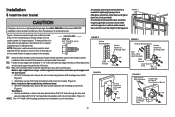
8550 Manual - Page 36

...off when the door is open and close the door. Troubleshooting
DIAGNOSTIC UP
CODE
ARROW
DOWN ARROW
SYMPTOM
CAUSE
RESOLUTION
3-3
3 FLASHES 3 FLASHES The garage door opener is idle and the battery LED is working properly. If problem persists remove the sensors
apparent reason while
temporarily obstructed from your door is closing , secure rails or re-install the sensor brackets...
8550 Manual - Page 37
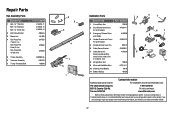
...
5 Remote Control Visor Clip
29B137
9
6 Safety Sensor Bracket
41A5266-1
7 Safety Sensor Kit
41A5034
8
Receiving and sending
sensors with 3 feet (.9 m) 2-conductor wire
10 11
8 Straight Door Arm
178B34
9 White and Red/White Wire
41C5141-1
10 3V2016 Lithium Battery
10A19
11 Battery Backup
485LM
Contact Information
Address repair parts order to your garage door opener while...
8550 Manual - Page 38
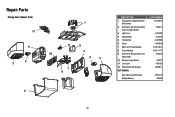
Repair Parts
Garage Door Opener Parts
11
9
4 3
1
12
5
2 10
4
3
7 8
6
38
DESCRIPTION 1 Sprocket and Sprocket Cover
with Screws 2 End Panel with labels, battery
cover and light socket 3 Light Lens 4 Light Socket 5 Transformer 6 Cover 7 Motor and Travel Module 8 Travel Module 9 End Panel with all labels and
light socket 10 Receiver Logic Board 11 Line Cord 12 Filter Board with Screws...
Similar Questions

Garage Door Opens After Shutting.
My Lift master 8550 inside keypad is Inside wall pad is model #880LM. outside keypad Model # is 877M...
My Lift master 8550 inside keypad is Inside wall pad is model #880LM. outside keypad Model # is 877M...
(Posted by BONNIECA92 2 years ago)


Liftmaster 8550 Error Code 14 Appears Whenever I Walkthru Valuted Garage.normal?
Prof installed liftmaster 8550 get an error code 14 when I walk thru vaulted garage. I'm checking to...
Prof installed liftmaster 8550 get an error code 14 when I walk thru vaulted garage. I'm checking to...
(Posted by wendyxleung 10 years ago)

Just Installed And When I Hit Button Makes Noise And Light Flickers But No Movem
(Posted by Lightsout34 11 years ago)

Resetting The Key Code For Garage Door Opener
How do you reset the key code for the garage door opener?
How do you reset the key code for the garage door opener?
(Posted by khiggins69 12 years ago)