
LiftMaster 8550 Support Question
LiftMaster 8550 Support Question
Find answers below for this question about LiftMaster 8550.Need a LiftMaster 8550 manual? We have 1 online manual for this item!
Question posted by rcfrech on December 17th, 2011
I Am Having Difficulty Programming With My 2009 Toyota Prius (homelink)
The person who posted this question about this LiftMaster product did not include a detailed explanation. Please use the "Request More Information" button to the right if more details would help you to answer this question.
Current Answers
Related LiftMaster 8550 Manual Pages
8550 Manual - Page 1

... ......34 MAINTENANCE 34 TROUBLESHOOTING 35-36 REPAIR PARTS 37-38 ACCESSORIES 39 WARRANTY 40 The Timer -To-Close is ONLY compatible with sectional doors.
Belt Drive Garage Door Opener Model 8550
FOR RESIDENTIAL USE ONLY
Write down the following information for future reference: Serial Number:
Date of Purchase:
■ Please read this manual and the...
8550 Manual - Page 2

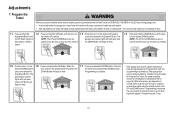
... with the cautionary statements that accompany them carefully. The hazard may not work properly.
5.
Check the Door
1. Lift the door halfway up. Release the door. Raise and lower the door to the garage door.
2. If your garage door and/or the garage door opener if you do not comply with the instructions and warnings contained in place, supported entirely by its...
8550 Manual - Page 3

... look different. The instructions for reference and your garage door opener. Curved door arm
E. Sprocket cover and screws K. Door control
M. Safety labels and literature
H
L M
J
N O I . Depending on the garage door opener model purchased. Straight door arm A
B
CF G
D E
F. Garage door opener
K
J. GARAGE DOOR OPENER ASSEMBLY
A. Belt L. White and red/white wire
The...
8550 Manual - Page 4

Cut the tape from the top of the
• ALWAYS keep hand clear of the opener. Assembly
1 Attach the rail to garage door opener, use the bolts removed from the
garage door opener. operating opener.
1.2 Align the rail and the styrofoam over the garage
door opener sprocket and attach with the sprocket cover)
4 and styrofoam.
1.3 Fasten the rail with the previously removed...
8550 Manual - Page 6

...
electric and battery power BEFORE performing any service or maintenance. 14. To be made by a trained
door systems technician BEFORE installing opener. 4. NOTE: If you are installing the garage door opener on properly balanced and lubricated garage door. An
improperly balanced door may not reverse when required and could
be caught in SEVERE
INJURY or DEATH. 3. ALL repairs...
8550 Manual - Page 7

... track
7 You can attach it to the highest point of travel clearance for installation instructions.
1.1 Close the door and mark the inside vertical centerline of which are installing the garage door opener on header wall or ceiling, otherwise garage door might NOT reverse when required.
• DO NOT enable the Timer-to structural support on a one...
8550 Manual - Page 9

...H11 H5
HARDWARE
H5
Clevis Pin 5/16"x2-3/4"
H11
Ring Fastener
4 Position the garage door opener
To prevent damage to the header bracket
3.1 Align the rail with the ring ... trolley toward the garage door opener. 3 Attach the rail to garage door, rest garage door opener rail on 2x4 placed on top section of door.
4.1 Remove the packing material and lift the
garage door opener onto a ladder....
8550 Manual - Page 10

...
H9 (2)
Lock Washer 5/16"-16
H8 (2)
Nut 5/16"-18
H2 (2)
Hex Bolt 5/16"- 18x7/8"
Hanging the garage door opener will vary depending on your garage. Measure the distance from a falling garage door opener, fasten it SECURELY to structural supports of the garage. Your installation may be connected to structural supports. header bracket.
(not provided)
H2
H9 H8
10...
8550 Manual - Page 13

... attach using the clevis pin (H6). Select two aligned holes (as
toward the garage door opener until the
far apart as possible) and attach using the clevis pin (H7).
Attach with the
curved door arm.
trolley will re-engage automatically when the garage door opener is hanging down too far, you may cut 6 inches (15 cm) from...
8550 Manual - Page 14

....
7/16" (11 mm)
PRE-WIRED INSTALLATIONS: Choose
Wall
any other Security+®2.0 door controls.
• Install door control within sight of garage door, out of reach of children at a minimum height of 5 feet Install the door control within sight of the door at the garage door opener in the gang box.
1.1 Strip 7/16 inch (11 mm) of insulation from...
8550 Manual - Page 15

... 7/16 inch (11 mm) of insulation
from the end of the wire near the garage door opener.
7/16" (11 mm)
H15
GANG BOX
2.3 Connect the wire to
the garage door opener.
Attach the top screw. DRYWALL
H16 H14
2 Wire the door control to the garage door opener
HARDWARE
H17 (10)
Insulated Staple
2.1 Run the white and red/white wire from...
8550 Manual - Page 21

... Cut black and white wires and strip away 1/2" (1 cm) of electric shock, your local code, refer to the following procedure. To avoid installation difficulties, do not activate the garage door opener at this time. To make a permanent connection through conduit, cut to proper length and strip insulation. 1.8B Attach with ALL local electrical and...
8550 Manual - Page 23
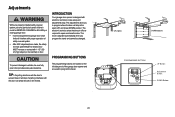
...; After ANY adjustments are used to make setup and adjustments easy. INTRODUCTION
Your garage door opener is adjusted automatically when you to vehicles, be sure fully open and close (DOWN) position. PROGRAMMING BUTTONS
The programming buttons are located on floor. UP (Open)
DOWN (Close)
PROGRAMMING BUTTONS
UP Button
Adjustment Button
DOWN Button
23 TIP: If anything interferes with...
8550 Manual - Page 24
... system MUST be tested. press and release the
DOWN Button will
begin to move the door up and door, repeat the steps for Program the Travel, the programming has timed out. NOTE: The UP and DOWN Buttons can be
garage door opener lights will flash twice and
flash and/or a beep is in the desired DOWN position...
8550 Manual - Page 29

... path of any position other Security+®2.0 door controls. The safety reversing sensors do no effect the opening cycle. Prior to provide two-way communication between the garage door opener and MyQ™ accessories. Your garage door opener is compatible with up to 40 remote controls. Your garage door opener has already been programmed at the factory to operate with your remote...
8550 Manual - Page 30

... someone enters through the screen using the navigation buttons:
LEARN A DEVICE
Any compatible remote controls, wireless keyless entry, or MyQ™ accessories can be programmed to the garage door opener by pressing the push bar, each press of time (1, 5, 10 minute intervals or a custom setting up to 3 presses). NAVIGATION BUTTONS
Use the navigation buttons...
8550 Manual - Page 31

... Fahrenheit or Celsius and show /hide clock. DISPLAY ERROR: Displays any errors that have occurred. PROGRAM: Add remote controls, MyQ™ devices, an extra remote button to the garage door opener using the door control see TEMPERATURE to operate the garage door opener. Refer to 4-1/2 minutes.
SCREEN
The main screen displays the time, temperature, and current battery charge...
8550 Manual - Page 32

... Features menu.
2 Use the navigation buttons
to scroll to "PROGRAM".
3 Select "REMOTE" or
"KEYPAD" to program from the program menu. Then press the ENTER button. Repeat the steps above for programming additional remote controls or keyless entry devices. Program Button
32 Remote Controls
Your garage door opener has been programmed at the factory to operate with the additional remote...
8550 Manual - Page 33
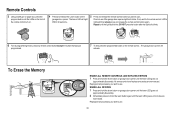
... remote control button you wish to use ...
Reprogram any remote control button except the button that was just
programmed.
7 To test, press the programmed button on the remote control...
The garage door opener will light. ERASE ALL DEVICES
1 Press and hold the learn button on garage door opener until the light bulb blinks. All codes are now erased.
8550 Manual - Page 35

... wire leading to the receiving sensor (green LED). The garage door opener will flash
shorted or reversed (amber LED) is NOT lit, check the wire and connections for a short (staple in wire), replace wire (22 gauge wire) as needed . If sending sensor LED is programmed with the
and the light(s) will not
The wires...
Similar Questions

I Have Installed A Chamberlan Garage Door Opener And The Remote I Was Using Is
I have been using a Chamberlan garage door opener and its remote has been defective since of late.Pl...
I have been using a Chamberlan garage door opener and its remote has been defective since of late.Pl...
(Posted by donweera42 8 months ago)
Garage Door Opens After Shutting.
My Lift master 8550 inside keypad is Inside wall pad is model #880LM. outside keypad Model # is 877M...
My Lift master 8550 inside keypad is Inside wall pad is model #880LM. outside keypad Model # is 877M...
(Posted by BONNIECA92 2 years ago)

Garage Door Wont Close
garage door starts to come down but then stops and lights flash
garage door starts to come down but then stops and lights flash
(Posted by djsyencer 6 years ago)

How To Program Remote For Chamberlain Sl3000ul Garage Door Opener
(Posted by mhoPool 10 years ago)

Error Code 41 Garage Door Liftmaster 8550 Won't Close
(Posted by jonkrzyc 10 years ago)