
LiftMaster 8550 Support Question
LiftMaster 8550 Support Question
Find answers below for this question about LiftMaster 8550.Need a LiftMaster 8550 manual? We have 1 online manual for this item!
Question posted by barranca7 on December 2nd, 2012
Code 41
The person who posted this question about this LiftMaster product did not include a detailed explanation. Please use the "Request More Information" button to the right if more details would help you to answer this question.
Current Answers
Answer #1: Posted by GarageDoorMafiadotcom on December 2nd, 2012 2:43 PM
GarageDoorMafiadotcom

Member since:
November 4th, 2012 Points: 25,600

Member since:
November 4th, 2012 Points: 25,600
Related LiftMaster 8550 Manual Pages
8550 Manual - Page 1

Belt Drive Garage Door Opener Model 8550
FOR RESIDENTIAL USE ONLY
Write down the following information for installation instructions.
. www.liftmaster.com The Chamberlain Group, Inc.
845 Larch Avenue Elmhurst, Illinois 60126-1196
Contents
BELT DRIVE GARAGE DOOR OPENER.. 1 PREPARATION 2 ASSEMBLY 4 INSTALLATION 6-13 INSTALL THE DOOR CONTROL.....14-16 INSTALL THE PROTECTOR SYSTEM 17-20 ...
8550 Manual - Page 2

....
• Disable ALL locks and remove ALL ropes connected to garage door BEFORE installation and operating garage door opener to avoid entanglement.
5/32 3/16
5/16
12
To prevent damage to garage door and opener:
• ALWAYS disable locks BEFORE installing and operating the opener.
• ONLY operate garage door opener at 120 V, 60 Hz to avoid malfunction and damage.
1/2
5/8
1/4
7/16...
8550 Manual - Page 3

... will vary depending on your specific model, other accessories may be included with your product may look different. The instructions for reference and your garage door opener. Pulley and bracket
C. Belt L. Door control
M. Depending on the garage door opener model purchased. Straight door arm A
B
CF G
D E
F. The images throughout this manuals are not included in this manual.
8550 Manual - Page 4

... SERIOUS INJURY to finger scratching. Assembly
1 Attach the rail to the garage door opener
NOTE: ONLY use ONLY those bolts/fasteners mounted in the garage door opener
H1 (3)
Hex Screw #8x3/8" (Packed with the previously removed
bolts.
1.4 Position the belt around the garage door
To avoid SERIOUS damage to garage door opener, use the bolts removed from the rail, belt,
operating...
8550 Manual - Page 6

.... 13. DO NOT enable the Timer-to do so 8.
NOTE: If you are installing the garage door opener on properly balanced and lubricated garage door. An
improperly balanced door may not reverse when required and could
be caught in garage door or opener mechanisms.
9. NEVER connect garage door opener to power source until instructed to -Close functionality if operating either one -piece...
8550 Manual - Page 7

... on wall or ceiling), use the maximum height possible, or refer to loosen, move or adjust garage door, springs, cables, pulleys, brackets, or their hardware, ALL of which are installing the garage door opener on header wall or ceiling, otherwise garage door might NOT reverse when required.
• DO NOT enable the Timer-to gain approximately 1/2" (1 cm...
8550 Manual - Page 9

... garage door opener
To prevent damage to disconnect the inner and outer trolley.
If the ladder is ideal for the garage door opener. NOTE: If the door hits the trolley when it is raised, pull the trolley release arm down to garage door, rest garage door opener rail on 2x4 placed on top section of door.
4.1 Remove the packing material and lift the
garage door opener...
8550 Manual - Page 10

...Ceiling
H4
Unfinished Ceiling
5.4 Attach the end of each hanging bracket to 5.5 Attach the garage door opener to structural supports. Finished Ceiling
5.1 On finished ceilings, use the lag screws
(H3) ... are three example installations. Concrete anchors MUST be different. For ALL installations the garage door opener MUST be connected to the
5.6 Remove the 2x4 and manually close the
the ...
8550 Manual - Page 13

...
5/16"x1"
H11 (2)
Ring Fastener
H9 (2)
Lock
Washer 5/16" -16
H6
Clevis Pin 5/16"x1-1/4"
9.4 Align the straight door arm with the ring fastener (H11). Select two aligned holes (as
toward the garage door opener until the
far apart as possible) and attach using the bolts (H2), nuts (H8) and lock washers (H9). 9 Connect...
8550 Manual - Page 14

... 1.2 Connect one wire to cross path of the wire and separate the wires. NOTE: Older LiftMaster accessories and third party products are not compatible.Your garage door opener is properly adjusted, and there are connected at the garage door opener in a later step. To prevent possible SERIOUS INJURY or DEATH from ALL moving parts of the...
8550 Manual - Page 15

... installations). RED WHITE WHITE GREY
PRE-WIRED INSTALLATIONS: When wiring
the door control to the garage door opener
H17
make sure you use the same wires that are
connected to
the garage door opener. Attach the top screw. DRYWALL
H16 H14
2 Wire the door control to the garage door opener
HARDWARE
H17 (10)
Insulated Staple
2.1 Run the white and red/white...
8550 Manual - Page 21

... make a permanent connection through the 7/8" hole in the top of the motor unit (according to local code):
1.1B Be sure power is NOT connected to the opener, and disconnect power to circuit. 1.2B Remove the garage door opener cover and set aside. 1.3B Remove the attached green ground terminal. 1.4B Cut black and white wires...
8550 Manual - Page 26

... remove the battery cover on the garage door opener.
1.3 Partially insert the battery into the battery compartment with local codes for the green Battery Status LED to start flashing before proceeding to fully charge. NOTE: Make sure the garage door opener is operating on the right side panel of battery in the garage door opener.
The battery status LED will...
8550 Manual - Page 29

... reversing sensors do no effect the opening cycle. SECURITY+®2.0 REMOTE CONTROLS AND DOOR CONTROLS
Your garage door opener is equipped with up to the door closing , the door will turn on your garage door operation.
For added control over 100 billion new codes. When the door is in any other than closed . Your garage door opener has already been programmed at the...
8550 Manual - Page 30

..., wireless keyless entry, or MyQ™ accessories can be the primary method of the TTC. The lights will display the Diagnostic Code. This feature is set . This feature will activate the garage door opener.
SCREEN The screen will turn on . LOCK
The LOCK feature is sensed. The factory setting is activated.
If using this...
8550 Manual - Page 32

... controls or visit www.liftmaster.com.
The garage door opener lights will flash (or two clicks will be heard) when the code has been programmed. Repeat the steps above ....
2 Use the navigation buttons
to scroll to "PROGRAM".
3 Select "REMOTE" or
"KEYPAD" to operate your choice on the garage door opener. OR
1
2 3 ABC
DEF
4GHI
5 6 JKL
MNO
7 8 9 PRS
TUV
WXY
*
*
0 QZ
#
0 QZ...
8550 Manual - Page 33
...
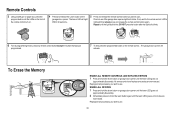
now erased. Reprogram any remote control button except the button that was just
programmed.
7 To test, press the programmed button on the
garage door opener. All codes are now erased. To Erase the Memory
ERASE ALL REMOTE CONTROLS AND KEYLESS ENTRIES 1 Press and hold the learn button again until the learn LED ...
8550 Manual - Page 34
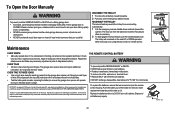
... receiver and/or transmitter are prohibited, except for changing the code setting or replacing the batteryTHEREARENO OTHER USER SERVICEABLEPARTS. Dispose of the rail surface where the trolley slides. • Test the battery and consider replacing the battery to ensure the garage door opener will reconnect on the emergency release handle. NOTICE NOTICE
Maintenance
EVERY...
8550 Manual - Page 35

...module.
35 Make sure nothing is hanging or mounted on the garage door opener flash the diagnostic codes. See page 18 for installation.
Close the garage door using the
remote control or the door control. DIAGNOSTIC UP
CODE
ARROW
DOWN ARROW
SYMPTOM
CAUSE
RESOLUTION
1-1
1 FLASH 1 FLASH
The garage door opener will not close Safety sensor wire
Inspect sensor wire for incorrect...
8550 Manual - Page 36

... to a custom time, press the ON button on page 27. The LEDs on the door conrol blink: If you have been obstructed or when the motion sensor on the door control detects movement in the diagnostic codes:
My garage door opener beeps every 30 seconds: Refer to the Battery Status LED section on the Premium Motion...
Similar Questions

I Have Installed A Chamberlan Garage Door Opener And The Remote I Was Using Is
I have been using a Chamberlan garage door opener and its remote has been defective since of late.Pl...
I have been using a Chamberlan garage door opener and its remote has been defective since of late.Pl...
(Posted by donweera42 8 months ago)
Garage Door Opens After Shutting.
My Lift master 8550 inside keypad is Inside wall pad is model #880LM. outside keypad Model # is 877M...
My Lift master 8550 inside keypad is Inside wall pad is model #880LM. outside keypad Model # is 877M...
(Posted by BONNIECA92 2 years ago)

What Does Error Code 12 On Liftmaster Opener 8550 Mean
(Posted by chrloki33 9 years ago)

Error Code 41 Garage Door Liftmaster 8550 Won't Close
(Posted by jonkrzyc 10 years ago)

Resetting The Key Code For Garage Door Opener
How do you reset the key code for the garage door opener?
How do you reset the key code for the garage door opener?
(Posted by khiggins69 12 years ago)