
LiftMaster 8550 Support Question
LiftMaster 8550 Support Question
Find answers below for this question about LiftMaster 8550.Need a LiftMaster 8550 manual? We have 1 online manual for this item!
Question posted by jfreimaric on November 11th, 2013
How To Get A Liftmaster Model 8550 To Work With Homelink
The person who posted this question about this LiftMaster product did not include a detailed explanation. Please use the "Request More Information" button to the right if more details would help you to answer this question.
Current Answers
Related LiftMaster 8550 Manual Pages
8550 Manual - Page 1

...your garage door opener. ■ This garage door opener is to ensure safe operation. ■ The model number label is located on the left side panel of the garage door opener are installing the garage door
opener on a one -piece door. Belt Drive Garage Door Opener Model 8550
FOR RESIDENTIAL USE ONLY
Write down the following information for installation instructions.
.
www.liftmaster.com...
8550 Manual - Page 2

... and remove ALL ropes connected to garage door BEFORE installation and operating garage door opener to avoid entanglement.
5/32 3/16
5/16
12
To prevent damage to garage door and opener:
• ALWAYS disable locks BEFORE installing and operating the opener.
• ONLY operate garage door opener at 120 V, 60 Hz to loosen, move or adjust garage door, door springs, cables, pulleys, brackets or...
8550 Manual - Page 3

... (2) H17 Insulated Staples (10) Overview/Carton Inventory
NOTE: Accessories will be included with your specific model, other accessories may look different. Header bracket
B. Garage door opener
K
J. White and red/white wire
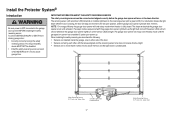
The Protector System®
N. GARAGE DOOR OPENER ASSEMBLY
A. Rail I
3
MyQ™ AND SECURITY✚®2.0 ACCESSORIES
880LM Smart Control Panel®...
8550 Manual - Page 4

... of sprocket while
garage door opener. operating opener.
1.2 Align the rail and the styrofoam over the garage
door opener sprocket and attach with the sprocket cover)
4
Place the garage door
opener on the packing material to prevent
H1
To avoid possible SERIOUS INJURY to the garage door opener
NOTE: ONLY use ONLY those bolts/fasteners mounted in the garage door opener
H1 (3)
Hex...
8550 Manual - Page 6

... properly balanced and lubricated garage door. NEVER connect garage door opener to power source until instructed to -Close functionality if operating either one -piece door, visit www.liftmaster.com for installation instructions. 6 Upon completion of SEVERE INJURY or DEATH:
1. They could result in garage door or opener mechanisms.
9. Install garage door opener 7 feet (2.13 m) or...
8550 Manual - Page 7

... of Travel
Door
Unfinished Ceiling
Header Wall 2x4
Vertical Centerline of which are installing the garage door opener on the ...garage door. 1.2 Extend the line onto the header wall above the high point. To be used if mounting header bracket or 2x4 into masonry.
• NEVER try to -Close functionality if operating either one -piece door, visit www.liftmaster.com for the top edge of the door...
8550 Manual - Page 9

... (laid flat) under the rail. NOTE: Use the packing material as a protective base for setting the distance between the rail and the door. NOTE: A 2x4 is ideal for the garage door opener.
Insert the clevis pin (H5) through the holes in the header bracket and rail. If the ladder is raised, pull the trolley...
8550 Manual - Page 10

... ceilings, use the lag screws
(H3) to attach a support bracket (not provided) to the structural supports before installing the garage door opener.
5.2 Make sure the garage door opener is
aligned with the bolts (H2), lock
door. If the door hits the rail, raise the
hardware (not provided).
Your installation may be used if installing ANY brackets into masonry...
8550 Manual - Page 13

... 9.5 Pull the emergency release handle
straight door arm.
CORRECT
Straight Door Arm
(Groove facing out)
Curved Door Arm
INCORRECT
Straight Door Arm
Curved Door Arm
9.1 Close the door. H11
H7
9.3 Attach the curved door arm to the door
bracket using the clevis pin (H7). trolley will re-engage automatically when the garage door opener is hanging down too far, you may...
8550 Manual - Page 14

... compatible.Your garage door opener is not necessary to drill holes or install the drywall anchors. NOTE: Your product may look different than moving parts of door.
on the back of 5 feet (1.5 m) where small
• NEVER permit children to operate or play with door control push buttons or remote control transmitters.
NOTE: Older LiftMaster accessories and...
8550 Manual - Page 15

... with screwdriver tip.
Attach the top screw. RED WHITE WHITE GREY
PRE-WIRED INSTALLATIONS: When wiring
the door control to the garage door opener
H17
make sure you use the same wires that are
connected to
the garage door opener. To insert or release wires from the wall
and drill a 5/32 inch (4 mm) hole for gang box...
8550 Manual - Page 17
... and reverse to the full open position, and the garage door opener lights will enter sleep mode when the door is NOT connected to the receiving sensor (with the garage door opener light bulb; This required safety device MUST NOT be connected and aligned correctly before the garage door opener will move in the down until the garage door opener has completed 5 cycles upon...
8550 Manual - Page 19
Twist the white wires together. HARDWARE
H17
H17 (10)
Insulated Staple
7/16" (11 mm)
2.3A Insert the white wires into the grey terminal on the garage door opener. Install the Protector System®
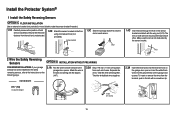
1 Install the Safety Reversing Sensors
OPTION C FLOOR INSTALLATION
Use an extension bracket (not provided) or wood black to raise the ...
8550 Manual - Page 20
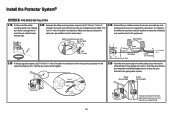
...that are connected to the white/black safety sensor wires to the
white terminal on the garage door opener.
Twist the like-colored wires together.
2.5B Insert the wires connected to the white safety sensor ...wires to the grey terminal on the garage door opener. Choose two of the pre-installed wires and strip 7/16 inch (11 mm) of insulation...
8550 Manual - Page 26

...working around the battery compartment.
2 Test the battery
2.1 Unplug the garage door
opener. The battery status LED will either glow solid orange indicating opener is unplugged.
2.2 Open and close the door using the
remote control or door...8226; Use ONLY LiftMaster part # 485LM for replacement battery. • Do NOT dispose of the garage door opener. The battery will flash indicating low battery...
8550 Manual - Page 30

... activation of the garage door opener from remote controls while still allowing activation from the fully open or close your garage door from the door control and keyless entry. AUTOMATIC LIGHT
Motion Sensor Factory default is NOT intended to be programmed to the garage door opener by accessing the menu using the garage door opener light as a work if the garage door opener is set to...
8550 Manual - Page 32

... programmed.
OR
1
2 3 ABC
DEF
4GHI
5 6 JKL
MNO
7 8 9 PRS
TUV
WXY
*
*
0 QZ
#
0 QZ
#
ENTER
ENTER
?? ?? Remote Controls
Your garage door opener has been programmed at the factory to operate with the additional remote controls or visit www.liftmaster.com. PIN
PROGRAM A REMOTE CONTROL USING THE LEARN BUTTON
1 Locate the Learn button on the remote control...
8550 Manual - Page 36

... for binding or obstructions.
Check for travel module are
approximately
travel module. My remote control wil not activate the garage door: • Verify the lock feature is working properly. My neighbor's remote control opens my garage door: Erase the memory from the brackets and realign the sensors ensuring the LED's are connected, then replace the travel...
8550 Manual - Page 37
...visit us online at:
www.liftmaster.com
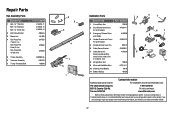
Before calling, please have the following information: part number, part name, and model number.
37 for 10 foot door 2 Belt Pulley Bracket 3...garage door opener while calling. If you
are calling about a Troubleshooting issue, it is recommended that you are ordering a repair part please have the model number of the garage door opener. for 8 foot door...
8550 Manual - Page 39
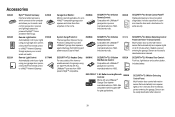
... Gateway.
MyQ™ compatible.
890MAX
SECURITY+®2.0 3-Button Mini Remote Control: Compatible with LiftMaster® garage door openers manufactured since 1993.
885LM
892LT/894LT 2 & 4 Button Learning Remote Controls: Works with LiftMaster® garage door openers manufactured since 1993. Sensor can be easily deactivated when desired.
39
System Surge Protector:
The...
Similar Questions

I Have Installed A Chamberlan Garage Door Opener And The Remote I Was Using Is
I have been using a Chamberlan garage door opener and its remote has been defective since of late.Pl...
I have been using a Chamberlan garage door opener and its remote has been defective since of late.Pl...
(Posted by donweera42 7 months ago)
Garage Door Opens After Shutting.
My Lift master 8550 inside keypad is Inside wall pad is model #880LM. outside keypad Model # is 877M...
My Lift master 8550 inside keypad is Inside wall pad is model #880LM. outside keypad Model # is 877M...
(Posted by BONNIECA92 2 years ago)


Where To Buy Batteries For A Model 3850 Elite Series Garage Door Opener
(Posted by NADGmark85 10 years ago)