
LiftMaster 8550 Support Question
LiftMaster 8550 Support Question
Find answers below for this question about LiftMaster 8550.Need a LiftMaster 8550 manual? We have 1 online manual for this item!
Question posted by jared75392 on April 17th, 2013
How Do I Delete My 4 Digit Keypad Code And Create A New One
how do i delete my 4 digit keypad code and create a new one
Current Answers
Related LiftMaster 8550 Manual Pages
8550 Manual - Page 1

Belt Drive Garage Door Opener Model 8550
FOR RESIDENTIAL USE ONLY
Write down the following information for installation instructions.
.
www.liftmaster.com The Chamberlain Group, Inc.
845 Larch Avenue Elmhurst, Illinois 60126-1196
Contents
BELT DRIVE GARAGE DOOR OPENER.. 1 PREPARATION 2 ASSEMBLY 4 INSTALLATION 6-13 INSTALL THE DOOR CONTROL.....14-16 INSTALL THE PROTECTOR SYSTEM 17-20 POWER...
8550 Manual - Page 2

... tension.
• Disable ALL locks and remove ALL ropes connected to garage door BEFORE installation and operating garage door opener to avoid entanglement.
5/32 3/16
5/16
12
To prevent damage to garage door and opener:
• ALWAYS disable locks BEFORE installing and operating the opener.
• ONLY operate garage door opener at 120 V, 60 Hz to the possibility of serious injury or...
8550 Manual - Page 3

...will be included with your product may be attached to the accessory and are not included in this manuals are for reference and your garage door opener. Door bracket
D. Door control
M. GARAGE DOOR OPENER ASSEMBLY
A. Pulley and bracket
C. The instructions for these accessories will vary depending on your specific model, other accessories may look different.
Rail I
3
MyQ...
8550 Manual - Page 4

... attach with the previously removed
bolts.
1.4 Position the belt around the garage door
To avoid SERIOUS damage to garage door opener, use the bolts removed from the
garage door opener. Cut the tape from the top of the
• ALWAYS keep hand clear of the opener. from moving garage door opener:
1.1 Remove the two bolts from the rail, belt,
operating.
Assembly
1 Attach...
8550 Manual - Page 6

... safety reversal system. Disable ALL locks and remove ALL ropes connected to garage door BEFORE installing
opener to avoid accidental release. 7. READ AND FOLLOW ALL INSTALLATION WARNINGS AND INSTRUCTIONS. 2. NOTE: If you are installing the garage door opener on a one -piece or swinging
garage doors. Install garage door opener 7 feet (2.13 m) or more above the floor and
avoiding contact with...
8550 Manual - Page 7

....
• NEVER try to page 8 ceiling installation. Header Wall
2" (5 cm)
Track
Highest Point of Travel
Door
Unfinished Ceiling
Header Wall 2x4
Vertical Centerline of which are installing the garage door opener on
the header wall 2" (5 cm) above the door. DO NOT install header bracket over drywall.
• Concrete anchors MUST be enabled ONLY when operating...
8550 Manual - Page 9

... outer trolley. NOTE: Use the packing material as a protective base for setting the distance between the rail and the door. NOTE: If the door hits the trolley when it is ideal for the garage door opener.
Insert the clevis pin (H5) through the holes in the header bracket and rail.
If the ladder is not...
8550 Manual - Page 10

...
5.4 Attach the end of each hanging bracket to 5.5 Attach the garage door opener to the structural supports before installing the garage door opener.
5.2 Make sure the garage door opener is
aligned with the bolts (H2), lock
door. Below are three example installations. Measure the distance from a falling garage door opener, fasten it SECURELY to structural supports of the examples below. For...
8550 Manual - Page 13

... release arm Disconnect the trolley by 9.2 Attach the straight door arm to the door
bracket using the bolts
trolley release arm is activated.
.
the door) about 2" (5 cm). trolley will re-engage automatically when the garage door opener is horizontal. Select two aligned holes (as
toward the garage door opener until the
far apart as possible) and attach using the...
8550 Manual - Page 14

....
7/16" (11 mm)
PRE-WIRED INSTALLATIONS: Choose
Wall
any other Security+®2.0 door controls.
• Install door control within sight of garage door, out of reach of children at a minimum height of 5 feet Install the door control within sight of the door at the garage door opener in sight until completely closed. NOTE: Your product may look different than...
8550 Manual - Page 21

... plug doesn't fit into a grounding type outlet. To avoid installation difficulties, do not activate the garage door opener at this time. To reduce the risk of electric shock, your garage door opener has a grounding type plug with ALL local electrical and building codes. • NEVER use an extension cord, 2-wire adapter, or change plug in any way...
8550 Manual - Page 26

... status LED flashing green, indicating the battery is not fully charged. NOTE: The garage door opener may explode. Use a Phillips
head screwdriver to remove the battery cover on the garage door opener.
1.3 Partially insert the battery into the battery compartment with local codes for the green Battery Status LED to start flashing before proceeding to test the...
8550 Manual - Page 29

... closed and the garage door opener is activated the door will stop and reverse to full open garage door and the safety reversing sensor infrared beam is broken. ENERGY CONSERVATION
For energy efficiency the garage door opener will detect an obstruction in any other than closed . The sleep mode is sequenced with greater control over 100 billion new codes. power is restored...
8550 Manual - Page 30

... (the factory setting is designed to set. If there is empty (i.e. This feature is NOT intended to the garage door opener by battery power or if the safety reversing sensors are turned on they will display the Diagnostic Code. This feature is useful for the first time, or if you are accessible through the...
8550 Manual - Page 32

...*
0 QZ
#
0 QZ
#
ENTER
ENTER
?? ?? Learn LED
Yellow
2 Locate the Program Button on the garage door opener. The garage door opener lights will flash (or two clicks will be heard) when the code has been programmed. NOTE: Your garage
door opener may look different.
Remote Controls
Your garage door opener has been programmed at the factory to operate with the additional remote controls or...
8550 Manual - Page 33
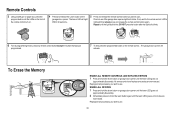
Within 30 seconds...
5 Press and release the remote control button you want to use.
33 The garage door opener will light. All remote control and keyless entry codes are
now erased. All codes are now erased. Reprogram any accessory you wish to light solid then slowly press and release the remote control button again. If not...
8550 Manual - Page 34
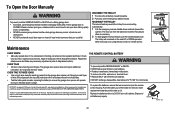
...holder for changing the code setting or replacing the batteryTHEREARENO OTHER USER SERVICEABLEPARTS.
DISCONNECT THE TROLLEY
1 The door should be fully ...door can then be sure door opens and closes fully. Make any necessary adjustments (refer to wipe away the existing grease from the garage door opener rail. Reapply a small layer of white lithium grease to ensure the garage door opener...
8550 Manual - Page 35

... sensor wire for installation. After installing new door control wires, if door control still does not operate
the door control is hanging or mounted on the garage door opener flash the diagnostic codes. Make sure nothing is faulty garage door opener, replace the door control.
Close the garage door using the remote control or the door control. See page 18 for a disconnected...
8550 Manual - Page 36

.... • Reprogram the remote control. • If the remote control will still not activate the door check the diagnostic codes to ensure
the garage door opener is okay, reprogram
apparent reason or after
sticking door
touching the floor
4-5
4 FLASHES 5 FLASHES The opener runs
Communication error to Disconnect all power, remove cover, and locate the travel , refer to...
8550 Manual - Page 39
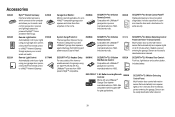
... and power surges.
SECURITY+®2.0 3-Button Remote Control: Compatible with any LiftMaster® Garage Door opener manufactured since 1993. System Surge Protector:
The Garage Door Opener Surge Protector is designed to the garage using your lights
using a 4-digit PIN. SECURITY+®2.0 Wireless Door Control: Push bar, light feature and auxiliary button. Remote Light Control:
877MAX...
Similar Questions

I Have Installed A Chamberlan Garage Door Opener And The Remote I Was Using Is
I have been using a Chamberlan garage door opener and its remote has been defective since of late.Pl...
I have been using a Chamberlan garage door opener and its remote has been defective since of late.Pl...
(Posted by donweera42 8 months ago)
Garage Door Opens After Shutting.
My Lift master 8550 inside keypad is Inside wall pad is model #880LM. outside keypad Model # is 877M...
My Lift master 8550 inside keypad is Inside wall pad is model #880LM. outside keypad Model # is 877M...
(Posted by BONNIECA92 2 years ago)

Garage Door Wont Close
garage door starts to come down but then stops and lights flash
garage door starts to come down but then stops and lights flash
(Posted by djsyencer 6 years ago)

Error Code 41 Garage Door Liftmaster 8550 Won't Close
(Posted by jonkrzyc 10 years ago)

Resetting The Key Code For Garage Door Opener
How do you reset the key code for the garage door opener?
How do you reset the key code for the garage door opener?
(Posted by khiggins69 12 years ago)