
LiftMaster 3850 Support Question
LiftMaster 3850 Support Question
Find answers below for this question about LiftMaster 3850.Need a LiftMaster 3850 manual? We have 1 online manual for this item!
Question posted by Gaydaves on May 4th, 2014
How To Unplug Motor Unit To Install N For Garage Door Opener Elite Series Model
3850
Current Answers
Related LiftMaster 3850 Manual Pages
3850 Elite Series Manual - Page 1

®
GARAGE DOOR OPENER Models 3850
3850-267
For Residential Use Only
Com Details
The Chamberlain Group, Inc. 845 Larch Avenue Elmhurst, Illinois 60126-1196 www.liftmaster.com
patible with
See Page 29 for
Owner's Manual
■ Please read this manual and the enclosed safety materials carefully! ■ Fasten the manual near the garage door after installation. ■ The door WILL...
3850 Elite Series Manual - Page 2

... change a Keyless Entry PIN 35
Repair Parts
36-37
Rail assembly parts 36
Installation parts 36
Motor unit assembly parts 37
Accessories
38
Notes
39
Repair Parts and Service
40
Warranty
40
INTRODUCTION Safety Symbol and Signal Word Review
This garage door opener has been designed and tested to offer safe service provided it . Read the...
3850 Elite Series Manual - Page 4
... of your opener.
Torsion Spring
Extension
Spring OR
Motor Unit
--- --- -- See page 12.
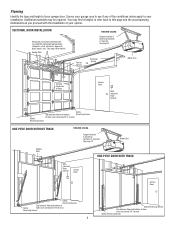
Additional materials may find it helpful to refer back to this page and the accompanying illustrations as you proceed with glass panels, etc.). See page 19 for lightweight garage doors (fiberglass, steel, aluminum, door with the installation of your garage area to your installation.
Safety...
3850 Elite Series Manual - Page 5

... 1/4"-14x5/8" (2) Screw 6-32x1" (2) Insulated Staples (10) Ring Fastener (3) Dry Wall Anchors (2) Rope Handle Rail Grease Carriage Bolt 1/4"-20x1/2" (2) Wing Nut 1/4"-20 (2)
5 Carton Inventory
Your garage door opener is packaged in the foam. Accessories will depend on the model purchased. Parts may be stuck in two cartons which contain the motor unit and all parts illustrated below .
3850 Elite Series Manual - Page 6

... the spring for optimum belt tension.
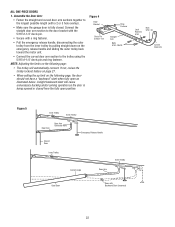
ASSEMBLY STEP 1 Attach the Rail to the Motor Unit
To avoid installation difficulties, do not run the garage door opener until instructed to do so. • Remove the two washered bolts mounted on top of motor unit. • Align rail and styrofoam over the motor unit belt pulley. Use only these bolts! Use of...
3850 Elite Series Manual - Page 7

... Cap Retainer
• Position the belt cap retainer over the motor unit belt pulley so the three holes in cap align with #8x3/8" hex screws provided. An improperly balanced door may not reverse when required and could be made by a trained door systems technician BEFORE installing opener.
4. Install garage door opener 7 feet (2.1 m) or more above floor.
7. NEVER wear watches, rings...
3850 Elite Series Manual - Page 11

... remain disconnected until Installation Step 12 is used to determine
the correct mounting height
from the floor to the top of the door.
• Using a stepladder as illustrated. Do not position the opener more than 4" (10 cm) above this point. Slide the outer trolley toward the motor unit. To prevent damage to garage door, rest garage door opener rail on...
3850 Elite Series Manual - Page 12

... Provided) Bolt 5/16"-18x7/8" Lock Washer 5/16" Nut 5/16"-18
12 INSTALLATION STEP 5 Hang the Opener
Three representative installations are not provided. 1. Cut both pieces of the garage.
Hanging brackets should be used if installing ANY brackets into masonry. Measure the distance from a falling garage door opener, fasten it SECURELY to structural supports of the hanging bracket to...
3850 Elite Series Manual - Page 13

... to the two screw terminals on the motor unit: white to white and white/red to operate the same garage door opener, it may damage the LCD screen. Fasten with a small flat-head screwdriver (Figure 1). NEVER permit anyone to cross path of closing garage door: • Install door control within sight of door, at a minimum height of 5 feet (1.5 m) where small...
3850 Elite Series Manual - Page 14

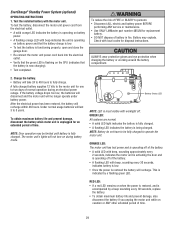
...Use ONLY incandescent. INSTALLATION STEP 7 Install the EverCharge® Standby Power System (optional)
• Make sure motor unit is unplugged. • Using a Phillips head screwdriver, remove the battery cover on
the motor unit. • Partially insert battery into motor unit with terminals facing
out. • Connect the red (+) and black (-) wires from motor unit to the opener: • DO...
3850 Elite Series Manual - Page 15

...motor unit:
• Remove the motor unit cover screws and set the cover aside.
• Remove the attached 3-prong cord.
• Connect the black (line) wire to the screw on the silver terminal;
To prevent possible SERIOUS INJURY or DEATH from a falling garage door... match or lighter to install the proper outlet.
To make it is required by your garage door opener has a grounding type ...
3850 Elite Series Manual - Page 16

... reversing sensor must be connected and aligned correctly before the garage door opener will detect an obstacle in the path of its electronic beam. The units must be unobstructed. If it is necessary. Either can be installed on the wall, the brackets must be installed inside the garage. The mounting brackets are available if needed.
The sending...
3850 Elite Series Manual - Page 22
... on the emergency release handle and sliding the outer trolley back toward the motor unit.
• Connect the curved door arm section to the longest possible length (with a 2 or 3 hole overlap).
• Make sure the garage door is being opened or closed . Figure 4
Door Bracket
Clevis Pin 5/16"x1-1/4"
Ring Fastener
Straight Arm
Bolts 5/16"-18x7/8
Lock...
3850 Elite Series Manual - Page 24

If the garage door opener cannot open and close the door.
1. Without a properly installed safety reversal system, persons (particularly small children) could be SERIOUSLY INJURED or KILLED by a closing garage door.
• Too much force on garage door will interfere with 1-1/2" (3.8 cm) high object (or 2x4 laid flat) on contact with proper operation of force required to open and close ...
3850 Elite Series Manual - Page 25
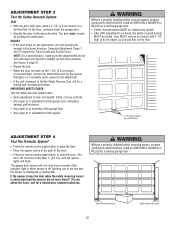
... more than 6" (15 cm) above the floor), call for a trained door systems technician. Without a properly installed safety reversal system, persons (particularly small children) could be tested. The garage door opener will not move more than 1" (2.5 cm), and the opener lights will flash. ADJUST
• If the door stops on the 1-1/2" (3.8 cm) board (or 2x4 laid flat), remove...
3850 Elite Series Manual - Page 29
...motor unit is activating the door and is unplugged for one to operate the motor unit. To obtain maximum battery life and prevent damage, disconnect the battery when motor unit... Test the installed battery with...unit is operating on battery power and that the battery charge is low.
• To test the battery is functioning properly, open and close the garage door.
• Re-connect the motor unit...
3850 Elite Series Manual - Page 31

... with beep, sounding approximately every 2 seconds, indicates the motor unit is activating the door and is operating off when door is open: • The garage door opener is low. • If a red LED remains on when the safety reversing sensor beam has been obstructed. Having a Problem (Troubleshooting)
NOTE: Always unplug battery prior to Operation section; The trolley should travel...
3850 Elite Series Manual - Page 32

... steadily, receiving indicator light is programmed with jumper wire. Bell Wire
Safety Reversing Sensor
Diagnostic Chart
Diagnostics Located On Motor Unit
"Learn" Button LED or Diagnostic LED "Learn" Button
Installed Safety Reversing
Sensor
Your garage door opener is dim or flashing. • Realign receiving eye sensor, clean lens and secure brackets. OR
2 FLASHES
Safety reversing sensors...
3850 Elite Series Manual - Page 34
... heard.
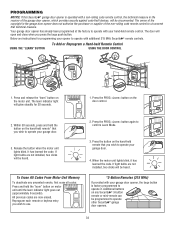
*3-Button Remotes (315 MHz)
If provided with your garage door opener, the large button is operated with additional 315 MHz Security✚® remote controls. When the motor unit lights blink, it . All previous codes are not installed, two clicks will glow steadily for programming your garage door.
3. Additional buttons on the hand-held Remote Control
USING...
3850 Elite Series Manual - Page 35
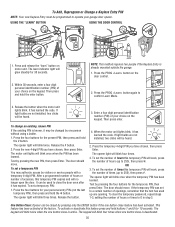
... the door even after it has expired. To set a temporary PIN:
1. This feature has been activated at the factory. Press the PROG button on motor unit. Release the # button.
2. One Button Close: Opener can be heard.
2. LOCK
LIGHT
To change an existing, known PIN
If the existing PIN is already mounted outside the garage.
1. Press...
Similar Questions

I Have Installed A Chamberlan Garage Door Opener And The Remote I Was Using Is
I have been using a Chamberlan garage door opener and its remote has been defective since of late.Pl...
I have been using a Chamberlan garage door opener and its remote has been defective since of late.Pl...
(Posted by donweera42 8 months ago)


Is There A Battery On Wall Unit Of Liftmaster Garage Door Opener
(Posted by amarnie 10 years ago)

How To Replace Backup Battery Liftmaster Garage Door Opener Elite Series
(Posted by jrch 10 years ago)

What Kind Of Battery Does A Liftmaster Elite Series Garage Door Opener Use?
(Posted by qpape 10 years ago)