
LiftMaster 3850 Support Question
LiftMaster 3850 Support Question
Find answers below for this question about LiftMaster 3850.Need a LiftMaster 3850 manual? We have 1 online manual for this item!
Question posted by rafaelcamarillo2277 on April 16th, 2022
Find Belt Part #
I can't find belt numbert for 41A5685 my liftmaster garage door Modelo is 3850P-26
Current Answers
Answer #1: Posted by SonuKumar on April 17th, 2022 7:09 AM
SonuKumar

Member since:
May 9th, 2021 Points: 16,617,810

Member since:
May 9th, 2021 Points: 16,617,810
https://www.garagedoorsupplyco.com/Liftmaster-3850_c_316.html
https://www.liftmaster.com/parts/c/parts
https://www.amazon.com/Liftmaster-Parts/s?k=Liftmaster+Parts
https://www.amazon.com/liftmaster-replacement-parts/s?k=liftmaster+replacement+parts
https://www.ebay.com/b/LiftMaster-Garage-Door-Gate-Opener-Parts/179688/bn_42804450
Please respond to my effort to provide you with the best possible solution by using the "Acceptable Solution" and/or the "Helpful" buttons when the answer has proven to be helpful.
Regards,
Sonu
Your search handyman for all e-support needs!!
Related LiftMaster 3850 Manual Pages
3850 Elite Series Manual - Page 1

...;
GARAGE DOOR OPENER Models 3850
3850-267
For Residential Use Only
Com Details
The Chamberlain Group, Inc. 845 Larch Avenue Elmhurst, Illinois 60126-1196 www.liftmaster.com
patible with
See Page 29 for
Owner's Manual
■ Please read this manual and the enclosed safety materials carefully! ■ Fasten the manual near the garage door after installation. ■ The door...
3850 Elite Series Manual - Page 2

...belt tension 6
Attach the belt cap retainer 7
Installation
7-22
Installation safety instructions 7
Determine the header bracket location 8
Install the header bracket 9
Attach the rail to the header bracket 10
Position the opener 11
Hang the opener...System 25
Operation
26-33
Operation safety instructions 26
Using garage door opener 26
Using the wall-mounted door control 27
...
3850 Elite Series Manual - Page 3

... by its springs.
2. To prevent damage to garage door and opener:
• ALWAYS disable locks BEFORE installing and operating the opener.
• ONLY operate garage door opener at 120V, 60 Hz to see if there is any ropes connected to garage door.
• Complete the following test to loosen, move or adjust garage door, door springs, cables, pulleys, brackets or their hardware...
3850 Elite Series Manual - Page 4
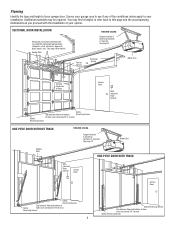
... garage door.
Motor Unit
Header Wall
ONE-PIECE DOOR WITH TRACK
Wallmounted Door Control
Access Door
Access Door
Safety
Reversing Sensor
Gap between floor and bottom of
Safety
door must not exceed 1/4" (6 mm)
Reversing Sensor
4
Safety Reversing Sensor
Gap between floor and bottom
Reversing Sensor
Safety
of the conditions below apply to your opener. SECTIONAL DOOR INSTALLATION...
3850 Elite Series Manual - Page 5

....
Carton Inventory
Your garage door opener is packaged in the foam. LOCK
LIGHT
SLmCaDrtMCootniotrnolDPeatencetli®ng Door Control Console
SECURITY✚® 3-Button Remote Control
Models 3850 (1) 3850-267 (2)
SECURITY✚® Keyless Entry Model 3850-267 (1) ONLY
Motor Unit with Light Lenses
2-Conductor Bell Wire White & White/Red
Belt Pulley Bracket
Trolley...
3850 Elite Series Manual - Page 6

... Tighten bolts securely. To avoid SERIOUS damage to opener, ONLY use any tools.
• Insert ...belt tension.
Cut tape from rail,
chain and styrofoam. • REMOVE STYROFOAM. • Insert both washered bolts through the rail into one of any other bolts will cause serious damage to do not run the garage door opener until instructed to door opener. • Position belt over belt...
3850 Elite Series Manual - Page 7

... DEATH:
1. Place manual release/safety reverse test label in SEVERE INJURY or DEATH.
3. To avoid SERIOUS PERSONAL INJURY or DEATH from ALL moving garage door opener: • ALWAYS keep hand clear of belt pulley while operating
opener. • SECURELY attach belt pulley cover BEFORE operating.
8x3/8" Hex Screws
HARDWARE SHOWN ACTUAL SIZE
Hex Screw #8x3/8"
WARNING...
3850 Elite Series Manual - Page 8
... garage door might not reverse when required. Open your door to garage door types. This height will provide travel as shown here and on header wall or ceiling, otherwise garage door might not reverse when required. Header Wall 2" (5 cm) Track
Highest Point of Travel
Door
Header Wall Track 2" (5 cm)
Highest Point
Door
of Travel
Sectional door with curved track
One-piece door...
3850 Elite Series Manual - Page 10
... and join with a clevis pin as a protective base. Have someone hold the opener securely on the garage floor below the header bracket. NOTE: If the door spring is in the way you'll need help. Header Wall Header Bracket Belt Pulley Bracket
Garage Door
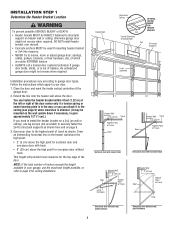
INSTALLATION STEP 3 Attach the Rail to the Header Bracket
• Position the...
3850 Elite Series Manual - Page 11

.... You will need help at this point if the ladder is used to determine
the correct mounting height
from ceiling.
11 To prevent damage to garage door, rest garage door opener rail on 2x4 placed on the trolley release arm to disconnect inner and outer sections.
INSTALLATION STEP 4
Position the...
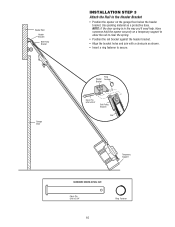
3850 Elite Series Manual - Page 12

... finished ceilings (Figure 2 and Figure 3), attach a sturdy metal bracket to opener at this time. Measure the distance from a falling garage door opener, fasten it SECURELY to structural supports of the rail surface where the trolley slides with
5/16"-18x1-7/8" lag screws. 5. Fasten the opener to the structural support. 2. NOTE: DO NOT connect power to structural...
3850 Elite Series Manual - Page 13

...° C) may be connected to avoid cracking plastic housing. NOTE: If you have any trouble with care to each garage door opener. NOTE: The functional temperature range of the door control is not connected BEFORE installing door
control. • Connect ONLY to red (Figure 2). SPECIAL NOTE: Only one end of bell wire and connect to...
3850 Elite Series Manual - Page 14

...hinge is connected. Do not remove the lens.
• Install a 100 watt maximum light bulb in the fully open position.
Use ONLY incandescent. The lights will turn ON and remain lit for replacement.
INSTALLATION STEP 7 Install the ... the procedure to close the lens.
• Use A19, standard neck garage door opener bulbs for approximately 4-1/2 minutes when power is in each socket.
3850 Elite Series Manual - Page 15

... persons and obstructions. • NEVER use emergency release handle to pull door open or closed. To avoid installation difficulties, do not run the opener at least 1" (2.5 cm) from a falling garage door: • If possible, use handle to disengage
trolley ONLY when garage door is required by your garage door opener has a grounding type plug with an overhand knot. Ensure that...
3850 Elite Series Manual - Page 16

... safety reversing sensor must be connected and aligned correctly before the garage door opener will move in masonry if repositioning is necessary. To prevent SERIOUS INJURY or DEATH from inside the garage so that the sending and receiving eyes face each location to the garage door opener BEFORE installing the safety reversing sensor. If it is necessary...
3850 Elite Series Manual - Page 17
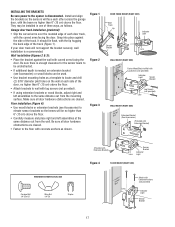
... Figure 2 Figure 3
DOOR TRACK MOUNT (RIGHT SIDE)
Door Track
Lip
Indicator Light
Sensor Bracket
Lens
WALL MOUNT (RIGHT SIDE)
IGWnasariladl gee
Fasten Wood Block to the opener is recommended. Floor installation... support the bracket securely, wall installation is disconnected. If your door track will face each other across the garage door, with the beam no higher than 6" (15 cm) above...
3850 Elite Series Manual - Page 31

...Weather conditions in particular can affect door travel limits. This feature activates the light on the motor unit then refer to a closed position. • Loosen the belt by a beep sounding every ...reversing sensor must be connected and aligned correctly before the garage door opener will not activate the door: • Verify your door, check diagnostic LED for the force and limit settings...
3850 Elite Series Manual - Page 36
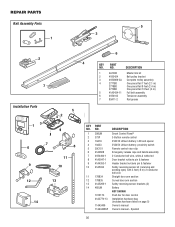
...m) One-piece Rail 10 feet (3 m)
5
41A5434-11 Full belt assembly
6
41B4103
Tensioner assembly
7
83A11-2
Rail grease
KEY PART NO...Button remote control
3 10A19
3V2016 Lithium battery: LED and opener
4 10A33
3V2450 Lithium battery: proximity switch
5 29C151
Remote... 2-Conductor bell wire, white & white/red
8 41A5047-1 Door bracket w/clevis pin & fastener
9 41A4353-1 Header bracket w/...
3850 Elite Series Manual - Page 38

....
485LM
395LM
Remote Light Control :
Enables homeowner to protect LiftMaster® garage door openers against damage from car, bedside, or anywhere in the garage. Also can be limited to a programmable number of hours or entries.
370LM 378LM
915LM
CLOSED OPEN
Garage Door Monitor:
Security for the largest door of your garage door is designed to turn on a specially designed keyboard...
3850 Elite Series Manual - Page 40
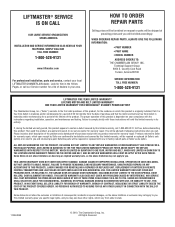
...BELT, AND NO IMPLIED WARRANTIES WILL EXIST OR APPLY AFTER SUCH PERIOD. Some States do not allow limitations on request or parts will be shipped at Seller's sole option. THIS LIMITED WARRANTY DOES NOT COVER ANY PROBLEMS WITH, OR RELATING TO, THE GARAGE DOOR OR GARAGE DOOR HARDWARE, INCLUDING BUT NOT LIMITED TO THE DOOR SPRINGS, DOOR... defect in its entirety. LIFTMASTER® SERVICE IS ON ...
Similar Questions

3850p Belt
I can't find belt number 41A5685 for my liftmaster garage door. Model is 3850P..serial number 431711...
I can't find belt number 41A5685 for my liftmaster garage door. Model is 3850P..serial number 431711...
(Posted by Lcbarham75 2 years ago)

Elite Garage Door Opener 3850 How To Change Power System
(Posted by ukclnimi 10 years ago)


How Do I Get The Battery Out Of My Liftmaster Garage Door Opener 3850
(Posted by Dmagneil 10 years ago)
