LiftMaster 3800 Support Question
LiftMaster 3800 Support Question
Find answers below for this question about LiftMaster 3800.Need a LiftMaster 3800 manual? We have 1 online manual for this item!
Question posted by cshfdon on February 27th, 2014
Where Does The Laser Assist Wire To A Liftmaster 3800
The person who posted this question about this LiftMaster product did not include a detailed explanation. Please use the "Request More Information" button to the right if more details would help you to answer this question.
Current Answers
Related LiftMaster 3800 Manual Pages
3800 Manual - Page 1
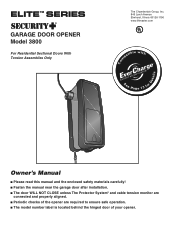
®
GARAGE DOOR OPENER Model 3800
For Residential Sectional Doors With Torsion Assemblies Only
Com Details
The Chamberlain Group, Inc. 845 Larch Avenue Elmhurst, Illinois 60126-1196 www.liftmaster.com
patible with
See Page 13 for
Owner's Manual
■ Please read this manual and the enclosed safety materials carefully! ■ Fasten the manual near the garage door after installation...
3800 Manual - Page 2
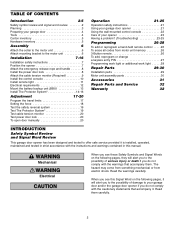
... Parts and Service
32
Warranty
32
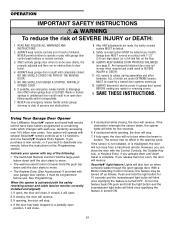
INTRODUCTION
Safety Symbol Review and Signal Word Review
This garage door opener has been designed and tested to the possibility of serious injury or death if you to the possibility of your garage
WARNING door and/or the garage door opener if you do not comply with the warnings that accompany it.
3800 Manual - Page 4
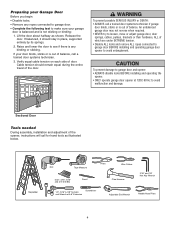
..., installation and adjustment of door.
Release the door.
CAUTION
To prevent damage to garage door and opener: • ALWAYS disable locks BEFORE installing and operating the
opener. • ONLY operate garage door opener at 120V, 60 Hz to avoid entanglement. Stepladder
12
Drill
Tape Measure
5/32", 3/16", 5/16" and 3/4" Drill Bits
Pencil
Pliers
Wire Cutters
Claw Hammer
3/16...
3800 Manual - Page 5
...Conductor Bell Wire White & White/Red
Power Door Lock 2-Conductor White & White/Black Bell Wire with Connector
Cable Tension Monitor with 2-Conductor Green/White Bell Wires
Mounting Bracket... (Located Under Access Door)
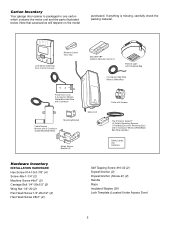
5 If anything is packaged in one carton which contains the motor unit and the parts illustrated below. Carton Inventory
Your garage door opener is missing, carefully check...
3800 Manual - Page 6
...1
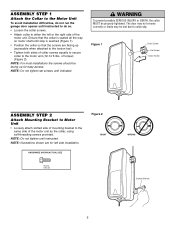
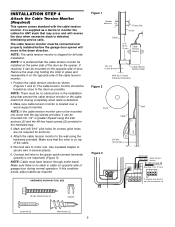
Attach the Collar to the Motor Unit
To avoid installation difficulties, do not run the garage door opener until instructed to do so.
• Loosen the collar screws.
• Attach collar ... to secure collar to the same side of the motor unit.
NOTE: Do not tighten until indicated. The door may not reverse
correctly or limits may be lost due to the torsion bar).
• Tighten both sides ...
3800 Manual - Page 7
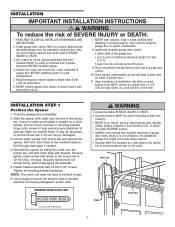
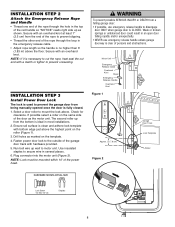
... emergency release handle no higher than 6 feet (1.83 m) above floor.
6. Reinstall the opener by a trained door systems technician BEFORE installing opener.
4. Use a staple to secure the antenna wire to loosen, move or adjust garage door, springs,
cables, pulleys, brackets or their hardware, ALL of the door.
9. NEVER wear watches, rings or loose clothing while installing or servicing...
3800 Manual - Page 8
... lighter to disengage door ONLY when garage door is CLOSED.
Select a door roller to secure wire in several places. 6. Ensure rail surface is clean and adhere lock template with an overhand knot. Plug connector into the motor unit (Figure 2). WARNING
To prevent possible SERIOUS INJURY or DEATH from being manually opened once the door is fully closed...
3800 Manual - Page 9
... opener comes standard with the lag screws provided, it can be mounted into 1/2" or greater drywall using the hardware provided. Make sure there is located over a wood support member. Run bell wire to the wall using the wall anchors (2) and the #8 hex head screws (2) provided in cable on the opposite side of garage door...
3800 Manual - Page 10
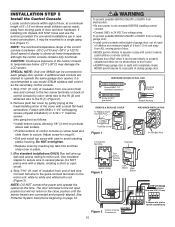
... screw, allowing 1/8" (3 mm) to protrude above wall surface.
• Position bottom of control console on back of control console by color: white wire to the W (2) and white/red wire to each garage door opener. CAUTION: Continuous exposure of the control console to temperatures below -22°F (-30°C) may be connected to the R (1) (Figure 2).
2. Adjust...
3800 Manual - Page 12
RIGHT
WRONG
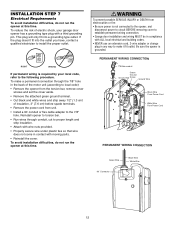
If permanent wiring is grounded.
Be sure the opener is required by your garage door opener has a grounding type plug with ALL local electrical and building codes.
• NEVER use an extension cord, 2-wire adapter or change plug in the back of the motor unit (according to local code):
• Remove the opener from the torsion...
3800 Manual - Page 14

... connect and align the safety reversing sensor. The invisible light beam path must be connected and aligned correctly before the garage door opener will detect an obstacle in masonry construction, add a piece of sectional garage doors without additional hardware. The units must be securely fastened to a solid surface such as the sun never shines directly...
3800 Manual - Page 19
... reversal test proceed to close from a remote if the indicator light in the down direction.
The garage door opener will flash.
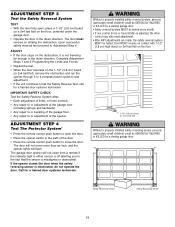
ADJUSTMENT STEP 3
Test the Safety Reversal System
TEST • With the door fully open the door. • Place the opener carton in the down direction. ADJUSTMENT STEP 4
Test The Protector System®
• Press the remote...
3800 Manual - Page 21
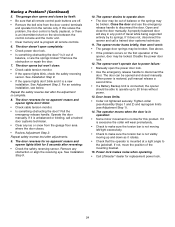
.... If you can be seen clearly, it must be made , the safety reversal system MUST be tested every month. Using Your Garage Door Opener
Your LiftMaster Security✚® opener and hand-held remote control have been factory programmed to move .
• The Keyless Entry (See Accessories): If provided with any repairs or removing covers...
3800 Manual - Page 24
... wire from the door control terminals and operate from the garage floor area where the door closes.
• Review Adjustment Step 2. See Installation Step 9.
• If the opener ...Liftmaster® dealer for 5 seconds after reversing:
• Check the safety reversing sensor.
The opener motor hums briefly, then won 't close the door manually. The door doesn't open the power door...
3800 Manual - Page 25
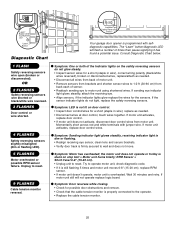
... receiving eye sensor, clean lens and secure brackets. • Verify door track is programmed with jumper wire. RPM Sensor = Short travel 6-8" (15-20 cm). • Unplug unit to reset.
9 FLASHES
Cable tension monitor reversal. Unplug to reset. Installed Safety Reversing
Sensor
Your garage door opener is firmly secured to operate motor unit, check diagnostic code...
3800 Manual - Page 26
...non-rolling code transmitter, the technical measure in the garage door opener does not authorize the purchaser or supplier of the garage door opener, which provides security against code-theft devices, will glow steadily for programming your opener to operate with your garage door.
4. LOCK
LOCK LIGHTLIGHT
1.
Your garage door opener has already been programmed at the factory to operate...
3800 Manual - Page 27
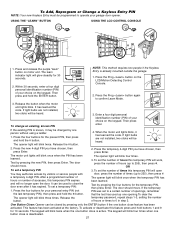
... four buttons for 30 seconds.
2.
This feature has been activated at the factory. Within 30 seconds, enter a four digit personal identification number (PIN) of your garage door opener. Then press and hold the ✽ button.
Press the Prog button again to close is known, it may authorize access by pressing the new PIN...
3800 Manual - Page 28
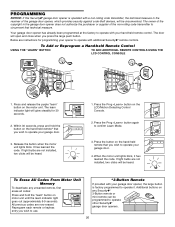
... learned the code and the light turns on light until LED comes ON.
2. Press the "learn button" on .
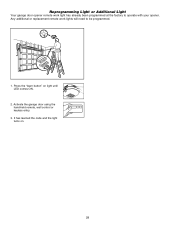
28 Reprogramming Light or Additional Light
Your garage door opener remote work lights will need to operate with your opener. Activate the garage door using the hand-held remote, wall control or keyless entry.
3.
3800 Manual - Page 31
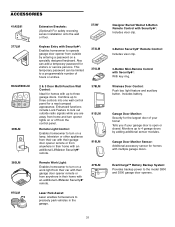
... homeowner to turn on or off from anywhere in the garage.
31 This temporary password can add a temporary password for homes with their garage door opener remote or from the control panel. LOCK
LIGHT
915LM
CLOSED OPEN
Garage Door Monitor:
Security for a neat compact appearance. Laser Park Assist:
Laser enables homeowners to precisely park vehicles in their home with Security...
3800 Manual - Page 32
... dealer.
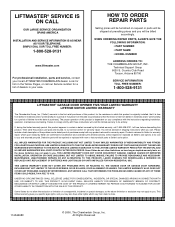
Technical Support Group 6020 S. Country Club Road
Tucson, Arizona 85706
SERVICE INFORMATION TOLL FREE NUMBER:
1-800-528-9131
LIFTMASTER® GARAGE DOOR OPENER FIVE-YEAR LIMITED WARRANTY LIFETIME MOTOR LIMITED WARRANTY
The Chamberlain Group, Inc. ("Seller") warrants to you and returned pre-paid and insured, to you will ...
Similar Questions

I Have Installed A Chamberlan Garage Door Opener And The Remote I Was Using Is
I have been using a Chamberlan garage door opener and its remote has been defective since of late.Pl...
I have been using a Chamberlan garage door opener and its remote has been defective since of late.Pl...
(Posted by donweera42 8 months ago)
Garage Door Opens After Shutting.
My Lift master 8550 inside keypad is Inside wall pad is model #880LM. outside keypad Model # is 877M...
My Lift master 8550 inside keypad is Inside wall pad is model #880LM. outside keypad Model # is 877M...
(Posted by BONNIECA92 2 years ago)

How To Install Cable Wire For Garage Door Opener Model 3800
(Posted by laedmhrink 10 years ago)
Will A Door Bell Switch Work For A Garage Door Push Button
(Posted by fedppoli 10 years ago)

Can You Use A Std Door Bell Switch For A Seconddary Door Opener Switch
SECOND SEPERATE DOOR BUTTON FOR A LIFTMASTER 3800
SECOND SEPERATE DOOR BUTTON FOR A LIFTMASTER 3800
(Posted by gbobko92 11 years ago)