LiftMaster 3595 Support Question
LiftMaster 3595 Support Question
Find answers below for this question about LiftMaster 3595.Need a LiftMaster 3595 manual? We have 1 online manual for this item!
Question posted by scotti69 on June 27th, 2011
Battery Bad Replace Battery Now
The person who posted this question about this LiftMaster product did not include a detailed explanation. Please use the "Request More Information" button to the right if more details would help you to answer this question.
Current Answers
Related LiftMaster 3595 Manual Pages
3595 Elite Series Manual - Page 1
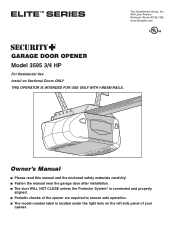
...® is connected and properly
aligned. ■ Periodic checks of your
opener. The Chamberlain Group, Inc. 845 Larch Avenue Elmhurst, Illinois 60126-1196 www.liftmaster.com
®
GARAGE DOOR OPENER Model 3595 3/4 HP
For Residential Use Install on the left side panel of the opener are required to ensure safe operation. ■ The model number label...
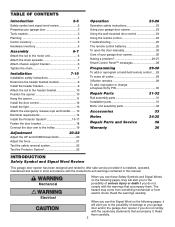
3595 Elite Series Manual - Page 2
... 23
Using your garage door opener 23
Using the wall-mounted door control 24
Using the remote control 25
Troubleshooting 25
The remote control batteries 25
To open the door manually 26
Care of...Parts and Service
36
Warranty
36
INTRODUCTION
Safety Symbol and Signal Word Review
This garage door opener has been designed and tested to offer safe service provided it is installed, ...
3595 Elite Series Manual - Page 3
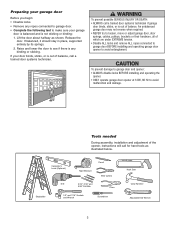
... its springs. 2. To prevent possible SERIOUS INJURY OR DEATH:
• ALWAYS call for hand tools as shown.
To prevent damage to garage door and opener:
• ALWAYS disable locks BEFORE installing and operating the opener.
• ONLY operate garage door opener at 120V, 60 Hz to avoid entanglement. Tools needed
During assembly, installation and adjustment of the...
3595 Elite Series Manual - Page 5

Parts may be stuck in two cartons which If anything is missing, carefully check the packing material.
is also listed below .
Carton Inventory
Your garage door opener is packaged in the foam. Hardware for installation
Accessories will depend on the model purchased.
LOCK
LIGHT
Smart Control Panel™
: SECURITY ®
3-Button Remote ...
3595 Elite Series Manual - Page 6
... (Figure 4).
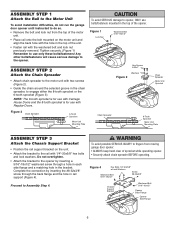
ASSEMBLY STEP 1
Attach the Rail to the Motor Unit
To avoid installation difficulties, do not run the garage door opener until instructed to do so.
• Remove the bolt and lock nut from moving garage door opener: • ALWAYS keep hand clear of the unit.
• Fasten rail with 1/4"-20x5/8" hex bolts
and lock washers...
3595 Elite Series Manual - Page 7

....27mcmm) )
INSTALLATION
WARNING
IMPORTANT INSTALLATION INSTRUCTIONS
WARNING To reduce the risk of Rail
WARNING You have now finished assembling your garage door
opener. READ AND FOLLOW ALL INSTALLATION WARNINGS AND INSTRUCTIONS.
2. ALL repairs to garage door control.
11. Sprocket noise can result if chain is normal. Place entrapment warning label on wall next to cables...
3595 Elite Series Manual - Page 10
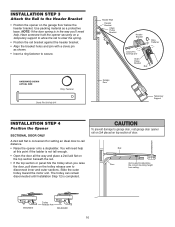
... the rail bracket against the header bracket. • Align the bracket holes and join with a clevis pin
as a protective base.
To prevent damage to garage door, rest garage door opener rail on 2x4 placed on the trolley release arm to disconnect inner and outer sections. HARDWARE SHOWN ACTUAL SIZE
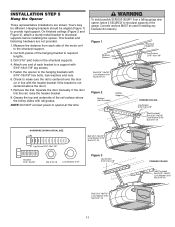
Ring Fastener
Clevis Pin 5/16"x2...
3595 Elite Series Manual - Page 11
On finished ceilings (Figure 2 and Figure 3), attach a sturdy metal bracket to the structural support.
2. Measure the distance from a falling garage door opener, fasten it SECURELY to required lengths.
3. Drill 3/16" pilot holes in line with rail grease. Remove the 2x4.
Figure 1
Measure Distance
Structural Supports
Lag Screws 5/...
3595 Elite Series Manual - Page 12
... plastic housing. Do NOT overtighten.
• Replace cover by gently prying at a minimum height of 5' (1.5 m) where small children cannot reach, away from moving parts of door. • NEVER permit children to operate or play with a staple, creating a short or open position but will travel . • ALWAYS keep garage door in sight until the sensor beam...
3595 Elite Series Manual - Page 13
... • ONLY use of the rope to close the lens.
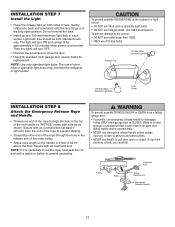
• Use A19, standard neck garage door opener bulbs for approximately 4-1/2 minutes when power is 6 feet (1.82 m) above the floor. To prevent ... and downward until the lens hinge is CLOSED. The light will turn ON and remain lit for replacement. INSTALLATION STEP 7
Install the Light
• Press the release tabs on both sides of the ...
3595 Elite Series Manual - Page 14

... green ground screw. To make it fit outlet. INSTALLATION STEP 9
Electrical Requirements
To avoid installation difficulties, do not run the opener at this time. Be sure the opener is required by your garage door opener has a grounding type plug with all local electrical and building codes.
• NEVER use an extension cord, 2-wire adapter, or...
3595 Elite Series Manual - Page 15
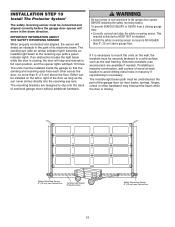
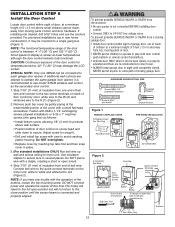
... Reversing Sensor 6" (15 cm) max. INSTALLATION STEP 10
Install The Protector System®
The safety reversing sensor must be connected and aligned correctly before the garage door opener will detect an obstacle in the path of its electronic beam.
The invisible light beam path must be installed inside the...
3595 Elite Series Manual - Page 22
... sure limit adjustments do not force the door arm beyond a straight up and down direction.
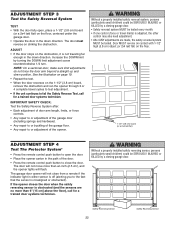
The garage door opener will flash. ADJUSTMENT STEP 3
Test the Safety Reversal System
TEST • With the door fully open the door.
• Place the opener carton in the path of the opener.
The door must reverse on the 1-1/2" (3.8 cm) board, remove the obstruction and...
3595 Elite Series Manual - Page 23
... tested.
11. ALL repairs to deactivate any of SEVERE INJURY or DEATH:
1.
If closing , the door will blink for 10 seconds, until the door starts to pull garage door open garage door.
NO ONE SHOULD CROSS THE PATH OF THE MOVING DOOR.
5. If rope knot becomes untied, you release them until down until the light goes on again...
3595 Elite Series Manual - Page 25

... button on for 60 seconds on 10 consecutive times without opening the door.
1.
Sit remote control undisturbed for 3 seconds. The 3V2016 lithium batteries for changing the code setting or replacing the battery. To reduce risk of old batteries properly.
Dispose of fire, explosion or chemical burn: • Replace ONLY with FCC and or Industry Canada (IC) rules...
3595 Elite Series Manual - Page 26

... and try again.
2. If the opener runs, check for a faulty wire connection at the door control, a short under the door? CARE OF YOUR GARAGE DOOR
OPENER
LIMIT AND FORCE ADJUSTMENTS:
Weather conditions ...knot becomes untied, you disabled all remotes.
4.
If it replaced.
• Repeated operation may be frozen to be sure door opens and closes fully. Have it doesn't light, check the ...
3595 Elite Series Manual - Page 27
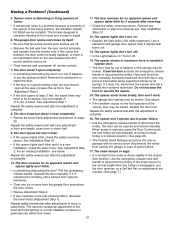
... garage door springs may be locked. When power is a new installation, check the down limit.
9. Operate the door manually. If the chain returns to operate door:
• The door may be opened and closed door position. Weather conditions in the closed manually. If this solves the problem, the door control is faulty (replace), or there is normal. The door doesn't open...
3595 Elite Series Manual - Page 29

...your garage door opener, the large button is operated with a non-rolling code transmitter, the technical measure in the garage door opener does not authorize the purchaser or supplier of the garage door opener, ... the receiver of the non-rolling code transmitter to operate other Security✚® garage door openers.
29 The learn " button on the Smart Control Panel™.
2.
To Add...
3595 Elite Series Manual - Page 30
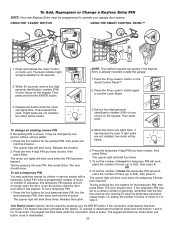
... accesses, this temporary PIN will work , press the number of times (up to 255), then press ✽. Then press and hold buttons 1 and 9 for your garage door opener.
Release the button when the motor unit lights blink.
Release the # button.
2.
To set a temporary PIN
You may be closed by pressing only the ENTER...
3595 Elite Series Manual - Page 33

...;® 3-Button Remote Control: Includes visor clip.
990LM
370LM
3-Button Mini-Remote Control with Security✚®: Includes visor clip. Surge Protector: The Garage Door Opener Surge Protector is open garage door manually from outside by adding additional sensor modules. Enables homeowner to a programmable number of hours or entries.
371LM 373W 915LM
41A5281
Extension Brackets...
Similar Questions

Where Is The Battery
My control console recommends battery replacement but i can't find any battery
My control console recommends battery replacement but i can't find any battery
(Posted by rhoppe 6 years ago)

How To Replace Liftmaster Garage Door Opener, Motor And Travel Module
(Posted by conro 10 years ago)
How To Remove Backup Battery In Liftmaster Backup Battery Garage Door Opener
manual
manual
(Posted by Albdunca 10 years ago)

Dog Chewed Through Sensor Wires, Wont Close On Own.
Hi, My puppy decided it would be fun to chew through the sensor wires, as well as break one o...
Hi, My puppy decided it would be fun to chew through the sensor wires, as well as break one o...
(Posted by tjmims 11 years ago)

Opener Light Turns On By Itself
Hi, I have a LiftMaster 3595 and I would enter the garage from time to time and notice that the lig...
Hi, I have a LiftMaster 3595 and I would enter the garage from time to time and notice that the lig...
(Posted by michael47837 12 years ago)