LiftMaster 3585 Support Question
LiftMaster 3585 Support Question
Find answers below for this question about LiftMaster 3585.Need a LiftMaster 3585 manual? We have 1 online manual for this item!
Question posted by fernandolee27 on May 25th, 2012
Mounting
Hi, can I mount this motor on a double garage insulated r11 door on one side instead of hanging of center?
Thanks
Current Answers
Related LiftMaster 3585 Manual Pages
3585 Elite Series Manual - Page 1
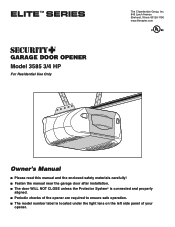
®
GARAGE DOOR OPENER Model 3585 3/4 HP
For Residential Use Only
The Chamberlain Group, Inc. 845 Larch Avenue Elmhurst, Illinois 60126-1196
www.liftmaster.com
Owner's Manual
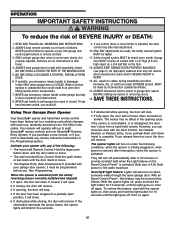
■ Please read this manual and the enclosed safety materials carefully! ■ Fasten the manual near the garage door after installation. ■ The door WILL NOT CLOSE unless the Protector System...
3585 Elite Series Manual - Page 2
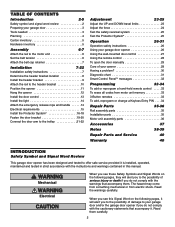
... 25
Test the Protector System 25
Operation
26-31
Operation safety instructions 26
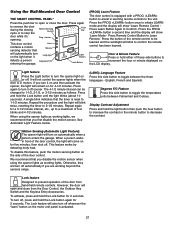
Using your garage door opener 26
Using the wall-mounted door control 27
Using the remote control 28
To open the door manually 29
Care of your garage door and/or the garage door opener if you do not comply with the warnings that accompany it will alert you...
3585 Elite Series Manual - Page 3

... tension.
• Disable ALL locks and remove ALL ropes connected to garage door BEFORE installing and operating garage door opener to avoid malfunction and damage.
To prevent damage to garage door and opener:
• ALWAYS disable locks BEFORE installing and operating the opener.
• ONLY operate garage door opener at 120V, 60 Hz to avoid entanglement. If balanced, it should...
3585 Elite Series Manual - Page 4

...the installation of your garage door.
Vertical Centerline of Door
Access Door
Wallmounted Door Control
Safety
Gap between floor and bottom of door
Reversing Sensor
must not exceed 1/4" (6 mm)
Reversing Sensor
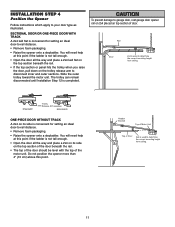
ONE-PIECE DOOR WITHOUT TRACK
FINISHED CEILING
Support bracket & fastening hardware is required. Torsion Spring
Extension
Spring OR
Motor Unit
--- --- --
See page 12...
3585 Elite Series Manual - Page 5
... Wire White & White/Red
Motor Unit w/Light Lenses
Belt Pulley Bracket
Trolley
One-Piece Rail
CEILING MOUNT ONLY UP
Header Bracket
Door Bracket
Curved Door Arm Section
Safety Sensor Bracket ...which contain the motor unit and all parts illustrated below . If anything is also listed below . Accessories will depend on the model purchased. Carton Inventory
Your garage door opener is packaged ...
3585 Elite Series Manual - Page 6
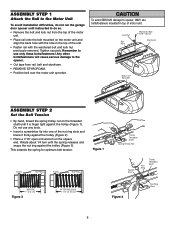
... STEP 1
Attach the Rail to the Motor Unit
To avoid installation difficulties, do not run the garage door opener until instructed to do so.
•...opener. Rotate about 1/4 turn until the spring releases and snaps the nut ring against the trolley (Figure 1).
Liftmaster Synchro Drive
• Cut tape from the top of the motor unit.
• Place rail onto the bolt mounted on the motor...
3585 Elite Series Manual - Page 7
... wear watches, rings or loose clothing while
INSTRUCTIONS. Install garage door opener 7 feet (2.13 m) or more above floor.
• away from moving parts of 5 feet
3. Mount emergency release handle 6 feet (1.83 m) above floor.
6.
Hex Screws 8x3/8"
Belt Cap Retainer
Motor Unit Sprocket
Mounting Plate
Hex Screw #8x3/8"
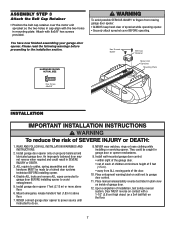
INSTALLATION
WARNING
IMPORTANT INSTALLATION INSTRUCTIONS...
3585 Elite Series Manual - Page 8
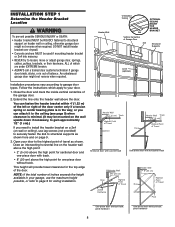
...be RIGIDLY fastened to structural
support on header wall or ceiling, otherwise garage door might not reverse when required. Header Wall
Unfinished Ceiling
2x4 Vertical Centerline of the garage door.
2. Close the door and mark the inside vertical centerline of Garage Door
2x4
OPTIONAL CEILING MOUNT FOR HEADER BRACKET
Structural Supports
Level (optional)
Installation procedures vary according...
3585 Elite Series Manual - Page 9
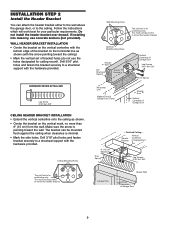
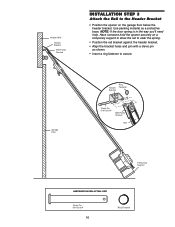
.... • Center the bracket on the horizontal line as shown (with the arrow pointing toward the wall. You must use concrete anchors (not provided). INSTALLATION STEP 2
Install the Header Bracket
You can be mounted flush against the ceiling when clearance is pointing toward the ceiling). • Mark the vertical set of Garage Door
9 Drill...
3585 Elite Series Manual - Page 10
... Rail to secure. Garage Door
Header Bracket
Ring Fastener
Clevis Pin 5/16"x2-3/4"
Belt Pulley Bracket
Rail
Temporary Support
HARDWARE SHOWN ACTUAL SIZE
Clevis Pin 5/16"x2-3/4"
10
Ring Fastener Use packing material as shown. • Insert a ring fastener to the Header Bracket
• Position the opener on the garage floor below the header...
3585 Elite Series Manual - Page 11
... down on top section of the motor unit.
Do not position the opener more than 4" (10 cm) above this point if the ladder is used to garage door, rest garage door opener rail on 2x4 placed on the trolley release arm to determine the correct mounting height from ceiling.
Rail
Door
2x4 is used to disconnect inner and outer...
3585 Elite Series Manual - Page 13
...insulation from one 398LM can be connected to each garage door opener. DO NOT connect power and operate the opener at this time.The trolley will travel . • ALWAYS keep garage door in new home construction), it can be seen clearly, is recommended to motor...prying at the lower/middle portion of the buttons, loosen the top mounting screw. DO NOT pierce wire with care to the R (1) (...
3585 Elite Series Manual - Page 16

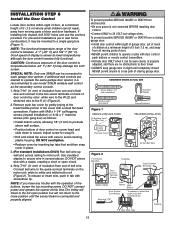
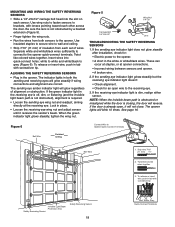
... obstruction breaks the light beam while the door is closing . The mounting brackets are available if needed. Be sure power is not connected to the receiving eye (with a green indicator light). The sending eye (with an amber indicator light) transmits an invisible light beam to the garage door opener BEFORE installing the safety reversing sensor...
3585 Elite Series Manual - Page 17
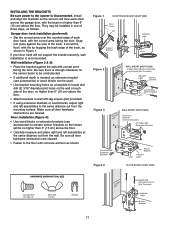
...the opener is recommended. Snap into place against the wall with curved arms facing the door....mounting surface. Figure 1
DOOR TRACK MOUNT (RIGHT SIDE)
Door Track
Lip
Indicator Light
Sensor Bracket
Lens
Figure 2
IGWnasairldal ege
WALL MOUNT (RIGHT SIDE)
Fasten Wood Block to the floor with the curved arms facing the door. If your door track will face each other across the garage door...
3585 Elite Series Manual - Page 18
...16" (11 mm) of insulation from both the sending and ... Use wing nuts to fasten sensors to Opener Quick-Connect Terminals
Bell Wire
Finished Ceiling
Bell Wire
1.
See page 16. MOUNTING AND WIRING THE SAFETY REVERSING SENSORS
•...door will blink 10 times. The opener lights will reverse. If the sending eye indicator light does not glow steadily after installation, check for an open...
3585 Elite Series Manual - Page 26
... Garage Door Opener
Your Security✚® opener and hand-held remote control have been factory-set to a matching code which are under the following : • The hand-held remote. If you purchase a new remote, or if you wish to move . • The wall-mounted Door Control: Hold the push button
or bar down travel .
4. If open garage door...
3585 Elite Series Manual - Page 27
... door control. The 4-1/2 minute interval can be learned and the worklight will also turn
Language
on the motor unit panel is equipped with a PROG button to turn on automatically when a person enters the garage.... opener lights as follows: Press and hold the light button then push the hour button to increase the contrast or the minute button to the unit.
Using the Wall-Mounted Door ...
3585 Elite Series Manual - Page 30

... motor unit hums briefly: • First verify that the trolley is normal. Using the Wall Mounted Door Control, Light Feature.
1-1/4" (3.18 cm)
• Re-Tighten the outer nut until the trolley spring is equipped with the door, pull the Emergency Release Rope to 5 turns. My remotes will not turn off when door is open:
• The garage door opener...
3585 Elite Series Manual - Page 34
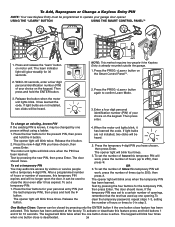
... move . If the temporary PIN was set the number of your garage door opener.
Within 30 seconds, enter a four digit personal identification number (PIN) of times this temporary PIN will blink twice. Release the button when the motor unit lights blink. Press the four buttons for the temporary PIN, then press Enter. To set...
3585 Elite Series Manual - Page 35
... battery: LED and opener 3V2016 Lithium battery: proximity switch Remote control visor clip Emergency release rope and handle assembly ...(.9 m) 2-conductor bell wire Straight door arm section Curved door arm section Safety sensor brackets (2)
NOT SHOWN
101D173
Push bar for door control
41A2770-12 Installation hardware bag (...
3 1
6
NOTICE
CEILING MOUNT ONLY UP
9
12
7 11
10
13
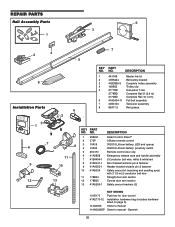
KEY PART NO. NO. NO.
Similar Questions


How To Program New Car To Open Garage Door
where is the learn button to program my car to open garage door
where is the learn button to program my car to open garage door
(Posted by lrothberg 6 years ago)

Liftmaster Elite Garage Door Opener Manual
i have a 3585s opener. always workusing inside control. it has been failing to open at times useing ...
i have a 3585s opener. always workusing inside control. it has been failing to open at times useing ...
(Posted by lgwinnjr 10 years ago)

Error Code 22. It's Not Listed In The Manual.
the upward pointing arrow flashes twice, then the downward flashes twice.
the upward pointing arrow flashes twice, then the downward flashes twice.
(Posted by bmcilwn 12 years ago)